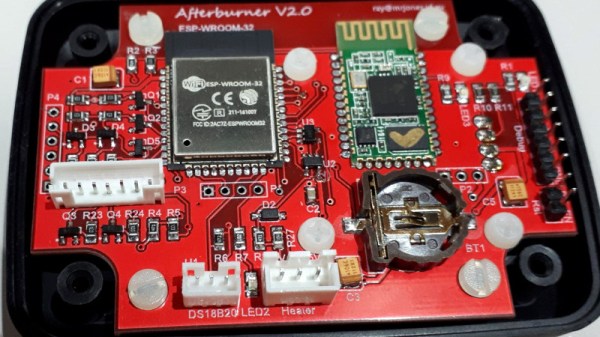
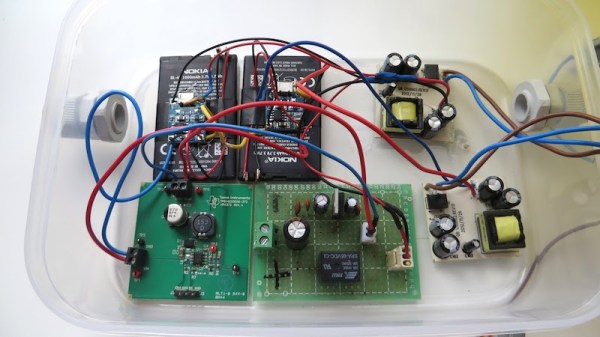
How Many Parts In A Triumph Herald Heater?

This Herald is in much better condition than my 12/50 was. Philafrenzy [CC BY-SA 4.0]
What was your first car? Mine was a 1965 Triumph Herald 12/50 in conifer green, and to be frank, it was a bit of a dog.

The Triumph Herald is a small saloon car manufactured between about 1959 and 1971. If you are British your grandparents probably had one, though if you are not a Brit you may have never heard of it. Americans may be familiar with the Triumph Spitfire sports car, a derivative on a shortened version of the same platform. It was an odd car even by the standards of British cars of the 1950s and 1960s. Standard Triumph, the manufacturer, had a problem with their pressing plant being owned by a rival, so had to design a car that used pressings of a smaller size that they could do in-house. Thus the Herald was one of the last British mass-produced cars to have a separate chassis, at a time when all other manufacturers had produced moncoques for years.

My 12/50 was the sporty model, it had the high-lift cam from the Spitfire and a full-length Britax sunroof. It was this sunroof that was its downfall, when I had it around a quarter century of rainwater had leaked in and rotted its rear bodywork. This combined with the engine being spectacularly tired and the Solex carburetor having a penchant for flooding the engine with petrol made it more of a pretty thing to look at than a useful piece of transport. But I loved it, tended it, and when it finally died irreparably I broke it for parts. Since then I’ve had four other Heralds of various different varieties, and the current one, a 1960 Herald 948, I’ve owned since the early 1990s. A piece of advice: never buy version 0 of a car.

Continue reading “How Many Parts In A Triumph Herald Heater?”

Enjoy The Last Throes Of Summer With A Nice Pool Automation Project

[Ken Rumer] bought a new house. It came with a troublingly complex pool system. It had solar heating. It had gas heating. Electricity was involved somehow. It had timers and gadgets. Sand could be fed into one end and clean water came out the other. There was even a spa thrown into the mix.

Needless to say, within the first few months of owning their very own chemical plant they ran into some near meltdowns. They managed to heat the pool with 250 dollars of gas in a day. They managed to drain the spa entirely into the pool, but thankfully never managed the reverse. [Ken] knew something had to change. It didn’t hurt that it seemed like a fun challenge.

The first step was to tear out as much of the old control system as could be spared. An old synchronous motor timer’s chlorine rusted guts were ripped out. The solar controler was next to be sent to its final resting place. The manual valves were all replaced with fancy new ones.

Rather than risk his fallible human state draining the pool into the downstairs toilet, he’d add a robot’s cold logical gatekeeping in order to protect house and home. It was a simple matter of involving the usual suspects. Raspberry Pi and Arduino Man collaborated on the controls. Import relay boards danced to their commands. A small suite of sensors lent their aid.

Now as the soon-to-be autumn sun sets, the pool begins to cool and the spa begins to heat automatically. The children are put to bed, tired from a fun day at the pool, and [Ken] gets to lounge in his spa; watching the distant twinkling of lights on his backyard industrial complex.

Etching A PCB In Ten Minutes.

Most circuit boards any maker could need for their projects can be acquired online at modest cost, but what if you need something specific? [Giorgos Lazaridis] of pcbheaven.com has designed his own etching bath complete with a heater and agitator to sped up the process of creating your own custom circuit boards.

[Lazaridis] started by building a circuit to control — in a display of resourcefulness — a fish tank heater he would later modify. The circuit uses a PIC 16F526 microcontroller and two thermristors to keep the temperature of the etching bath between 38 and 41 degrees Celsius. The fish tank heater was gingerly pried from its glass housing, and its bimetallic strip thermostat removed and replaced with a wire to prevent it shutting off at its default 32 degrees. All of it is mounted on a small portable stand and once heated up, can etch a board in less than 10 minutes.

Continue reading “Etching A PCB In Ten Minutes.”

Wood Stove Runs On Arduino Power

Ahh, sweet scope creep! Usually it’s the death of a nice, simple little hack. But once in a hundred times, a small hack doesn’t get buried under the extra features, but instead absorbs them in stride and blossoms into a beautiful system. [rockfishon]’s Arduino-powered wood stove controller is one of these beautiful exceptions. (OK, we’d admit that it could use a fancier faceplate.)

He started off simply enough, wanting to connect a thermocouple to an Arduino, read out the value, and issue an alarm when the temperature got too high. But who could stop there? Just one air-baffle servo away from a closed-loop heating control system? So [rockfishon] added a display and a few more buttons and has a system that will keep his wood-burning stove running at exactly the right temperature, even overnight when nobody’s around to tend it. As a bonus, everything is logged for later analysis.

The code is relatively straightforward, and can be found in this Gist. If you’d like to build your own, you’ll need an Arduino Mega and can then get the control board made for you at OSHPark. Judging from the comments on the Hackaday.io project page, a couple people have already tried this out. We’ve seen other wood-stove monitoring hacks before, but this is the first we’ve seen that closes the control loop. Very cool.

Incubating Resin Prints Through The Chilly Months

FormLabs resins operate best between the comfortable temperature range of 18 – 28°C (64 – 82°F). For many of us experiencing the chillier weather these days, our garage workshops can easily drop below those temperatures and cause our prints to fail. Rather than hunker down for the freeze and wait for the world outside to defrost, [MarkStrohbehn] has discovered a budget heating technique that heats the print chamber from the inside instead.

This trick comes in two parts. First, to bring the temperature up, [Mark] installed an egg incubator inside the chamber using a powerful magnet attached to the fixture containing the lead screw. Next, to maintain the warm temperature, he’s taped together an insulating jacket composed of several layers of off-the-shelf mylar emergency blankets. Finally, he’s managed to slip the egg incubator power cable cleanly under the FormLabs lid without triggering the open-lid sensor. This hack is staggeringly simple but effective at reducing the odds of failed prints through the cold weather. Best of all, the modifications are far less invasive than other upgrades made to 3D printers, as it requires no modification of the Form1+. For those of us who haven’t seen the sun in a few months, rest assured that you can still churn out parts.

Using Vacuum Tubes As Immersion Heaters

Fellow Hackaday writer [Ethan Zonca] was doing a little bit of woodworking recently and decided to test ammonia fuming on a small piece of oak. Yes, this means discoloring wood with ammonia vapor, and it’s a real technique. [Ethan] wanted to increase the rate of evaporation of his ammonia solution and decided to make an immersion heater. Out of a vacuum tube.

This is a non-optimal solution to the problem of heating a solution of ammonia – already a bad idea unless you have a fume hood – but it gets better. The vacuum tube was slightly cracked, something easily fixed with a bit of silicone sealant. This was then immersed in an ammonia solution, wired up to a driver board and controlled by a homebrew PID controller. If it’s stupid and it works, it’s not stupid.

After getting the ammonia solution up to 30° C, a noxious cloud of ammonia seeped into a piece of oak. This was left overnight, and the result is something that looks like old barn wood, and looks great after some linseed oil is rubbed into it. This is only a test run for fuming an entire desktop this spring, and while that’s a project that will require a real heater (and doing it outside), it’s still a great demonstration of lateral thinking and great woodworking techniques.

A Simple Induction Heater

For those of you not familiar, an induction heater is a device capable of heating something up very rapidly using a changing magnetic field. [RMC Cybernetics] decided to build one and was nice enough to write up the project for the Internet’s learning and amusement. A full explanation as well as a schematic and build instructions are provided on their website.

This heater works using a principle involved in most transformers. When there is a change in the magnetic field near a conductive object, a current will be induced in it and it will generate heat. Interestingly enough, while transformers are designed to minimize this heat, an induction heater instead aims to maximize this heat in whatever object is placed within the coils.

[RMC] Has provided a video of how to build the heater as well as it in action after the break! Skip to to 1:42 to see the heating in action. Or watch the whole thing to see how it’s built.

Continue reading “A Simple Induction Heater”