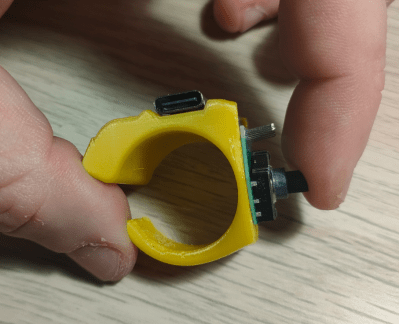
A Bluetooth mouse in ring form.

Updated Mouse Ring Does It With A Joystick

Have you ever wished for easy mouse controls to go along with your VR headset experience? Or maybe you just want a cooler way to mouse in general. In any case, look no further than [rafgaj78]’s Bluetooth Mouse Ring project.

Side view of a Bluetooth mouse in ring form.This is version two, which of course comes with several improvements over version one. The biggest change is from tactile buttons to a joystick input. [rafgaj78] also did away with the power switch, using deep-sleep mode instead. Version two is easier to assemble and offers improved ergonomics, as well as a range of ring sizes.

Like the first version, this ring runs on a Seeed Xiao nRF52840 and is programmed in CircuitPython. There are two modes to choose from. In one mode, the joystick does left and right mouse click and wheel up and down, while the push action recovers the micro from deep sleep. In the other mode, the joystick axis is a mouse pointer mover, and you push down to left click.

We really like this sleek design, and [rafgaj78] has great instructions if you want to build your own. This isn’t the first cool mouse ring we’ve seen, and it certainly won’t be the last.

Illustrated Kristina with an IBM Model M keyboard floating between her hands.

Keebin’ With Kristina: The One With The TRON Keyboard

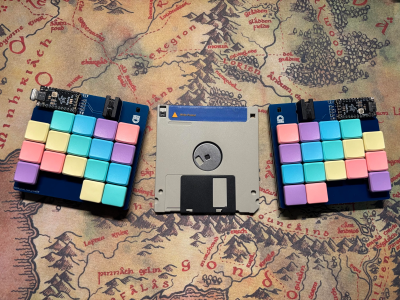
[Folaefolc] was craving a new keyboard build a few weeks ago and got inspired by the humble 3.5″ floppy disk. So much so that he decided to make a split keyboard with each half having the exact footprint of a floppy — 90 mm x 94 mm. And you know the PCBs have floppy details silkscreened on the back. Just check out the gallery.

A split keyboard with a 3.5" floppy disk footprint for each half. An actual floppy sits between the two halves.
Image via [Folaefolc] via reddit
This bad boy uses a pair of Liatris microcontrollers, which are made by splitkb and are designed to be drop-in replacements for Pro Micros and an alternative to the RP2040.

The other fun part of this build is that [Folaefolc] used RJ9 connectors to join the halves instead of something like TRRS.

Beneath those candy keycaps are 34 Kailh choc v1 switches shoved into hot swap sockets in case [Folaefolc] changes his mind. Gerbers are available if you want to build one of these cuties!

Via reddit

Continue reading “Keebin’ With Kristina: The One With The TRON Keyboard”

ESP32 Hosts A USB Keyboard In This Typewriter

Did you know the ESP32 can be a USB host? Well it can, and [Volos] uses host mode to build this fun little word processor.

The venerable ESP32 has a well-known USB device mode. Anyone who has programmed one has used it. A bit less known is the microcontroller’s ability to host USB devices. These days, operating as a USB device is relatively simple. But acting as a host is a much more complex task. The ESP32 has a software host that works — but only for Human Interface Devices (HID).  Human interface devices generally are keyboards, mice, trackballs, and similar devices that handle data relatively slowly, forming the interface with us simple humans.

[Volos] uses the EspUsbHost Arduino library for this project. The library makes USB host mode simple to use. Another piece of the puzzle is the LCD board [Volos] picked. It has a dual-role USB Type-C port, meaning the hardware to switch roles is baked in. Other boards may require some modifications or special cables to make things work.

The software is the best part of this build. [Volos] implemented a simple word processor. It can save and load files from a microSD card and, of course, edit text — all controlled by a USB keyboard. He had to use a 4-bit palette to save memory. This gives the device a retro charm that reminds us of Don Lancaster’s TV Typewriter. The source for this and all of [Volos] projects can be found on GitHub. Now, all we need is a spell check that can fit in the memory constraints of the ESP32! We have to admit the chip has a lot of potential USB tricks.

Continue reading “ESP32 Hosts A USB Keyboard In This Typewriter”

Open-Source, 3D Printed Trackpad

Touchpads, or trackpads, have been around since the 1980s. Today, you can often find them in laptops and notebook computers as pointing devices. With no moving parts, a trackpad are easy to integrate into the body of a portable computer.  they’re much smaller than the traditional mouse. Until the advent of multitouch and gestures over the past two decades, though, they were generally poor substitutes for an actual mouse. These days, trackpads have enough features that some users prefer them even on their desktop computers. If you’re that type of person and don’t want to shell out a big pile of money for an Apple, Logitech, or other off-the-shelf trackpad you can always build your own.

Continue reading “Open-Source, 3D Printed Trackpad”

Remapping HID For Fun And… Well Fun

If you want to remap some mouse or keyboard keys, and you use Linux, it is easy. If you use Windows or another operating system, you can probably do that without too much trouble. But what if you use all of them? Or what if you don’t have access to the computer in question? Thanks to [jfedor2], you can reach for a Raspberry Pi Pico and make this handy key-and-mouse remapping hardware dongle.

Continue reading “Remapping HID For Fun And… Well Fun”

A Tiny Knob Keeps You In Control

There are many forms of human interface device beyond the ubiquitous keyboard and mouse, but when it comes to fine-tuning a linear setting such as a volume control there’s nothing quite like a knob. When it comes to peripherals it’s not the size that matters, as proven by  [Stefan Wagner] with the Tiny Knob. It’s a very small PCB with a rotary encoder and knob, an ATtiny85, a USB port, and not much else.

It uses the V-USB software implementation of USB HID, and should you have a need for a Tiny Knob of your own you can find all the files for it in a GitHub repository. There’s even a very professional-looking 3D-printed enclosure for the finishing touch. We like this project for its simplicity, and we think you might too.

Over the years we’ve brought you more than one knob, they appear to be a popular subject for experimentation. If you’re up for more, have a look at this one.

screenshot of the code defining a hid descriptor by using essentially macros for common descriptor types

Coupling STM32 And Linux? Consider HID Over I2C

If you’re pairing a tiny Linux computer to a few peripherals — perhaps you’re building a reasonably custom Pi-powered device — it’s rightfully tempting to use something like an STM32 for all your low-level tasks, from power management to reading keyboard events.

Now, in case you were wondering how to tie the two together, consider HID over I2C, it’s a standardized protocol with wide software and peripheral support, easily implementable and low-power. What’s more, [benedekkupper] gives you an example STM32 project with a detailed explanation on how you too can benefit from the protocol.

There are several cool things about this project. For a start, its code is generic enough that it will port across the entire STM32 lineup nicely. Just change the pin definitions as needed, compile it, flash it onto your devboard and experiment away. Need to change the descriptors? The hid-rdf library used lets you define a custom descriptor super easily, none of that building a descriptor from scratch stuff, and it even does compile-time verification of the descriptor!

The project has been tested with a Raspberry Pi 400, and [benedekkupper] links a tutorial on quickly adding your I2C-HID device on an Linux platform; all you need is DeviceTree support. Wondering what’s possible with HID? We’ve seen hackers play with HID aplenty here, and hacking on the HID standard isn’t just for building keyboards. It can let you automate your smartphone, reuse a laptop touchpad or even a sizeable Wacom input surface, liberate extra buttons on gamepads, or build your own touchscreen display.