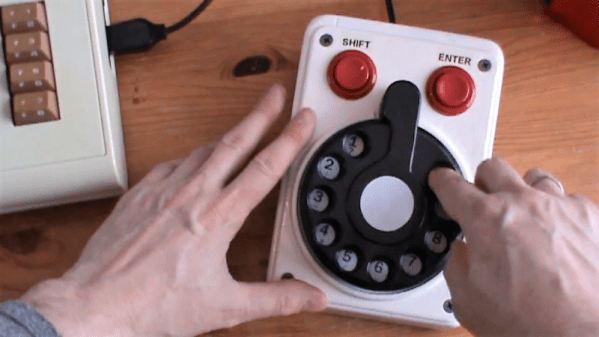
The N64 Controller Gets Brass Gears Through 3D Printing

The controller for the Nintendo 64 is a masterpiece of design, and despite being more than two decades old, people are still using this controller competitively. Smash Bros, you know. Those competitive gaming enthusiasts are hard on their controllers, and after decades and tournaments, the analog stick will wear out. Previously, this required a rebuild or simply replacing the entire controller. Now there’s another option: a completely re-engineered analog stick, all made possible thanks to 3D printing.

[Nam Le] is a student at Cal Poly, and as would be expected for a very specific subset engineering students, had to track down new N64 controller every few months. The stick on these controllers wear out, so [Nam] decided to make the most durable joystick that has ever fit inside an N64 controller.

The design of the N64 stick is pretty simple, and exactly what you would expect if you’ve ever opened up an analog joystick. There’s the stick itself, which is connected to gears on the X and Y axes, which are in turn connected to encoders. This entire assembly sits in a bowl. After twenty years, the mating surface between the stick and the gears wear down, and the bowl becomes deformed. The solution here is obviously to engineer something sturdier, and despite what most of the 3D printing community will tell you, ABS and PLA just won’t cut it.

[Nam] re-designed the gears and bowl out of brass using lost-wax casting using 3D printed parts. These brass parts were mated with 3D printed gears and an enclosure for the bowl. The stick is nylon, an important design choice because this is the first part to wear down anyway, and it’s also the easiest part to replicate. Yes, this is designing an analog stick for the strength of materials and Real Engineering™ for those of you keeping track at home.

Right now, the joystick works as intended, and lasts much longer than the stock version. The goal now is to get this stick tournament-legal for some serious Smash time, in the hopes of not replacing controllers every few months.

Thumbs Up For This Custom Atari 5200 Controller

It may be nearly 40 years old, but the Atari 5200 still inspires legions of fans to relive the 8-bit glory days of their youth. There was much to love about the game console, but the joystick-and-keypad controllers were not among its many charms. The joystick didn’t auto-center, the buttons were mushy, and the ergonomics were nonexistent.

Retro-aficionados need not suffer in silence, though, thanks to this replacement controller for the Atari 5200. [Scott Baker] didn’t want to settle for one of the commercial replacements or, horrors, an adapter for the old PC-style joystick, so he rolled his own. Working from the original Atari schematics, [Scott] devised a plan for using a readily available thumbstick controller as the basis for his build. The essential problem was how to adapt the 10k pots on the new joystick to work in an environment expecting 500k pots, which he solved using an analog to digital and back to analog approach. The ADCs on an ATtiny85 convert each joystick pot’s voltage to a digital value between 0 and 255, which is sent to a 100K digital potentiometer. A little fiddling with RC constants brings it back in line with what the console expects. The thumbstick and buttons live on a custom PCB – kudos to [Scott] for designing an ambidextrous board. The video below shows the design and the finished product in action.

[Scott] is on a bit of a 5200 kick these days; he just finished up a Raspberry Pi multi-cartridge for the venerable console. His controller should make retro-gameplay on the console a little easier on the hands.

Continue reading “Thumbs Up For This Custom Atari 5200 Controller”

Sushi-Snarfing Barbie Uses Solenoid To Swallow

The view from America has long seen French women as synonymous with thin and/or beautiful. France is well-known for culinary skill and delights, and yet many of its female inhabitants seem to view eating heartily as passé. At a recent workshop devoted to creating DIY amusements, [Niklas Roy] and [Kati Hyyppä] built an electro-mechanical sushi-eating game starring Barbie, American icon of the feminine ideal. The goal of the game is to feed her well and inspire a happy relationship with food.

Built in just three days, J’ai faim! (translation: I’m hungry!) lets the player satiate Barbie one randomly lit piece of sushi at a time. Each piece has a companion LED mounted beneath the surface that’s connected in series to the one on the game board. Qualifying sushi are determined by a photocell strapped to the underside of Barbie’s tongue, which detects light from the hidden LED. Players must race against the clock to eat each piece, taking Barbie up the satisfaction meter from ‘starving’ to ‘well-fed’. Gobble an unlit piece, and the score goes down.

The game is controlled with a lovely pink lollipop of a joystick, which was the main inspiration for the game. Players move her head with left and right, and pull down to engage the solenoid that pushes her comically long tongue out of her button-nosed face. Barbie’s brain is an Arduino Uno, which also controls the stepper motor that moves her head.

[Niklas] and [Kati] wound up using cardboard end stops inside the box instead of trying to count the rapidly changing steps as she swivels around. The first motor they used was too weak to move her head. The second one worked, but the game’s popularity combined with the end stops did a number on the gears after a day or so. Click past the break to sink your teeth into the demo video.

Barbie can do more than teach young girls healthy eating habits. She can also teach them about cryptography.

Continue reading “Sushi-Snarfing Barbie Uses Solenoid To Swallow”

Teensy Hat Controls Games

[Carson] didn’t know how to use an accelerometer until he wired one up to a Teensy and put it all in a hat. The result is a joystick that will probably cause you neck problems if you play video games for very long. You can see a video of how the device came to be and how it works, below.

We liked the approach of building up the circuit and testing it before integrating it with the hat. He used a small breadboard with half the Teensy pins hanging off. That seems to work, although we’d be worried about something shorting or floating pins causing issues. Of course, if you drove the disconnected pins as outputs or inputs with pullups that might not be a big deal.

Continue reading “Teensy Hat Controls Games”

A HID For Robots

Whether with projects featured here or out in the real world, we have a tendency to focus most upon the end product. The car, solar panel, or even robot. But there’s a lot more going on behind the scenes that needs to be taken care of as well, whether it’s fuel infrastructure to keep the car running, a semiconductor manufacturer to create silicon wafers, or a control system for the robot. This project is one of the latter: a human interface device for a robot arm that is completely DIY.

While robots are often automated, some still need human input. The human input can be required all the time, or can be used to teach the robot initially how to perform a task which will then be automated. This “keyboard” of sorts built by [Ahmed] comes with a joystick, potentiometer, and four switch inputs that are all fully programmable via an Arduino Due. With that, you can perform virtually any action with whatever type of robot you need, and since it’s based on an Arduino it would also be easy to expand.

The video below and project page have all the instructions and bill of materials if you want to roll out your own. It’s a pretty straightforward project but one that might be worth checking out since we don’t often feature controllers for other things, although we do see them sometimes for controlling telescopes rather than robots.

Continue reading “A HID For Robots”

Motorized Stage Finesses The Microscopic World

No matter how fine your fine motor skills may be, it’s really hard to manipulate anything on the stage of a microscope with any kind of accuracy. One jitter or caffeine-induced tremor means the feature of interest on the sample you’re looking at shoots off out of the field of view, and getting back to where you were is a tedious matter of trial and error.

Mechanical help on the microscope stage is nice, and electromechanical help is even better, but a DIY fully motorized microscope stage with complete motion control is the way to go for the serious microscopist on a budget. Granted, not too many people are in [fabiorinaldus]’ position of having a swell microscope like the Olympus IX50, and those that do probably work for an outfit that can afford all the bells and whistles. But this home-brew stage ticks off all the boxes on design and execution. The slide is moved across the stage in two dimensions with small NEMA-8 steppers and microstepping controllers connected to two linear drives that are almost completely 3D-printed. The final resolution on the drives is an insane 0.000027344 mm. An Arduino lives in the custom-built control box and a control pad with joystick, buttons, and an OLED display allow the stage to return to set positions of interest. It’s really quite a build.

We’ve featured a lot of microscope hacks before, most of them concerning the reflective inspection scopes we all seem to covet for SMD work. But that doesn’t mean we haven’t shown love for optical scopes before, and electron microscopes have popped up a time or two as well.

Continue reading “Motorized Stage Finesses The Microscopic World”

An Open Source Sip-and-Puff Mouse For Affordable Accessibility

At the core of any assistive technology is finding a way to do something with whatever abilities the user has available. This can be especially difficult in the case of quadriplegia sufferers, the loss of control of upper and lower limbs caused by spinal cord damage in the cervical region. Quadriplegics can gain some control of their world with a “Sip-and-puff” device, which give the user control via blowing or sucking on a mouthpiece.

A sip-and-puff can make a world of difference to a quadriplegic, but they’re not exactly cheap. So to help out a friend, [Jfieldcap] designed and built an open source sip-and-puff mouse on the cheap. As is best for such devices, the design is simple and robust. The hollow 3D-printed mouthpiece acts as handle for a joystick module , and a length of tubing connects the mouthpiece to a pressure sensor. An Arduino lets the user move his head to position the cursor; hard sips and puffs are interpreted as left and right clicks, while soft mouth pressure is used for scrolling. In conjunction with some of the accessibility tools in modern OSes and personal assistant software like Siri or Cortana, the sip-and-puff opens up the online world, and for all of $50 in material.

We’re impressed by the effort and the results, but we worry that the standard PLA used for the mouthpiece won’t stand up to the cleaning it’ll need. Of course, printing extra mouthpieces is easy, but since it’s going to be in contact with the mouth, perhaps a review of food-safe 3D-printing is in order.