The Tiniest RetroPie

The RetroPie project is a software suite for the Raspberry Pi that allows the user to easily play classic video games through emulators. It’s been around for a while now, so it’s relatively trivial to get this set up with a basic controller and video output. That means that the race is on for novel ways of implementing a RetroPie, which [Christian] has taken as a sort of challenge, building the tiniest RetroPie he possibly could.

The constraints he set for himself were to get the project in at under 100 mm. For that he used a Pi Zero loaded with the RetroPie software and paired it with a 1.44″ screen. There’s a tiny LiPo battery hidden in there, as well as a small audio amplifier. Almost everything else is 3D printed including the case, the D-pad, and the buttons. The entire build is available on Thingiverse as well if you’d like to roll out your own.

While this might be the smallest RetroPie we’ve seen, there are still some honorable mentions. There’s one other handheld we’ve seen with more modest dimensions, and another one was crammed into an Altoids tin with a clamshell screen. It’s an exciting time to be alive!

Continue reading “The Tiniest RetroPie”

Continuous Computing The Analog Way

When your only tool is a hammer, everything starts to look like a nail. That’s an old saying and perhaps somewhat obvious, but our tools do color our solutions and sometimes in very subtle ways. For example, using a computer causes our solutions to take a certain shape, especially related to numbers. A digital computer deals with numbers as integers and anything that isn’t is actually some representation with some limit. Sure, an IEEE floating point number has a wide range, but there’s still some discrete step between one and the next nearest that you can’t reduce. Even if you treat numbers as arbitrary text strings or fractions, the digital nature of computers will color your solution. But there are other ways to do computing, and they affect your outcome differently. That’s why [Bill Schweber’s] analog computation series caught our eye.

One great example of analog vs digital methods is reading an arbitrary analog quantity, say a voltage, a temperature, or a shaft position. In the digital domain, there’s some converter that has a certain number of bits. You can get that number of bits to something ridiculous, of course, but it isn’t easy. The fewer bits, the less you can understand the real-world quantity.

For example, you could consider a single comparator to be a one-bit analog to digital converter, but all you can tell then is if the number is above or below a certain value. A two-bit converter would let you break a 0-3V signal into 1V steps. But a cheap and simple potentiometer can divide a 0-3V signal into a virtually infinite number of smaller voltages. Sure there’s some physical limit to the pot, and we suppose at some level many physical values are quantized due to the physics, but those are infinitesimal compared to a dozen or so bits of a converter. On top of that, sampled signals are measured at discrete time points which changes certain things and leads to effects like aliasing, for example.

Continue reading “Continuous Computing The Analog Way”

Don’t Toss That Bulb, It Knows Your Password

Whether it was here on Hackaday or elsewhere on the Internet, you’ve surely heard more than a few cautionary tales about the “Internet of Things” by now. As it turns out, giving every gadget you own access to your personal information and Internet connection can lead to unintended consequences. Who knew, right? But if you need yet another example of why trusting your home appliances with your secrets is potentially a bad idea, [Limited Results] is here to make sure you spend the next few hours doubting your recent tech purchases.

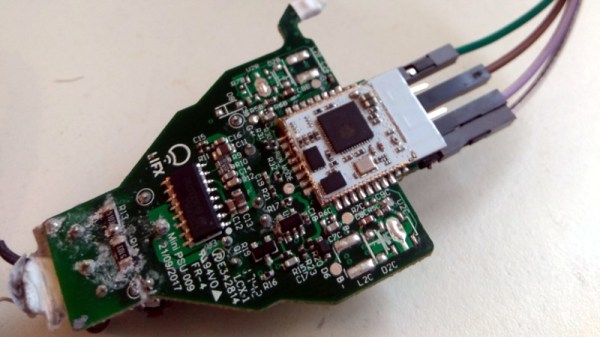
In a series of posts on the [Limited Results] blog, low-cost “smart” bulbs are cracked open and investigated to see what kind of knowledge they’ve managed to collect about their owners. Not only was it discovered that bulbs manufactured by Xiaomi, LIFX, and Tuya stored the WiFi SSID and encryption key in plain-text, but that recovering said information from the bulbs was actually quite simple. So next time one of those cheapo smart bulb starts flickering, you might want to take a hammer to it before tossing it in the trash can; you never know where it, and the knowledge it has of your network, might end up.
Regardless of the manufacturer of the bulb, the process to get one of these devices on your network is more or less the same. An application on your smartphone connects to the bulb and provides it with the network SSID and encryption key. The bulb then disconnects from the phone and reconnects to your home network with the new information. It’s a process that at this point we’re all probably familiar with, and there’s nothing inherently wrong with it.

The trouble comes when the bulb needs to store the connection information it was provided. Rather than obfuscating it in some way, the SSID and encryption key are simply stored in plain-text on the bulb’s WiFi module. Recovering that information is just a process of finding the correct traces on the bulb’s PCB (often there are test points which make this very easy), and dumping the chip’s contents to the computer for analysis.

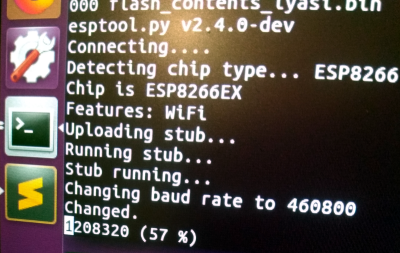
It’s not uncommon for smart bulbs like these to use the ESP8266 or ESP32, and [Limited Results] found that to be the case here. With the wealth of information and software available for these very popular WiFi modules, dumping the firmware binary was no problem. Once the binary was in hand, a little snooping around with a hex editor was all it took to identify the network login information. The firmware dumps also contained information such as the unique hardware IDs used by the “cloud” platforms the bulbs connect to, and in at least one case, the root certificate and RSA private key were found.

On the plus side, being able to buy cheap smart devices that are running easily hackable modules like the ESP makes it easier for us to create custom firmware for them. Hopefully the community can come up with slightly less suspect software, but really just keeping the things from connecting to anything outside the local network would be a step in the right direction.

(Some days later…)

[Limited Results] had hinted to us that he had previously disclosed some vulnerabilities to the bulb’s maker, but that until they fixed them, he didn’t want to make them public. They’re fixed now, and it appears that the bulbs were sending everything over the network unencrypted — your data, OTA firmware upgrades, everything.  They’re using TLS now, so good job [Limited Results]! If you’re running an old version of their lightbulbs, you might have a look.

On WiFi credentials, we were told: “In the case where sensitive information in the flash memory wasn’t encrypted, the new version will include encrypted storage processing, and the customer will be able to select this version of the security chips, which can effectively avoid future security problems.” Argue about what that actually means in the comments.


Follow The Bouncing Needles Of This Analog Meter Clock

Our community never seems to tire of clock builds. There are seemingly infinite ways to mark the passage of time, and finding unique ways to display it is endlessly fascinating.

There’s something about this analog voltmeter clock that really seems to have caught on with the Redditors who commented on the r/DIY thread where we first spotted this. [ElegantAlchemist]’s design is very simple – just a trio of moving coil meters with nice industrial-looking bezels. The meters were wired for 300 volts AC, so the rectifier and smoothing cap were removed and the series resistance was substituted for one more appropriate for the 0-5VDC range needed for the project. New dial faces showing hours, minutes and seconds were whipped up in Corel Draw, and everything was put into a sturdy and colorful aluminum “stomp box” normally used for effects pedals. An Arduino Nano and an RTC drive the meters with a nice, bouncy action. Simple, cheap to build, and a real crowd pleaser.

The observant reader will note a similarity to a clock we covered a while back. That one chose 3D-printed cases for an airplane instrument cluster look. We like the spare case design in [ElegantAlchemist]’s build, but wonder how this clock would look in a fine wood case.

What Happens When A Regular Person Finds A Huge Security Flaw?

The biggest news in the infosec world, besides the fact that balaclavas are becoming increasingly popular due to record-low temperatures across the United States, is that leet haxors can listen to you from your iPhone using FaceTime without you even answering the call. There are obvious security implications of this bug: phones should only turn on the microphone after you pick up a call. This effectively turns any iPhone running iOS 12.1 or later into a party line. In response Apple has taken group FaceTime offline in preparation of a software update later this week.

So, how does this FaceTime bug work? It’s actually surprisingly simple. First, start a FaceTime call with an iPhone contact. While the call is dialing, swipe up, and tap Add Person. Add your own phone number in the Add Person screen. This creates a group call with two instances of your iPhone, and the person you’re calling. You may now listen in to the audio of the person you originally called even though they haven’t chosen to pick up the call. Dumb? Yes. Insecure? Horribly. If your iPhone is ringing, the person on the other end could be listening in.

But this isn’t a story about how Apple failed yet again. This is a story about how this security flaw was found, and what a normal person can do if they ever find something like this.

Continue reading “What Happens When A Regular Person Finds A Huge Security Flaw?”

Plastics: PETG

You’d be hard-pressed to walk down nearly any aisle of a modern food store without coming across something made of plastic. From jars of peanut butter to bottles of soda, along with the trays that hold cookies firmly in place to prevent breakage or let a meal go directly from freezer to microwave, food is often in very close contact with a plastic that is specifically engineered for the job: polyethylene terephthalate, or PET.

For makers of non-food objects, PET and more importantly its derivative, PETG, also happen to have excellent properties that make them the superior choice for 3D-printing filament for some applications. Here’s a look at the chemistry of polyester resins, and how just one slight change can turn a synthetic fiber into a rather useful 3D-printing filament.

Continue reading “Plastics: PETG”

Interfacing The Sidewinder Joystick To AVRs

The Sidewinder line was a series of gaming peripherals produced by Microsoft, starting in the 1990s. After some initial stumbles, several cutting edge joysticks were released, at a time when the home computer market was in a state of flux, transitioning from legacy interfaces like serial and parallel to the more modern USB. In this interim period, Sidewinder joysticks used a special method to communicate digitally over the game port interface, which more typically used a kludge to read joysticks in an analog manner. [MaZderMind] managed to reverse engineer this protocol, and implemented the interface on an AVR microcontroller.

The technology is loosely described in US Patent 5628686, which discusses the method used to communicate bidirectionally with the Sidewinder joystick. [MaZderMind] found that the patent documents didn’t correspond exactly with how the Sidewinder Precision Pro communicated, but it was close enough that the operation could be reverse engineered.

The plan is to use the vintage joystick to control a quadcopter, so the interface was implemented on an AVR, and a graphical LCD installed to act as a display for testing the operation. [MaZderMind] also captured data on an oscilloscope to indicate in detail the quirks of the joystick’s operation.

Yes, it’s entirely possible to use a more modern microcontroller with a USB joystick. However, there are few that measure up to the standards of the old Sidewinder hardware, and sometimes the best tool for the job is the one you’ve got with you. A traditional single joystick is a different take on quadcopter control, but there’s other options – gesture control is possible, too.