Put That Headphone Jack Anywhere You Want It

yamaha-keyboard-headphone-jack-hack

Check out this brand new Yamaha keyboard. The fact that we’re seeing the guts means that [Todd Harrison] can kiss his warranty goodbye. But by now you should know that he doesn’t look to others when something goes wrong with his electronics. This time around he’s not repairing anything. He didn’t like having to plug in headphones on the rear of the keyboard. He cracked it open and relocated the headphone jack to a more convenient location.

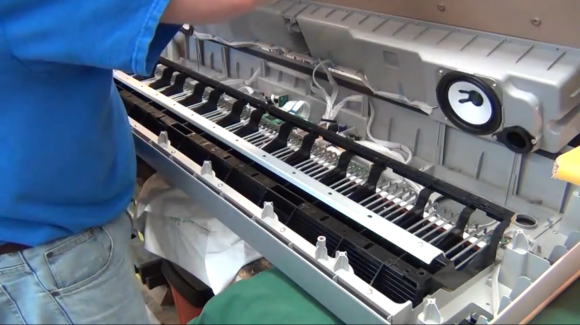
As you can see, there’s a ton of room inside once the MDF base which holds the speakers and some sounding boxes has been removed. While he’s in there he takes a good look at the mechanics of the keys. They’re weighted with metal rods (seen above) to help the electronic instrument feel more like an acoustic version to the player. But he doesn’t neglect the chance to gawk at all the electronics as well.

After pulling out the PCB that has the headphone jack on it he goes to work with a solder sucker. With the solder gone he cuts through the glue that holds the jack on the board. All that’s left is to solder some wire in its place and give it a nice project box as an enclosure. To complete the hack he mounts the box on the MDF base and now the headphones connect on the front. See the entire process in the video after the break.

Continue reading “Put That Headphone Jack Anywhere You Want It”
USB NeXT Keyboard

USB NeXT Keyboard

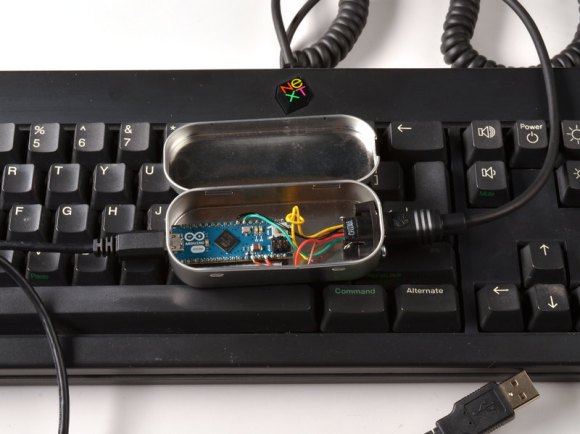
[Ladyada] and [pt] had an old keyboard from NeXT, but since it used a custom protocol it wasn’t usable with modern hardware. So they built a custom device to convert the NeXT protocol to USB.

The device uses a Arduino Micro to read data from the keyboard and communicate as a HID device over USB. It connects to the keyboard using the original mini-DIN connector, and is housed in the classic Altoids tin enclosure.

Since the protocol used by NeXT isn’t standard, they had to figure it out and write some code to interpret it. The keyboard communicates bidirectionally with the computer, so they needed to send the correct frames to key data back.

Fortunately, they hit on a Japanese keyboard enthusiast’s site, which had protocol specifications. They implemented this protocol on the Micro, and used the Keyboard library to create a HID device.

The final product is an adapter for NeXT to USB, which allows for the old keyboards to be used on any computer with USB. It’s a good way to bring back life to some otherwise unusable antique hardware.

Turning Toy Pianos Into MIDI Keyboards

Building a MIDI device is always a great microcontroller project, and nearly everyone has an old toy keyboard lying around in the back of a closet or in the basement. [JenShen] decided to take one of these toy keyboards and build a MIDI keyboard.

The keyboard [JenShen] used was a simple Casio keyboard with built-in voices. After tearing out the guts of the keyboard, the only thing that remained is the row of push buttons underneath the keys. These buttons were laid out in a row/column matrix, so [JenShen] needed to decode this matrix before sending the result to an Arduino for processing.

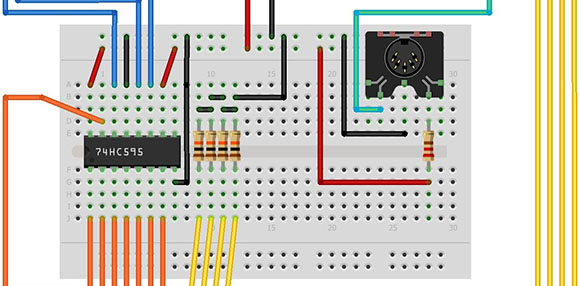
A 74HN595 shift register was used to read the 8 rows of buttons underneath the keys, while the rows were tied to different input pins on the ‘duino. This allowed [JenShen] to scan the keyboard matrix with an Arduino and generate MIDI notes and send them to other synths.

In the video after the break, you can check out [JenShen]’s circuit and code that allowed him to turn a toy keyboard into a proper 32-note MIDI keyboard. It’s not velocity sensitive, but he says he’ll show everyone how to accomplish that in a future post.

Continue reading “Turning Toy Pianos Into MIDI Keyboards”

Typing With A MIDI Drum Set

[Autuin] picked up the drums at the age of 18, but by his own admission he’s no [Bonzo], [Buddy Rich] or [Ringo]. Practicing always seems to fall off the end of his to-do list, and there really is only one way to Carnegie Hall. One thing [Autuin] is really fast at is typing, so he figured he could improve his drumming skills by banging a few paragraphs out.

The core of the build is a Yamaha DTX drum module, a MIDI-to-USB adapter, and little light coding. Basically, [Autuin] made a chorded keyboard out of his drums; by hitting one (or two, or three) drum heads at the same time, he can type characters in Open Office.

For going outside the comfort zone of a steady rock beat, we’re thinking [Autuin]’s build might just be useful. He’ll be displaying his Keyboard/Drum mashup at Vancouver’s East Side Culture Crawl alongside a horrible device of artistic merit. If you promise not to break anything, drop in on him in a few weeks.

Vidia after the break.

Continue reading “Typing With A MIDI Drum Set”

LED Illuminated Isomorphic Keyboard Looks As Good As It Sounds

Unlike the traditional ebony and ivory found on pianos, isomorphic keyboards arrange buttons on a grid. This makes every chord the same shape, and to transpose a piece it’s simply a matter of moving your fingers a few places to the left or right. [Brett Park] sent in an isomorphic keyboard he built loaded up with LEDs, and we’re thinking it the perfect instrument for musicians looking to move up from playing their MacBook.

The body of [Brett]’s keyboard is made out of a sheet of acrylic. After drilling 64 holes for each of the clear arcade buttons, [Brett] bent the sides of his hexagonal keyboard into a very sturdy-looking enclosure.

On the hardware side, [Brett] used a 64 button Arduino shield and a Sparkfun MIDI shield. The RGB LEDs behind each button are controlled via MIDI sysex messages generated outside the instrument, making it perfect for a little bit of visual feedback from whatever soft synth you desire.

In the videos after the break, you can check out the light patterns in action along with one of [Brett]’s improvs. Notice how all the chords are the same shape, and changing the key only requires [Brett] to move his hands slightly to the side.

Continue reading “LED Illuminated Isomorphic Keyboard Looks As Good As It Sounds”

MIDI Man-in-the-middle Hack Lets You Add Pedal To The Mix

[Sebastian] has a friend who would like to use a pedal with his MIDI setup, but his keyboard doesn’t support one. Some might interpret that as a sign you need to buy a new keyboard. But [Sebastian] has already done a lot of work with the MIDI protocol. He knew it should be possible to create a MIDI pass-through which adds support for a pedal.

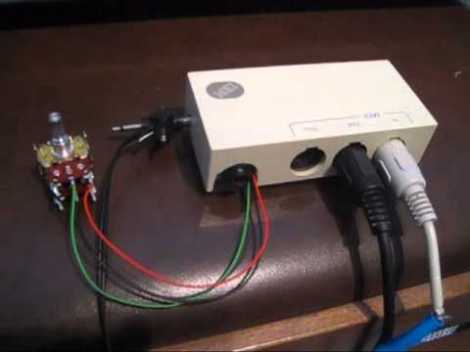
You can see the two MIDI cables connected to the box above. One is the input from the keyboard, the other is the output to the synthesizer. There is also a jack for a pedal input to the left. The chip inside intercepts each packet, rolling in values based from the pedal input and passing on the altered packets to the synthesizer. As you can hear in the video after the break, this works like a charm.

Catch more of [Sebastian’s] midi work by following his keyboard sensor replacement projects.

Continue reading “MIDI Man-in-the-middle Hack Lets You Add Pedal To The Mix”

Using A Raspberry Pi As Your Travel Computer

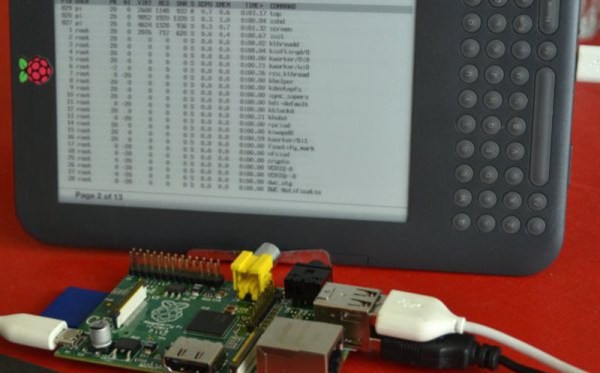
Do you think you could travel for the entire summer and leave your laptop at home? [Gef] did just that. With the help of his Kindle he used a Raspberry Pi as his travel computer. This was an easy association to think up, since he planned to bring the Kindle along as his reading material anyway. All it was going to take was some creative hacking to get it working as a display for the single-board computer.

The Kindle is merely connecting to the Raspberry Pi through a terminal emulator. This happens via USB, and requires that you Jailbreak the kindle and install a package called USBnetwork. The problem with the technique is that you’re going to go crazy trying to use the tiny keyboard that is built into the eBook reader. [Gef] decided to take a USB keyboard along with him, but how is he going to use it to control the terminal screen on the Kindle? The answer is the ‘screen’ application. We’ve used it a lot to keep programs running on a machine after we’ve exited from an SSH session. It turns out it can also be used to host multiple users on the same terminal session. Pretty neat!

[via Make]