Thin Keyboard Fits In Steam Deck Case

Although some of the first Android-powered smartphones had them and Blackberries were famous for them, physical keyboards on portable electronics like that quickly became a thing of the past. Presumably the cost to manufacture is too high and the margins too low regardless of consumer demand. Whatever the reason, if you want a small keyboard for your portable devices you’ll likely need to make one yourself like [Kārlis] did for the Steam Deck.

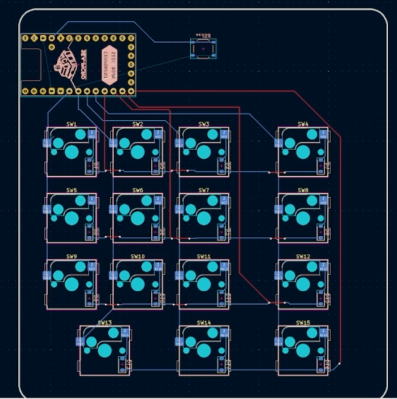
Unlike a more familiar mechanical keyboard build which prioritizes the feel and sound of the keyboard experience, this one sacrifices nearly every other design consideration in order to be thin enough to fit in the Steam Deck case. The PCB is designed to be flexible using copper tape cut to size with a vinyl cutter with all the traces running to a Raspberry Pi Pico which hosts the firmware and plugs into the Steam Deck’s USB port. The files for the PCB are available in KiCad and can be exported as SVG files for cutting.

In the end, [Kārlis] has a functioning keyboard that’s even a little more robust than was initially expected and which does fit alongside the Deck in its case. On the other hand, [Kārlis] describes the typing experience as “awful” due to its extreme thinness, but either way we applaud the amount of effort that went in to building a keyboard with this form factor. The Steam Deck itself is a platform which lends itself to all kinds of modifications as well, from the control sticks to the operating systems, and Valve will even show you how.

Hackaday Prize 2023: Jumperless, The Jumperless Jumperboard

Jumperless is a jumperless breadboard with multicolored LED visualization of signals in real-time. Sounds like magic? This beautifully executed entry to the 2023 Hackaday Prize by [Kevin Santo Cappuccio] uses a boatload of CH446Q analog switch ICs to perform the interconnect between the Raspberry Pi Pico header and the jumper board (or breadboard if you prefer.)

This will add some significant resistance, but for low currents and digital logic levels, this should not be a major concern. Additionally, there are two DAC channels and four ADC channels to help break out of the digital world, which could make for some very interesting non-trivial applications.

The visualization of the Pico header signals is solved neatly with a tiny wishbone-shaped PCB that is reverse-mounted to the back of the main board to illuminate upwards. The masking of the labels is done by using copper to mask off the individual signals and solder mask to draw in the legends. This PCB-level hacking is simply wonderful to see. The PCBs are designed with KiCAD, the design files for which you can find here. It appears however that [Kevin] needed to have the spring clips for the jumper board custom-made, so you’d need to contact them if you needed to get some for a build.

On the software side of things, [Kevin] currently recommends using Wokwi, to run the Arduino stack applications and to perform the signal routing to the virtual jumper board. You can follow how it works internally here. A Python-based bridge application runs on the host computer, which takes care of programming the interconnects as they are constructed, which looking at the demo in the embedded video, appears to ‘just work.’

One word of caution though — the bridge app uses Python requests and Beautiful Soup to scrape the Wowki project page, which could potentially make it vulnerable to getting out-of-sync with updates, so hopefully [Kevin] will keep track of this and keep them in sync.

Need some breadboarding tips? We got you covered. Talking of bread, here’s an 8-bit TTL breadboard-based CPU in a breadbin.

Continue reading “Hackaday Prize 2023: Jumperless, The Jumperless Jumperboard”

Where Did Your PCB Go Wrong? KiRI Knows

When working on a PCB design in KiCad, it’s helpful that the files are all text and can easily be checked into Git or other source control. However, stepping back through the revisions to determine where precisely a trace got routed wrong can be tricky. [Leandro] started with a simple script that exported the KiCad project to an image for inspection — over time it grew into a full-blown visual diff tool named KiCad Revision Inspector (KiRI).

The primary mechanism exports the revisions of a KiCad 5, 6, or 7 project to SVG, which can then be compared via a handy onion skin view. As this is a tool written for those using KiCad, shortcuts are a huge part of the experience. A command line interface generates artifacts to view the diff in any web browser. As these outputs have the KiRI tooling baked in, it is relatively easy to archive the output as a build artifact and allow easy access to review design changes.

For the long-time reader, you might remember back in 2018 talked about another diffing tool called plotgitsch (which this KiRI uses for KiCad 5 projects). KiCad has grown significantly in the last five years. It might be time to update our tips to utilize Git better for your PCB designs.

Continue reading “Where Did Your PCB Go Wrong? KiRI Knows”

Hackaday Prize 2023: Circuit Scout Lends A Hand (Or Two) For Troubleshooting

Troubleshooting a circuit is easy, right? All you need is a couple of hands to hold the probes, another hand to twiddle the knobs, a pair of eyes to look at the schematic, another pair to look at the circuit board, and, for fancy work, X-ray vision to see through the board so you know what pads to probe. It’s child’s play!

In the real world, most of us don’t have all the extra parts needed to do the job right, which is where something like CircuitScout would come in mighty handy. [Fangzheng Liu] and [Thomas Juldo]’s design is a little like a small pick-and-place machine, except that instead of placing components, the dual gantries place probes on whatever test points you need to look at. The stepper-controlled gantries move independently over a fixture to hold the PCB in a known position so that the servo-controlled Z-axes can drive the probes down to the right place on the board.

As cool as the hardware is, the real treat is the software. A web-based GUI parses the PCB’s KiCAD files, allowing you to pick a test point on the schematic and have the machine move a probe to the right spot on the board. The video below shows CircuitScout moving probes from a Saleae logic analyzer around, which lets you both control the test setup and see the results without ever looking away from the screen.

CircuitScout seems like a brilliant idea that has a lot of potential both for ad hoc troubleshooting and for more formal production testing. It’s just exactly what we’re looking for in an entry for the Gearing Up round of the 2023 Hackaday Prize.

Continue reading “Hackaday Prize 2023: Circuit Scout Lends A Hand (Or Two) For Troubleshooting”

Easyeda2KiCad: Never Draw A Footprint Again

What if I told you that you might never need to draw a new footprint again? Such is my friend’s impression of the tool that she’s shown me and I’m about to show you in turn, having used this tool for a few projects, I can’t really disagree!

We all know of the JLCPCB/LCSC/EasyEDA trio, and their integration makes a lot of sense. You’re expected to design your boards in EasyEDA, order the components on LCSC, and get the boards made by JLCPCB. It’s meant to be a one-stop shop, and as you might expect, there’s tight integration between all three. If there wasn’t, you’d be tempted to step outside of the ecosystem, after all.

But like many in this community, I use KiCad, and I don’t expect to move to a different PCB design suite — especially not a cloud one. Still, I enjoy using the JLCPCB and LCSC combination in the hobby PCB market as it stands now, and despite my KiCad affinity, it appears that EasyEDA can help me after all!

Continue reading “Easyeda2KiCad: Never Draw A Footprint Again”

Nail, Meet KiCad

You know the old saying. When all you have open is KiCad, everything looks like a PCB. That was certainly true for [Evan], who needed to replace a small part recently and turned to PCBs to get the job done.

The part in question was a sheered apart detent cam from a retractable cord reel. Glue and epoxy might have worked, and [Evan] was worried about how a 3D printed PLA part would have held up. The part is an extruded 2D shape, making PCBs a non-traditional but viable choice. Using the old scanner trick, he traced the outline in KiCad 7 (which adds image references). Then with the five boards stacked up, solid core wire, solder, and a propane torch worth of heat fused it. Ultimately, this machine’s tolerances are generous, so it worked wonderfully.

Was it the “right” tool for the job? Right or wrong, it is hard to argue that in terms of durability and ease per dollar, this doesn’t come out on top. PCB files are on GitHub if you have a 5020TF-4c retractable cord reel that needs a new cam. PCBs have a fun way of adopting different use cases like enclosures, but perhaps the idea of PCBs as a mechanical part could be applied elsewhere.

Importing EAGLE Projects Into KiCad 7, And How To Fix Them

Migrating a PCB design from one CAD software package to another is no one’s favorite task. It almost never works cleanly. Often there are missing schematic symbols, scrambled PCB footprints, and plenty of other problems. Thankfully [shabaz] shows how to import EAGLE projects into KiCad 7 and fix the most common problems one is likely to encounter in the process. Frankly, the information couldn’t come at a better time.

This is very timely now that EAGLE has gone the way of the dodo. CadSoft EAGLE used to be a big shot when it came to PCB design for small organizations or individual designers, but six years after being purchased by Autodesk they are no more. KiCad 7 is a staggeringly capable open-source software package containing some fantastic features for beginner and advanced designers alike.

Of course, these kinds of tutorials tend to be perishable because software changes over time. So if you’re staring down a migration from EAGLE to KiCad and could use some guidance, there’s no better time than the present. [shabaz]’s video showing the process is embedded below.

Thanks to [problemchild68] for the tip!

Continue reading “Importing EAGLE Projects Into KiCad 7, And How To Fix Them”