New Tool Helps Create Laser-Cut Doom Maps

Doom has a larger cultural footprint than the vast majority of video games ever made. That inspired [Theor] to see if it was possible to laser-cut some of the game’s maps to create a real-world model of those famous original levels.

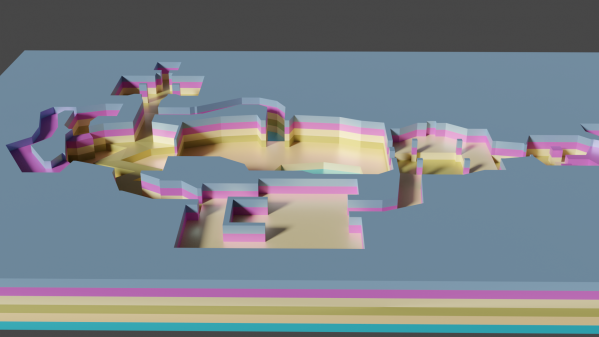
Level data was extracted from the game’s original WAD data files using code written in Rust. Maps are described by multiple “lumps” within the WAD file format, each containing information on vertexes, walls, and floors. This data was scraped and converted into SVG files suitable for laser cutting. [Theor] then built a visualizer that could display what a stacked-up laser cut map would look like in 3D, to verify everything worked correctly. With that done, the map could be laser cut without worries that it would come out a jumbled, janky mess.

[Theor] kept the finished product simple, creating the map as a stack of blue acrylic pieces. We can imagine this tool being perfect for creating a high-quality diorama though, with some work done to paint the map to match what the player sees in game. If you happen to take that approach, don’t hesitate to notify the tipsline!

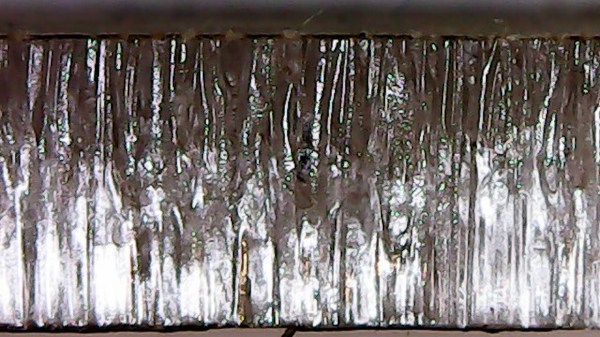
A closeup picture showing the jagged edge of the cut

Debugging Laser Cut Wobble, The Scientific Way

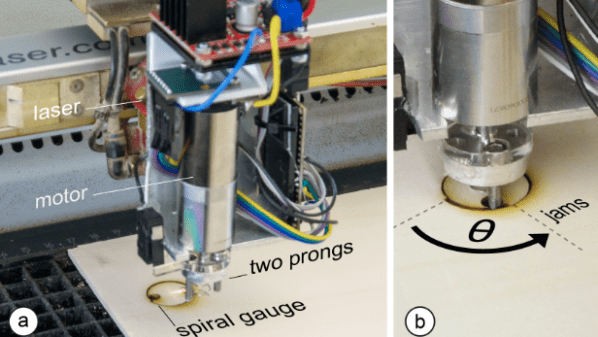
[PWalsh] was using his lasercutter to cut acrylic, expecting the cuts to have a pleasantly smooth edge. Alas, the edges turned out to be wobbly and sandpaper-like, not smooth in the slightnest. Bummer! Internet suggested a stepper motor swap, but not much in the way of insights – and that would’ve been a royal pain for sure. How would you approach debugging such a problem? Well, [PWalsh] didn’t want to swap crucial components willy-nilly, going the scientific way instead, and breaks it down for us.

Having compiled an extensive list of possible places to look for a fault in, he started going through fundamental assumptions. Do other lasercutters experience this issue? No, even the cheap ones can cut things properly. Is it water level causing intermittent cooling? Nope, not that. Is it the stepping settings? Tweaked, not that. Laser pulsing frequency? No dice. Continue reading “Debugging Laser Cut Wobble, The Scientific Way”

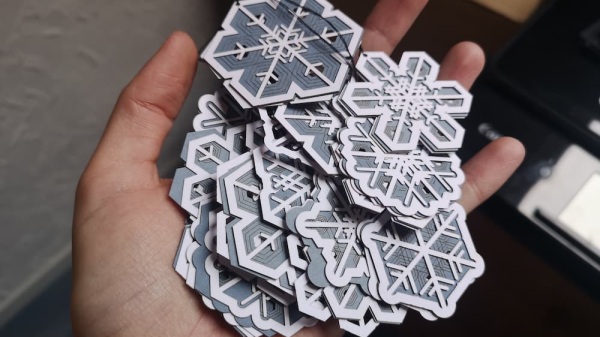
A persons handing holding a pile of generative, laser cut snowflake ornaments

Laser-Cutting A Flurry Of Generative Snowflakes

It’s the holiday season, and what better way to celebrate than to carve out some generative snowflakes on your laser cutter? [Bleeptrack] has developed a web-based tool that creates generative snowflake ornaments which can be exported to SVG files ready-made for laser or vinyl cutting.

True to their namesake, each generated snowflake ornament is (very likely to be) unique, with multiple layers created that can be stacked on top of each other. [Bleeptrack] has showcased a few realizations, using semitransparent paper sandwiched between two top layer cutouts, made out of wood or cardboard.

The snowflakes are a great balance of minimal design while still being beautiful and rich in detail. They can be easily produced on any laser cutter or vinyl cutter that you might have handy. Source code is available on GitHub for those wanting to dive into the details of the web tool. Cutting one of your own would make a perfect addition to a Neodriver ornament or a tiny DOOM playing ornament. Video after the break!

Continue reading “Laser-Cutting A Flurry Of Generative Snowflakes”

A hand holding a paper cup pours orange resin into a mold. There are several different colors in a spiral inside a circular mold on a circular platform with holes around its perimeter sitting on a wooden table.

Reproducing Vinyl Records In Resin

While most are just plain, vinyl records can be found in a variety of colors, shapes, and some even glow in the dark. [Evan and Katelyn] decided to spruce up a plain old record by replicating it in bright, glow-in-the-dark resin.

By first making a silicone mold of the vinyl record and then pouring several different colors of resin into the resulting mold, [Evan and Katelyn] were able to make a groovy-looking record that still retained the texture necessary to transmit the original sounds of the record. The resulting piece has some static, but the music is still identifiable. That said, audiophiles would probably prefer to leave this up on the wall instead of in their phonograph.

Acrylic rings were laser cut and bolted together to build the form for the silicone mold with the original record placed at the bottom. To prevent bubbles, the silicone was degassed in a vacuum chamber before pouring over the record and the resin was cured in a pressure pot after pouring into the resulting mold.

If you’re interested in how records were originally made, check out this installment of Retrotechtacular. A more practical application of resin might be this technique to reproduce vintage plastic parts.

Continue reading “Reproducing Vinyl Records In Resin”

$60 Laser Makes The Cut With New Controller

If you are reading the Lightburn forums, you probably already have a laser cutter of some kind.  But, if you are like most of us, you can always be tempted into another “deal.” [Dkj4linux] has a post where he bought a $79 laser engraver  (now selling for between $59 and $65, we noticed). Like most of these cheap engravers, the machine takes a proprietary controller with Windows-only software. No surprise that [Dkj4linux] would want to use…um… Linux. The answer? Rip the board out and replace it with an old spare.

The machine looks well constructed, as you can see in the video below. For that price, you get a 3-watt laser head (that is likely way less than that in terms of optical power), and a build area of 220x290mm. The controller was in a small metal enclosure, and it was easy to simply unplug the two axis and the laser control cable.

Continue reading “$60 Laser Makes The Cut With New Controller”

Owen with his laser cutter

A Home Made Laser Cutter For $700

While some decent lasers are out there for under $400 USD, they tend to be a little small. What if you wanted something a little nicer but didn’t want to jump to the $2,000 category? The answer for [Owen Schafer] was to build it with parts he had lying around and a few strategic purchases.

While he was initially planning on using a diode laser, doing anything more than engraving is tricky. He purchased a cheap 40 W CO2 laser tube, but it meant that he needed water cooling, mirrors, and more complex stuff that a diode doesn’t need. The frame is aluminum extrusion held together with 3D printed plates. Given there was a powerful laser bouncing around with mirrors, a plywood box formed the enclosure.

The stepper controller is an Arduino Mega running the Marlaser firmware, though [Owen] admits perhaps a laser cutter-specific driver board would have been better as he spent many hours trying to get the Arduino to do what he wanted. Air ventilation is a tube with a fan that vents out a nearby window. Water cooling is just a bucket of water with a pump in it. A simple nylon hose connected to a compressor with a maximum airflow valve provides an air assist while cutting. Finally, we’re happy to report that [Owen] bought safety glasses specific to his laser to protect his eyes and researched how to ground the high voltages generated.

We particularly loved seeing all of [Owen’s] test cuts. He proudly displayed his boxes, sharks, and lamp shades like anyone with their new laser cutter is wont to do. If you’re looking to upgrade your laser, there’s an add-on for detecting materials optically or a relatively cheap laser bed you can throw in your laser.

Continue reading “A Home Made Laser Cutter For $700”

3D Print Glass With A Laser Cutter

We’re all familiar with FDM 3D printing, and some of the more well-heeled or adventurous among us may even have taken a faltering step into the world of SLA printers. But for most of us there’s a step further in 3D printing that remains beyond our reach. SLS, or Selective Laser Sintering, creates prints from powder by melting it layer by layer using a laser, and has the advantage of opening up more useful materials than the polymer stock of the other methods. It’s not entirely unreachable though, as [Kenneth Hawthorn] shows us by using a laser cutter to produce SLS prints from powdered glass.

He evolved the technique of repeated fast passes with the laser to gradually melt more glass together as opposed to slower passes. He achieved a resolution as low as 0.1 mm, though he found a better glass color when the laser was less tightly focused. It raises the concern that glass powder is abrasive and thus a threat to any mechanism, thus he’s being extremely careful with the fan settings.

This may not be quite in the league of an SLS printer costing thousands of dollars, but it’s a technique that bears more investigation and could no doubt be refined for more custom fused glass creations. He tells us he was inspired by a previous Hackaday post about sintering sand, and of course we’d like to remind readers of a 3D printer that did the same job with the power of the sun.