Stepper Killer Killer Killed, Repair Attempted

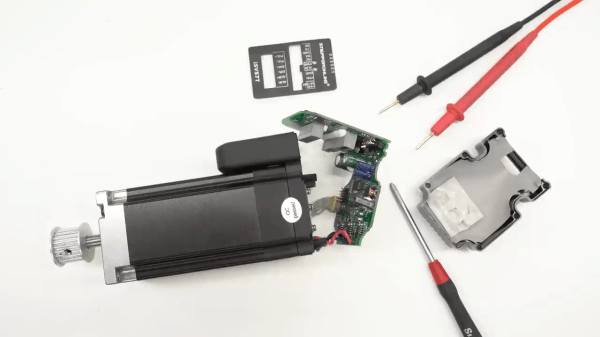
The low-cost servo motor in [Clough42]’s lathe’s electronic leadscrew bit the dust recently, and he did a great job documenting his repair attempts ( see video below the break ). When starting the project a few years ago, he studied a variety of candidate motors, including a ClearPath servo motor from Teknic’s “Stepper Killer” family. While that motor was well suited, [Clough42] picked a significantly lower-cost servo motor from China which he dubbed the “Stepper Killer Killer”.

He does a very thorough post-mortem of the motor’s integrated servo controller, checking the circuits and connections on the interface PCB first. Not finding any obvious problem, he proceeds to the main PCB which contains the microcontroller, motor driver transistors, and power supplies. There is no visible damage, but a check of the logic power supply shows 1.65V where 3.3V is expected. Looking at the board with a smart-phone mounted IR camera, he quickly finds the bad news — the microcontroller has shorted out.

Continue reading “Stepper Killer Killer Killed, Repair Attempted”

Two pairs of steel parallel pliers sit on a rough wooden benchtop. The pair on the left is open and the pair on the right is closed, demonstrating the parallel nature of the pliers' jaws over their entire range of motion. There are three brass pins flush with the steel surface of the handles and you can just barely make out the brass and copper filler material between the steel outer surfaces of the handles.

Producing A Pair Of Parallel Pliers

A regular pair of pliers is fine most of the time, but for delicate work with squarish objects you can’t go wrong with a pair of parallel pliers. [Neil Paskin] decided to make his own pair from scratch. (YouTube)

The jaws were machined down from round stock in [Paskin]’s mill before heat treating and tempering. The steel portions of the handles were cut from 16 gauge plate steel and half of them were stamped on a fly press to make the bridging section around the pivot bolt. The filler for the handles is copper on one side and brass on the other as [Paskin] didn’t have enough brass of the correct size to do both.

The steel and filler were joined with epoxy and copper pins before beveling the edges and sanding to give a comfortable contour to the handles. The bolts for the pliers started as ordinary hex bolts before being machined down on the lathe to a more aesthetically-pleasing shape and size. The final touches included electrolytically etching a logo into the bridge and then spraying down the pliers with a combination lubricant and corrosion preventative spray. This is surely a pair of pliers worth handing down through the generations.

For more mesmerizing machining, checkout this pocket safe or this tiny adjustable wrench.

Continue reading “Producing A Pair Of Parallel Pliers”

A wooden table with walnut squares and a maple grid. The table has a large barrel-shaped curve on one end and the other is a representation of a wormhole with what look like two stretched cones connected through a narrow cylinder. The wooden grid looks stretch to follow the curvature of spacetime.

Wormhole Coffee Table Takes Woodworking To Another Dimension

While some people are happy with a simple coffee table to hold their snacks while watching Star Trek reruns, others want their furniture to go where no furniture has gone before. [Olivier Gomis] has definitely satisfied this need with his Wormhole Coffee Table. [YouTube]

The complicated shape and curvature of a (3D representation of a) wormhole isn’t easy to create, but [Gomis] managed to carve one without the aid of a CNC or 3D printer. Starting with walnut planks and maple veneer laminated together, he created a grid stackup to replicate the common representation of spacetime as a 2D grid. Using various arrangements of these grids, he built up the central section of the wormhole which looked like a low poly vase before he put it on the lathe for turning.

The lathe work on this build is simultaneously impressive and terrifying. Turning down the central portion of the wormhole required working between two large spinning squares of walnut, which [Gomis] admits was “scary.” Multiple custom jigs were required to keep parts flat and deal with the extreme curvature of the inside of the wormhole’s opening. If that weren’t enough, if you look down the wormhole, he has installed a set of LED lights that show the spacetime grid continuing on to parts unknown.

If you’d like to see another impressive wormhole, check out this Amazing STARGᐰTE With DHD And Infinity Mirror Wormhole.

Continue reading “Wormhole Coffee Table Takes Woodworking To Another Dimension”

See What You’re In For When Buying And Moving A Lathe

Sometimes, with patience and luck, one can score a sweet deal on machinery. But for tools that weigh many hundreds of pounds? Buying it is only the beginning of the story. [Ben Katz] recently got a lathe and shared a peek at what was involved in moving a small (but still roughly 800 pound) Clausing 4901 lathe into its new home and getting it operational.

The lathe had sat unused in a basement, but was ready for a new home.

Moving such a stout piece of equipment cannot simply be done by recruiting a few friends and remembering to lift with the legs. This kind of machinery cannot be moved and handled except with the help of other machines, so [Ben] and friends used an engine hoist with a heavy-duty dolly to get it out of the basement it was in, and into the bed of a pickup truck. Separating the lathe from its base helped, as did the fact that the basement had a ground-level egress door which meant no stairs needed to be involved.

One also has to consider the machine’s ultimate destination, because not all floors or locations can handle nearly a thousand pounds of lathe sitting on them. In [Ben]’s case, that also meant avoiding a section of floor with a maintenance trapdoor when moving the lathe into the house. Scouting and knowing these things ahead of time can be the difference between celebratory pizza and deep dish disaster. Pre-move preparation also includes ensuring everything can physically fit through the necessary doorways ahead of time; a task that, if ignored, will eventually explain itself.

With that all sorted out, [Ben] dives into cleaning things up, doing function checks, and in general getting the lathe up and running. He provides some fantastic photos and details of this process, including shots of the 70s-era documentation and part diagrams.

Watch the first chips fly in the short video embedded below. And should you be looking at getting a lathe of your own? Check out our very own buyer’s guide to lathe options.

Continue reading “See What You’re In For When Buying And Moving A Lathe”

A wooden table with a puzzle on top of it sits in an off white room with a light wood floor. A red chair sits behind the table and the slats of the rolled away tambour top are visible.

Tambour Table With A Puzzling Secret

Some people really like puzzles. [Simone Giertz] is one of these serious puzzle lovers and built a transforming table (YouTube) to let her easily switch between puzzles and more mundane tasks, like eating.

While there are commercial solutions out there for game tables with removable tops and simpler solutions like hinged lids, [Giertz] decided to “make it more complicated and over-engineered than that.” A tambour top that rolls out of the way makes this a unique piece of furniture already, but the second, puzzle table top that can be raised flush with the sides of the table really brings this to the next level.

If that wasn’t already enough, the brass handles on the table are also custom made. In grand maker tradition, [Giertz] listened to her inner MYOG (Make Your Own Gnome) and got a lathe to learn to make her own handles instead of just buying some off the shelf.

If you’re less enamored of puzzles, you may want to see how Jigsaw Puzzles are Defeated. If you’re worried about losing pieces, check out these 3D Printed Sliding Puzzles.

Continue reading “Tambour Table With A Puzzling Secret”

How To Achieve Knurling On A Flat Surface

Knurling is a popular way to finish handles of tools and other hardware, with a pattern of crossed lines rolled into metal to provide better grip and an attractive finish. It’s most commonly done on a lathe to round stock, but it can also be achieved on flat surfaces if you have the right tool. Of course, you can make one yourself.

The build is simple, and is based around by creating a special carrier out of a solid piece of steel. It’s a long bar has a space milled out to hold two wheels in the middle. A pair of off-the-shelf knurling wheels are then installed in the bar, with socket head bolts serving as axles.

With the tooling complete, it’s then a simple matter of installing the carrier bar in a lathe and running it back and forth over a flat workpiece. The workpiece is rolled back and forth to allow the wheels to do their work, while also being shifted horizontally to allow the entire flat surface to be worked over.

A nice knurled finish really can elevate the form and function of any tool or other piece of metal craftsmanship. We’ve explored how to create your own knurled knobs before, too.

Continue reading “How To Achieve Knurling On A Flat Surface”

Custom Lathe Tool Cuts Complex Oil Grooves

Oil grooves are used to lubricate the inside of a bearing, and can come in many forms — from a single hole that takes a few drops of oil, to helical patterns that distribute it over the entire internal surface. The ideal arrangement is a looping figure eight pattern similar to an oscilloscope Lissajous figure, but cutting these is a nightmare. That is, unless you’ve got the proper tool.

We figure [Machine Mechanic] must need to cut a lot of them, as they spent quite a bit of time perfecting this custom lathe attachment to automate the process. Through an assortment of clever linkages and a rod-turned-crank that was welded together in-situ, the device converts the rotational motion of the lathe into a reciprocating action that moves the cutting tool in and out of the bearing. Incidentally the business end of this gadget started life out as a bolt, before it was turned down and had a piece of tool steel brazed onto the end.

With a little adjustment, it seems like this device could also be used to carve decorative patterns on the outside of the workpiece. But even if this is the only trick it can pull off, we’re still impressed. This is a clever hack for a very specialized machine shop operation that most would assume you’d need a four-axis CNC to pull off.

Lathes seem at first like rather single purpose machines, we’re always pleased to discover strange and wonderful things being done with them, like this seemingly impossible-to-turn piece, and this combo wire EDM and lathe.

Continue reading “Custom Lathe Tool Cuts Complex Oil Grooves”