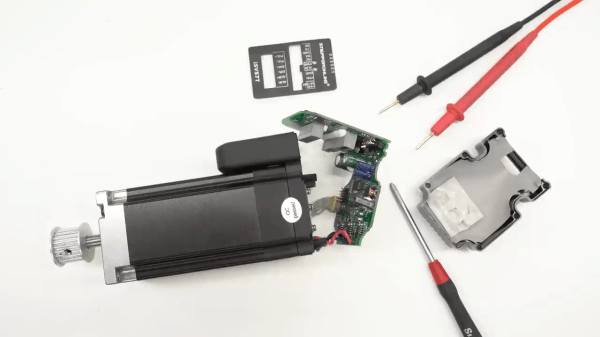
Better Mousetraps (or Screw Drives) Don’t Always Win

I’ve noticed, lately, that slotted screw heads are all but gone on new equipment. The only thing that I find remarkable about that is that it took so long. While it is true that slotted heads have been around for ages, better systems are both common and have been around for at least a century.

Check out those cool threads.

The reason slotted heads — technically known as the drive — are so common is probably because they are very easy to make. A hacksaw is sufficient for the job and there are other ways to get there, too. The only advantages I know of for the user is that you can easily clean a slotted drive and — possibly — use field expedient items like butter knives and quarters to turn the screw. I’ve heard people claim that it also is a feature that the screwdriver can pry things like paint can lids, but that’s a feature of the tool, not the screw drive.

The disadvantages, though, are significant. It is very hard to apply lots of torque to a slotted screw drive without camming it out or snapping the head off the screw. The screwdriver isn’t self-centering either, so applying force off-axis is common and contributes to the problem.

Continue reading “Better Mousetraps (or Screw Drives) Don’t Always Win”

Adjustable, Piston-Damped Hammer

When all you have is a hammer, every problem is a constant quest for an even better hammer, as the popular saying goes. At least, that seems to be [Ebenisterie Éloïse]’s situation. She wanted a deadblow hammer that not only had an aesthetically pleasing wood and brass construction, but also one that included adjustable dampers to make sure that each hammer swing is as efficient as possible.

For those unfamiliar with specialty hammers, dead blow hammers typically have some movable mass such as sand or lead shot within the hammer head. This mass shifts forward when the hammer strikes an object, reducing rebound of the hammer off of the object and transferring more energy into each strike. This hammer omits a passive mass in favor of four custom-machined brass tubes, each of which holds a weighted fluid, a spring, and brass weight. Each piston acts as a damper in a similar way to a shock absorber on a vehicle, and a screw and o-ring at the top of each one allows them to be adjustable by adding different weight fluids as needed. Some detailed testing of the pistons shows a marked improvement over any of the passive mass varieties as well.

Not only is this an incredible amount of detail and precision for a tool that is often wielded in a non-precise way (at least among those of us for who aren’t skilled craftspeople), but it is also made out of wood, leather, and brass which gives it an improved look and feel over a plastic and fiberglass hammer that is typical of most modern deadblow hammers. It even rivals this engineer’s hammer with its intricate custom engraving in craftsmanship alone.

Continue reading “Adjustable, Piston-Damped Hammer”

Vertical Mill Completes Scrapyard Lathe Build

One thing’s for sure: after seeing [Roland Van Roy] build a vertical mill from industrial scrap, we’ve got to find a better quality industrial scrapyard to hang around.

The story of this build started, as many good shop stories do, at the lathe, which in this case was also a scrapyard build that we somehow managed to miss when it first posted. This lathe is decidedly different from the common “Gingery method” we’ve seen a few times, which relies on aluminum castings. Instead, [Roland] built his machine from plate stock, linear slides, and various cast-off bits of industrial machines.

To make his lathe yet more useful, [Roland] undertook this build, which consists of a gantry mounted over the bed of the lathe. The carriage translates left and right along the bed while the spindle, whose axis lines up perfectly with the center axis of the lathe, moves up and down. [Roland] added a platform and a clever vise to the lathe carriage; the lathe tool post and the tailstock are removed to make room for these mods, but can be added back quickly when needed. Digital calipers stand in for digital read-outs (DROs), with custom software running on a Picaxe and a homebrew controller taking care of spindle speed control.

[Roland] reports that the machine, weighing in at about 100 kg, exhibits a fair amount of vibration, which limits him to lighter cuts and softer materials. But it’s still an impressive build, and what really grabbed us was the wealth of tips and tricks we picked up. [Roland] used a ton of interesting methods to make sure everything stayed neat and square, such as the special jig he built for drilling holes in the T-slot extrusions to the use of cyanoacrylate glue for temporary fixturing.

Continue reading “Vertical Mill Completes Scrapyard Lathe Build”

Tiny Chain-Link Fence Made With Hand-Cranked Brilliance

Chain link fences are woven with a mechanism that is almost hypnotic to watch, so [Levsha] decided to build his own tiny hand-crank tabletop version to make tiny copper wire fences.

Chain link consist of a series of wires bent and woven in a zigzag pattern. The zigzag bends are made by winding the wire around a rotating flat plate inside a stationary tube with a spiral slot in the side to keep the spacing of the bends consistent. [Levsha]’s version is roughly 1/10 scale of the real thing, and only does the bending and winding parts. Linking the bent wire together is up to the operator. All the components were machined on a lathe and CNC router, and beautifully finished and assembled on a wood base. The hardest part was the tube with the spiral slot, which took a few attempts to get right. [Levsha] initially tried to use steel wire, but it was too stiff and caused the winding mechanism to lock up. 0.4 mm copper wire turned out to be the best choice.

Although there is no practical use for this device that we can see, the craftsmanship is excellent, and it is one of those videos that reminds us how badly we want some machine tools.

Fine attention to detail is really what makes videos like this enjoyable to watch. Wee seen a few other such project, like a beautiful scratch-built lathe, or a pneumatic powered drone that can’t fly.

Continue reading “Tiny Chain-Link Fence Made With Hand-Cranked Brilliance”

Gorgeous Mini-Lathe Makes The Most Out Of Wood And Metal

It’s a cliche that the only machine tool that can make copies of itself is the lathe. It’s not exactly true, but it’s a useful adage in that it points out that the ability to make big round things into smaller round things, and to make unround things into round things, is a critical process in so many precision operations. That said, making a lathe primarily out of wood presents some unique challenges in the precision department

This isn’t [Uri Tuchman]’s first foray into lathe-building. Readers may recall the quirky creator’s hybrid treadle-powered and electric lathe, also primarily an exercise in woodworking. That lathe has seen plenty of use in [Uri]’s projects, turning both wood and metal stock into parts for his builds. It wasn’t really optimal for traditional metal turning, though, so Mini-Lathe 2 was undertaken. While the bed, headstock, and tailstock “castings” are wood — gorgeously hand-detailed and finished, of course — the important bits, like the linear slides for the carriage and the bearings in the headstock, are all metal. There’s a cross-slide, a quick-change tool post, and a manual lead screw for the carriage. We love the finely detailed brass handcranks, which were made on the old lathe, and all of the lovely details [Uri] always builds into his projects.

Sadly, at the end of the video below we see that the lathe suffers from a fair amount of chatter when turning brass. That’s probably not unexpected — there’s not much substitute for sheer mass whenit comes to dampening vibration. We expect that [Uri] will be making improvements to the lathe in the coming months — he’s not exactly one to leave a job unfinished.

Continue reading “Gorgeous Mini-Lathe Makes The Most Out Of Wood And Metal”

Homemade Gear Cutting Indexer Blends Art With Engineering

Ordinarily, when we need gears, we pop open a McMaster catalog or head to the KHK website. Some of the more adventurous may even laser cut or 3D print them. But what about machining them yourself?

[Uri Tuchman] set out to do just that. Of course, cutting your own gears isn’t any fun if you didn’t also build the machine that does the cutting, right? And let’s be honest, what’s the point of making the machine in the first place if it doesn’t double as a work of art?

[Uri’s] machine, made from brass and wood, is simple in its premise. It is placed adjacent to a gear cutter, a spinning tool that cuts the correct involute profile that constitutes a gear tooth. The gear-to-be is mounted in the center, atop a hole-filled plate called the dividing plate. The dividing plate can be rotated about its center and translated along linear stages, and a pin drops into each hole on the plate as it moves to index the location of each gear tooth and lock the machine for cutting.

The most impressive part [Uri’s] machine is that it was made almost entirely with hand tools. The most advanced piece of equipment he used in the build is a lathe, and even for those operations he hand-held the cutting tool. The result is an elegant mechanism as beautiful as it is functional — one that would look at home on a workbench in the late 19th century.

[Thanks BaldPower]

Continue reading “Homemade Gear Cutting Indexer Blends Art With Engineering”

Custom Tool Helps Hakko Set Threaded Inserts

When the tool you need doesn’t exist, you have to make it yourself. Come to think of it, even if the tool exists, it’s often way more fun to make it yourself. The former situation, though, is one that [Sean Hodgins] found himself in with regard to threaded inserts. Rather than suffer from the wrong tool for the job, he machined his own custom threaded insert tool for his Hakko soldering iron.

Like many of us, [Sean] has embraced the use of heat-set threaded inserts to beef up the mechanical connections on his 3D-printed parts. [Sean] dedicated a soldering iron to the task, equipping it with a tip especially for the job. But it was the flavor of iron proverbially known as a “fire stick” and he found that this iron was too hot for PLA prints. As the new owner of a lathe, he was able to make quick work of the job using a piece of brass rod stock. Luckily, Hakko tips just slip on the heating element, so no threading operations were needed. [Sean] made insert tips for multiple sized inserts, and the results speak for themselves.

If you haven’t tried these out yet, check out [Joshua Vasquez’s] excellent guide on heat-set inserts. You’ll find this guide to the relative merits of the different types useful when ordering inserts. And if you’ve got the itch to buy a lathe now, we’ve got you covered there too.

Continue reading “Custom Tool Helps Hakko Set Threaded Inserts”