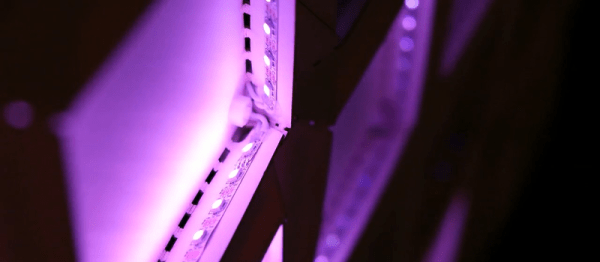
Our Norwegian is pretty weak, so we struggled a little bit with the documentation for a big public LED art project in the lighthouse (translated) in Horten, Norway. But we do speak the universal language of blinkies, and this project has got them: 3,008 WS2812b LEDs ring the windows at the top of the lighthouse and create reactive patterns depending on the wave height and proximity of the ferry that docks there.
This seems to be an evolving project, with more features being added slowly over time. We love the idea of searching for the WiFi access point on the ferry to tell when it’s coming in to port, and the wave height sensor should also prove interesting data, with trends at the low-frequency tidal rate as well as higher frequency single waves that come in every few seconds. What other inputs are available? How many are too many?
It’s so cool that a group of tech-minded art hackers could get access to a big building like this. Great job, [Jan] and [Rasmus] and [everyone else]!
There’s a new challenger on the block for the title of the “Worlds Smallest 4x4x4 RGB LED Cube“. At 13x13x36 mm, [nqtronix]’s Cube Pendant is significantly smaller than [HariFun’s] version, which measures in at about 17x17x17 mm just for the cube, plus the external electronics. It took about a year for [nqtronix] to claim this spot, and from reading the comments section, it seems [HariFun] isn’t complaining. The Cube Pendant is small enough to be used as a key fob, and [nqtronix] has managed to really cram a lot of electronics in it.
The LED’s used are 0606 RGB’s which are 1.6mm square, although he did consider using 0404’s before scrubbing the idea. There’s many ways of driving 192 IO’s, but in this case, Charlieplexing seemed like the best solution, requiring 16 IO’s. Unlike [HariFun]’s build, this one is fully integrated, with micro-controller, battery and everything else wrapped up in a case made entirely from PCB — inspired by [Voja Antonic]’s FR4 enclosure technique, and the LED array is embedded in clear resin.
[Paul] created a frame that uses an Arduino and LEDs to create a slow motion illusion of a delicate item (like a flower or a feather). The effect is striking as you can see in the video below.
[Paul] had seen similar projects (both one-offs and sold as a product), but wanted to do his own take on it. The principle is simple: The device vibrates the objects at one frequency and strobes LEDs at a slightly different frequency (80 and 79.5 Hz, in this case). The difference between the frequencies (the beat frequency) is what your eye perceives as a very slow (0.5 Hz, here) motion.
[Bithead942]’s ten-year-old niece is a huge Star Wars fan, and also a violinist. Which of course has led her to learn to play some of the music from the film franchise, and then to ask her uncle to make her violin bow light up like a lightsaber.
His solution might seem fairly straightforward at first sight, simply attach a strip of DotStar addressable LEDs to a bow and drive them from an Arduino Pro Mini to gain the required animation of a saber power-up. But of course, there’s another dimension to this project. Not only does the bow have to do its lightsaber trick, it also has to be a playable bow. The electronics must not impede the musician by being too heavy or intrusive, but the result must have enough power in reserve to keep the lights burning for the duration of a performance.
After experimentation with AAA cells and CR2032s the power requirement was satisfied by a tiny Li-po cell attached to the top of the end of the bow with industrial Velcro, and the LED strip was glued and further secured using tiny rubber bands of the type used by orthodontists.
A short demonstration of the bow’s lightsaber action is shown below the break, we’re sure it’ll impress the young violinist’s audience.
Death Stars were destroyed twice in the Star Wars movies and yet one still lives on in this 168 LED persistence of vision globe made by an MEng group at the University of Leeds in the UK. While Death Stars are in high demand, they mounted it on an axis tilted 23.4° (the same as the Earth) so that they can show the Earth overlaid with weather information, the ISS position, or a world clock.
More details are available on their system overview page but briefly: rotating inside and mounted on the axis is a Raspberry Pi sending either video or still images through its HDMI port to a custom made FPGA-based HDMI decoder board. That board then controls 14 LED driver boards mounted on a well-balanced aluminum ring. All that requires 75W which is passed through a four-phase commutator. Rotation speed is 300 RPM with a frame rate of 10 FPS and as you can see in the videos below, it works quite well.
While there’s something to be said for dead-bug construction, hot glue, and other construction methods that simply get the job done, it’s inspiring to see other builds that are refined and intentional but that still hack together things for purposes other than their original intent. To that end, [Li Zanwen] has designed an interesting new lamp that uses magnets to turn itself on in a way that seems like a magnetic switch of sorts, but not like any we’ve ever seen before.
While the lamp does use a magnetic switch, it’s not a traditional switch at all. There are two magnetic balls on this lamp attached by strings. One hangs from the top of the circular lamp and the other is connected to the bottom. When this magnet is brought close to the hanging magnet, the magnetic force is enough to both levitate the lower magnet, and pull down on a switch that’s hidden inside the lamp which turns it on. The frame of the lamp is unique in itself, as the lights are arranged on the inside of the frame to illuminate the floating magnets.
While we don’t typically feature design hacks, it’s good to see interesting takes on common things. After all, you never know what’s going to inspire your next hackathon robot, or your next parts drawer build. All it takes is one spark of inspiration to get your imagination going!
Every time we say “We’ve seen it all”, along comes a project that knocks us off. 60 year old [Mark Nesselhaus] likes to learn new things and he’s never worked with hardware at the gate level. So he’s building himself a 4-bit Computer, using only Diode-Transistor Logic. He’s assembling the whole thing on “card board” perf-board, with brass tacks for pads. Why — because he’s a thrifty guy who wants to use what he has lying around. Obviously, he’s got an endless supply of cardboard, tacks and Patience. The story sounds familiar. It started out as a simple 4-bit full adder project and then things got out of hand. You know he’s old school when he calls his multimeter an “analog VOM”!
It’s still work in progress, but he’s made a lot of it in the past year. [Mark] started off by emulating the 4-bit full adder featured on Simon Inns’ Waiting for Friday blog. This is the ALU around which the rest of his project is built. With the ALU done, he decided to keep going and next built a 4-to-16 line decoder — check out the thumbnail image to see the rats nest of jumbled wires. Next on his list were several flip flops — R-S, J-K and D types, which would be useful as program counters. This is when he bumped into problems with signal levels, timing and triggering. He decided to allow himself the luxury of adding one IC to his build — a 555 based clock generator. But he still needed some pulse shaping circuitry to make it work consistently.
LED Driver : from left, Gnd, NC, +5V, Input
[Mark] also built a finite-state-machine sequencer based on the work done by Rory Mangles TinyTim project. He finished building some multiplexers and demultiplexers, and it appears he may be using a whole bank of 14 wall switches for address, input and control functions. For the output display, he assembled a panel using LED’s recovered from a $1 Christmas light string. Something seems amiss with his LED driver, though — 2mA with LED on and >2.5mA with LED off. The LED appears to be connected across the collector and emitter of the PNP transistor. Chime in with your comments.
This build seems to be shaping along the lines of the Megaprocessor that we’ve swooned over a couple of times in the past. Keep at it, [Mark]!