Recreating One Of The First Hackintoshes

Apple’s Intel era was a boon for many, especially for software developers who were able to bring their software to the platform much more easily than in the PowerPC era. Macs at the time were even able to run Windows fairly easily, which was unheard of. A niche benefit to few was that it made it much easier to build Hackintosh-style computers, which were built from hardware not explicitly sanctioned by Apple but could be tricked into running OSX nonetheless. Although the Hackintosh scene exploded during this era, it actually goes back much farther and [This Does Not Compute] has put together one of the earliest examples going all the way back to the 1980s.

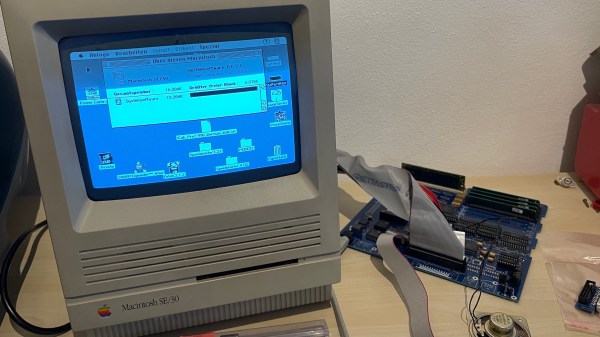
The build began with a Macintosh SE which had the original motherboard swapped out for one with a CPU accelerator card installed. This left the original motherboard free, and rather than accumulate spare parts [This Does Not Compute] decided to use it to investigate the Hackintosh scene of the late 80s. There were a few publications put out at the time that documented how to get this done, so following those as guides he got to work. The only original Apple part needed for this era was a motherboard, which at the time could be found used for a bargain price. The rest of the parts could be made from PC components, which can also be found for lower prices than most Mac hardware. The cases at the time would be literally hacked together as well, but in the end a working Mac would come out of the process at a very reasonable cost.

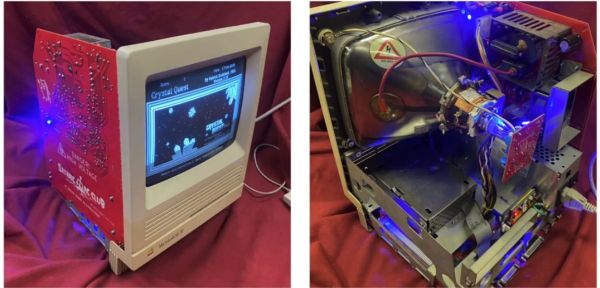
[This Does Not Compute]’s case isn’t scrounged from 80s parts bins, though. He’s using a special beige filament to print a case with the appropriate color aesthetic for a computer of this era. There are also some modern parts that make this style computer a little easier to use in today’s world like a card that lets the Mac output a VGA signal, an SD card reader, and a much less clunky power supply than the original would have had. He’s using an original floppy disk drive though, so not everything needs to be modernized. But, with these classic Macintosh computers, modernization can go to whatever extreme suits your needs.

Thanks to [Stephen] for the tip!

Continue reading “Recreating One Of The First Hackintoshes”

Mac SE Restomod Has A Floppy Surprise

If he’s anything like us [Duncan Hall] was probably equal parts excited and disgusted when he found a 1987 Macintosh SE case at a garage sale. Excited, because not every day do vintage computers show up at these things. Disgusted, because it had been gutted and coated in house paint; the previous owner apparently wanted to make an aquarium. [Duncan] wanted to make a computer, and after 15 years, he finally did, calling it the PhoeNIX SE.

Note the small hole in the top floppy bay for the laptop webcam.

The NIX part of the name might make you suspect he’s running Linux on it, which yes, he absolutely is. The guts of this restomod were donated from a Dell XPS laptop, whose Core i7 CPU and motherboard power the project. A 9.7″ LCD serves in place of the original monochrome CRT, held in place by 3D printed hardware. While a purist might complain, it’s not like anyone makes replacement CRTs anymore, and once that’s gone? You might as well go full modern. (The analog board, on the other hand, is available. So is the logic board, if you were wondering. Lacking a CRT, some might have chosen e-ink instead, but the LCD looks good here.)

All ports are on the rear, as Steve would have wanted. That original sticker survived under latex paint is a spot of luck.

Having gone full modern, well, there’s no need for the M5011’s dual floppies, so one of them holds a webcam and monitor for a modern experience. A zoom call from that case would be a bit surreal, but we really appreciate the use of the empty floppy bay to keep the clean lines of the Macintosh SE unaltered. The other floppy bay (this is a dual-floppy unit) appears empty; we might have put an SD-card reader or something in there, but we absolutely agree with [Duncan]’s choice to 3D Print a new back panel and keep all I/O on the rear of the case, as God and Steve Jobs intended.

However you feel about restomodding retrocomputers (and we’re aware it’s a controversial practice), I think we can all agree this is a much better fate for the old Mac than becoming an aquarium. Thanks to [Loddington] for the tip.

If you’re on the side of the aisle that prefers to see restorations than restomods, the tips line is waiting for some quality restorations.

A New Analog And CRT Neck Board For The MacIntosh SE

Keeping a 35-year old system like the MacIntosh SE and its successor, the SE/30, up and running requires the occasional replacement parts. As an all-in-one system, the analog board that provides the power for not only the system but also the 9″ (23 cm) built-in CRT is a common failure location, whether it is due to damaged traces, broken parts or worse. For this purpose [Kay Koba] designed a replacement analog board, providing it with a BOM of replacement components. This also includes the neck board, which is the part that the CRT itself connects to.

As [Kay] notes in the project log, the design was inspired after building [Kai Robinson]’s Classic Reloaded logic board, which we covered previously. After a few revisions, [Kay] has now begun selling the PCBs for $42. The product page also links to BOMs for both the analog board and the neck board, with most of the parts simple through-hole parts. If the board’s fancy styling and LEDs compared to the original board isn’t your cup of tea, it does look like there exists interest in a more subdued version as well.

30-Year-Old Macintosh SE/30 Gets A Brand New Logic Board

Some time ago, [Bolle] got the idea to redraw the Macintosh SE/30 schematics in Eagle. Progress was initially slow, but over the past month (and with some prodding and assistance from fellow forum frequenter [GeekDot]), he’s taken things a step further by creating a fully functional replacement Macintosh SE/30 logic board PCB.

By using the available schematics, the project didn’t even require much reverse engineering. Though he plans for more modernization in later iterations, this design is largely faithful to the original components and layout, ensuring that it is at least basically functional. He did update the real time clock battery to a CR2032 and, as a benefit of redrawing all the traces, he was able to use a 4-layer PCB in place of the costly 6-layer from Apple’s design.

The board came back from fabrication looking beautiful in blue; and, once he had it soldered up and plugged in, the old Mac booted on the very first try! A copy-paste mistake with the SCSI footprints led to some jumper wire bodging in order to get the hard drive working, but that problem has already been fixed in the next revision. And, otherwise, he’s seen no differences from the original after a few hours of runtime.

Recreating old Macintosh logic boards almost seems like its own hobby these days. With the design and fabrication capabilities now accessible to hobbyists, even projects that were once considered professional work are in reach. If you’re interested in making your own PCB designs, there are many resources available to help you get started. Alternatively, we have seen other ways to modernize your classic Macs.

[Thanks to techknight for the tip!]

Recreating The Mac SE Logic Board

When [Kai Robinson] found himself faced with the difficult task of saving as many Mac SE’s as he possibly could, the logical but daunting answer was to recreate the Mac SE logic board for machines that would otherwise be scrapped. These machines are over 30 years old and the PRAM battery often leaks, destroying parts and traces. Given that the logic board is a simple through-hole two four-layer board, how hard could it be?

The first step was to get some reference photos so [Kai] set to desoldering everything on the board. The list of components and the age of solder made this an arduous task. Then a composite image was produced by merging images together using a scanner and some Inkscape magic. in graphics software.

Rather than simply putting the pins in the right place and re-routing all the netlists, [Kai] elected instead to do a copy, trace for trace of the original SE board. [Kai] and several others on the forum have been testing the boards and tracking down the last few bugs and kinks in the design. An unconnected pin here and an improperly impedance matched resistor there. Hopefully, soon they’ll have Gerbers and design files ready for anyone should they need a new logic board PCB.

It’s no secret that we love the Macintosh SE here at Hackaday. We’ve seen new custom cases for it and now new PCBs for it. It does cause the mind to ponder though and wonder, what’s next?

Thanks [Toru173] for sending this one in!

The 30th Anniversary Macintosh

It’s been just over thirty years since the original Macintosh was released, and [hudson] over at NYC Resistor thought it would be a good time to put some old hardware to use. He had found an all-in-one Mac SE “on the side of a road” a while ago (where exactly are these roads, we wonder), and the recent diamond anniversary for the original mac platform convinced him to do some major hardware hacking.

Inspired by a six-year-old project from a NYC Resistor founder aptly named the 24th anniversary Mac, [hudson] decided to replace the old hardware with more powerful components – in this case, a BeagleBone Black. Unlike the earlier build, though, the original CRT would be salvaged; the analog board on the Mac SE has pins for video, hsync, vsync, and power.

To get a picture on the old CRT, [hudson] needed to write a software video card that used the BeagleBone’s PRU. The CRT isn’t exactly “modern” tech, and everything must be clocked at exactly 60.1 Hz lest the CRT emit a terrible buzzing sound.

With a software video card written for the old CRT, the BeagleBone becomes the new brains of this beige box. It runs all the classic Linux GUI apps including XEyes and XScreenSaver, although flying toasters might be out of the question. He also managed to load up the Hackaday retro site with xterm, making this one of the best ways to make an old Mac SE useful.

Uncovering Easter Eggs In Old Mac ROMs

The picture you see above is taken from the ROM of a Macintosh SE made in the  late 1980s. This black and white image remained buried inside old Macs until [Adam] and [Trammell] at NYC Resistor reverse engineered these old Mac ROMs and found a few really cool Easter eggs.

[Adam] and [Trammell] have been dumping ROMs from old computers for a while now. Their modus operandi is finding old 27C-series EPROMs on old computers, prying the out of their comfortable home, slapping them in a breadboard, and wiring up an Arduino clone to dump the data to a computer.

Recently, the guys found an old Mac SE lying on the side of a road in Brooklyn and brought it over to NYC Resistor. They had known about images hidden in the SE ROM, but the guys wanted to know how and where these pictures were stored. After carefully inspecting the binary file generated from dumping the ROM, [Adam] was able to recover three images hidden in every Macintosh SE.

The folks at Apple – especially in the heady days of the Apple II and 68k Macs – hid quite a few Easter eggs in the ROMs of their computers. For instance, the Apple IIgs has audio data stored in the ROM, and the Macintosh Classic hid an entire operating system – System 6.0.3 – in the ROM of the machine.

via Make