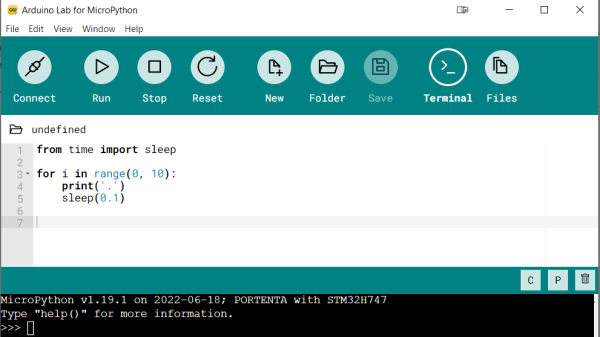
Screenshot of the Arduino Lab for MicroPython

Arduino Brings A MicroPython IDE

Both Arduino and MicroPython are giants when it comes to the electronics education area, and each one of them represents something you can’t pass up on as an educator. Arduino offers you a broad ecosystem of cheap hardware with a beginner-friendly IDE, helped by forum posts explaining every single problem that you could and will stumble upon. MicroPython, on the other hand, offers a powerful programming environment ripe for experimentation, and doesn’t unleash a machine gun fire of triangle brackets if you try to parse JSON slightly incorrectly. They look like a match made in heaven, and today, from heaven descends the Arduino Lab for MicroPython.

This is not an Arduino IDE extension – it’s a separate Arduino IDE-shaped app that does MicroPython editing and uploads code to your board from a friendly environment. It works over a serial port, and as such, the venerable ESP8266-based boards shouldn’t be be left out – it even offers file manager capabilities! Arduino states that this is an experimental effort – it doesn’t yet have syntax checks, for instance, and no promises are made. That said, it already is a wonderful MicroPython IDE for beginner purposes, and absolutely a move in the right direction. Want to try? Download it here, there’s even a Linux build!

High-level languages let you build projects faster – perfect fit for someone getting into microcontrollers. Hopefully, what follows is a MicroPython library manager and repository! We’ve first tried out MicroPython in 2016, and it’s come a long way since then – we’ve seen quite a few beginner-friendly MicroPython intros, from a gaming handheld programming course, to a bipedal robot programming MicroPython exploration. And, of course, you can bring your C libraries with you.

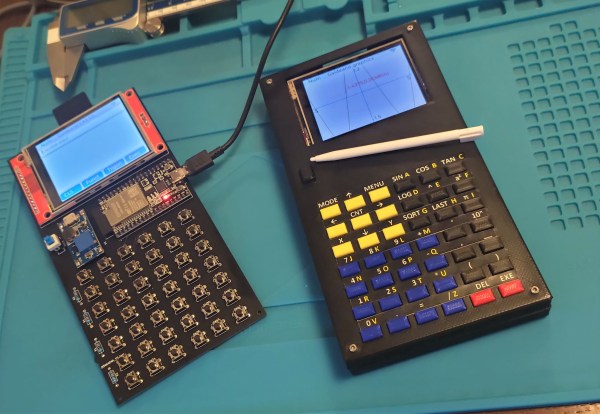
A graphing calculator with a 3D-printed enclosure, with a circuit board next to it

2022 Cyberdeck Contest: The Galdeano Is More Than A Graphing Calculator

Graphing calculators have evolved from expensive playthings for rich nerds to everyday tools for high schoolers worldwide. Even though teenagers nowadays carry powerful internet-connected computers in their pockets, math teachers often prefer them to use a clunky Z80-powered calculator in class, if only because their limited performance reduces the potential for distraction. The worst thing a lazy student can do is play a simple game like Snake or Tetris.

But what if you’re not a student anymore and you want a graphing calculator that has up-to-date hardware and infinite customizability in software? Look no further than [Angel Cabello]’s Galdeano, a handheld that has all the features of a modern graphing calculator plus a lot more. The heart of the device is an ESP32, which sits on a custom PCB that also holds a 6×7 array of push-buttons and a 320×240 touch-sensitive color display. It can be powered through a lithium-polymer battery or, like a classic calculator, through four AAA cells. The entire thing is housed in a 3D printed enclosure with color-coded buttons indicating various built-in functions.

The ESP32 runs MicroPython along with a symbolic math engine called Eigenmath. This enables the Galdeano to  manipulate expressions, perform integration and differentiation, and plot functions. Porting Eigenmath to a memory-constrained platform like the ESP32 was quite a challenge and required a few workarounds, including a memory partition scheme and even a custom compact font with mathematical symbols.
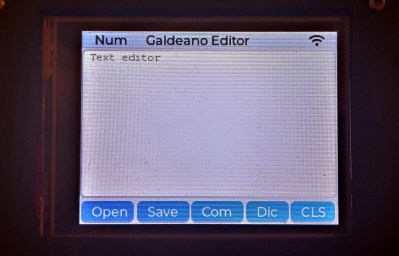
Thanks to the flexibility of MicroPython and the ESP’s WiFi system, the Galdeano is not limited to implementing a calculator: it can also perform various general-purpose tasks ranging from file editing to controlling a set of smart light bulbs. The project page doesn’t mention any games yet, but we’re sure it won’t take long before someone ports Tetris to this system as well.

Of course, even classroom-grade calculators can be pushed to do much more than their designers intended: they can receive GPS signals, run Debian or even perform ray tracing. If you’re looking for a powerful open-source calculator, this BeagleBoard-based machine runs the R statistical computing environment.

Continue reading “2022 Cyberdeck Contest: The Galdeano Is More Than A Graphing Calculator”

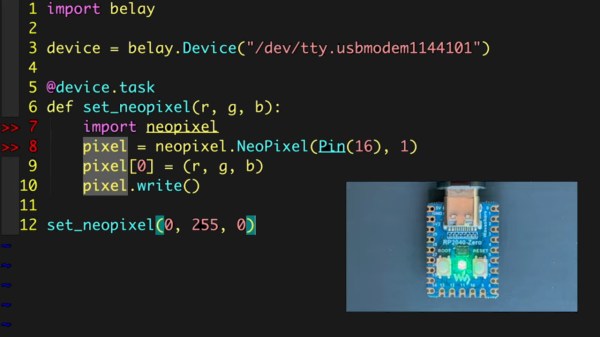
screenshot from the video linked, showing example code that lights up an LED, and in a small window, also shows the LED lit up on a small Pi Pico board connected over USB

Your MicroPython Board Can Be Your Tinkering Peripheral

[Brian Pugh] has shared a cool new project that simultaneously runs on desktop Python and MicroPython – the Belay library. This library lets you control a MicroPython device seamlessly from your Python code – interacting with real-world things like analog/digital trinkets, servos, Neopixels and displays, without having to create your own firmware or APIs.

You need a serial-connected MicroPython board – even an ESP8266 should do. Then, you can intersperse your Python code with MicroPython-written functions, and call them whenever you need your connected device to do something – keeping the entire logic of your project within a single device. [Brian] provides quite a few examples, even for more complex things like displays. No doubt, there are limitations, but this looks to be a powerful tool in a hacker’s arsenal.

Readers might be reminded of an Arduino library called Firmata – an old-time way to do such connectivity. We’ve also previously covered a Pi Pico firmware that does a similar thing, and even features a breakout board for all your experimentation needs!
Continue reading “Your MicroPython Board Can Be Your Tinkering Peripheral”

IOT Garage Door Opener Makes For Excellent Beginner IOT Project

If you live in a home with a garage door opener, you may have experienced one or more inevitable moments. You pull up to your home, you press the button on the garage door opener, and… nothing. Or you can’t find the garage door opener. Or you have to mash the button repeatedly to get a response. Or… you get the idea. Thanks to [Core Electronics] however, you now have the basis for using a much better device to control your own garage door: Your phone. You can see the tutorial on the web or in video format below the break.

[Michael] at [Core electronics] was tired of dealing with the inconsistencies and inconveniences of a poorly built remote for his garage door opener. When he inspected the controller board on the garage door opener itself, he found that it was already configured to allow three buttons to be connected: Up, Down, and Stop. Continue reading “IOT Garage Door Opener Makes For Excellent Beginner IOT Project”

The OpenMV board inside a security camera shell on the left, an AprilTag on smartphone's screen on the right

Use AprilTags To Let Guests Open Your Front Gate

[Herb Peyerl] is part of a robotics team, and in his robotics endeavours, learned about AprilTags; small QR-code-like printable patterns that are easily recognizable by even primitive machine vision. Later on, when thinking about good ways to let his guests through his property’s front gate, the AprilTags turned out to be a wonderful solution. Now all he needs to do is send his guest a picture of the appropriate AprilTag, which they can present to the camera at his front gate using their smartphone.

He used an OpenMV board for this – thanks to its wide variety of available libraries, the AprilTag recognition is already baked in, and the entire script is merely a hundred lines of MicroPython. An old surveillance camera gave up its dome-shaped housing, and now the OpenMV board is doing guest access duty on a post in front of his property’s front gate. He’s shared the code with us, and says he’s personally running a slightly modified version for security reasons — not that a random burglar is likely to stumble upon this post anyway. Besides it looks like the gate would be easy for a burglar to jump over without any need for security bypass, and the convenience benefits of this hack are undeniable.

In the unlikely chance a burglar is reading this, however, don’t be sad. We do happen to have a bunch of hacks for you, too. There’s far less secure systems out there, from building RFID keyfobs to gated community access control systems, sometimes all you need is a 12 V battery. If you’re not into burglary, that’s okay too — we’ve covered other guest access hacks before, for instance, this ESP8266-powered one.

Network Time Protocol On The ESP32

Network Time Protocol (NTP) is one of the best ways to keep networked computers synchronized to the same time. It’s simple, lightweight, and not only allows computers to maintain a time standard together, but it also allows some computer manufacturers to save some money on hardware costs. The Raspberry Pi is perhaps the most well-known example of a low-cost computer without the extra expense of a real-time clock (RTC). While the Pi sets up NTP essentially automatically, other microcontrollers like the ESP32 don’t, but it is possible to configure them to use this time standard with some work.

For this project the MicroPython implementation for the ESP32 is required. MicroPython is a way of running Python code on microcontrollers or other embedded systems without all of the overhead that Python would normally require. Luckily enough, the NTP libraries are built right in so once MicroPython is running on the ESP32 it’s nearly as easy as calling the library. Of course you will have to make sure there is an internet connection, and then grab the time, sync it to the machine, and then set the timezone.

For a bonus exercise, the project’s creator [Bhavesh] suggests attempting to configure Daylight Savings Time, although this can be a surprisingly difficult problem to solve. In the meantime, there are a few other ways of installing a clock on a microcontroller like this one. An RTC module is an obvious choice, but you can also get incredibly accurate time by using a GPS module as well.

Raspberry Pi Pico Makes For Expeditious Input Device

With its copious number of GPIO pins and native USB, the Raspberry Pi Pico is arguably the ideal microcontroller for developing your own platform agnostic USB Human Input Devices. But you don’t have to take our word for it. Check out how quickly the $4 USD board allowed [Alberto Nunez] to put together a pair of foot pedals for his computer.

Wiring doesn’t get much easier than this.

A peek inside the enclosure reveals…well, not a whole lot. All that’s hiding inside that heavy-duty plastic box is the Pi Pico and some screw down terminals that let [Alberto] easily wire up the female bulkhead connectors for the pedals themselves. Incidentally, while you could certainly make your own pedals, the ones used for this project appear to be the sort of commercially available units we’ve seen used in similar projects.

With the hardware sorted, [Alberto] just needed to write the software. While he could have taken the easy way out and hard coded everything, we appreciate that his CircuitPython script loads its configuration from a text file. This allows you to easily configure which GPIO pins are hooked up to buttons, and what key codes to associate them with. He didn’t really need to go through this much effort for his own purposes, but it makes the project far easier to adapt for others, so our hats off to him.

If you’re looking for a bit more inspiration, our very own [Kristina Panos] put together a Python-powered macro foot stool that you can put under your desk for rapid fire keyboard shortcuts. Plus you can stand on it to reach the top shelf, if need be.