When the Raspberry Pi people launched their RP2040 microcontroller, it seemed as though it might be destined as a niche product for those areas in which the Pi has traditionally been strong. But during the global semiconductor shortage, it has remained almost alone among microcontrollers in having plenty of fab capacity to keep the supplies rolling. That, and its very vanilla set of ARM peripherals alongside those programmable state machines have thus seen it find a home in many places it might not otherwise have seen. Take the dual RP2040 motor controller from [Twisted Fields] as an example, would it have been more likely to have sported an STM32 in previous years?
It’s been produced as part of the Acorn Precision Farming Robot platform, and it’s a fully open-source two-channel controller on a board the same size as a credit card. The schematic appears fairly conventional through a cursory glance at the PDF, but we know from experience that motor controllers are never as deceptively simple to get right as their circuit would lead the unwary engineer to believe. The heat dissipation, current, and transient handling all play a part in a successful design, and we expect this one to evolve to fix any issues it might still contain.
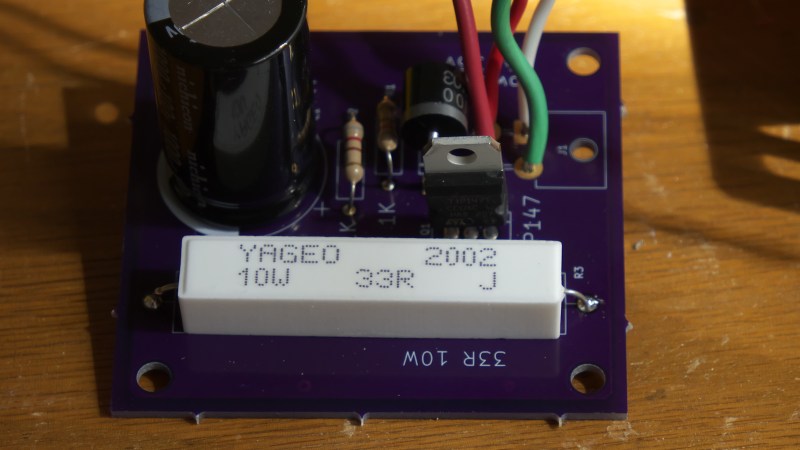
[Mark Rehorst] tells us about a tragic incident involving an untimely demise of $200 worth of motor driving hardware, and shares a simple circuit so that we can prevent such tragedies in the future. His Arrakis sand table project has quite a few motors involved, and having forgotten to add limits into the software, he slammed a motor-driven mechanism into a well-fixed part of the table. The back EMF of the motor created a burst of energy, taking out the motor driver, the controller board, and the power supply.
With the postmortem done, he had to prevent this from happening again – preferably, in hardware. Based on a small appnote from Gecko Drives, he designed a simple PCB that shunts the motor with a high-power resistor, as soon as the current starts flowing into a direction it’s not supposed to flow into. He goes in depth about the way that the circuit works and the reasoning behind parts selection, as well as shows an LTSpice simulation and shares the PCB files. This was his first time designing PCBs in KiCad, and we believe he’s done a great job! This worklog is certainly worth reading if you’d like to understand how such circuits work and what goes into building one.
He dubs this a “bank account protection” circuit, and we can absolutely relate. It’s not just CNC tables that need such protections of course – we’ve seen a solution for small hacky makeshift electric vehicles, for instance. A motor’s generative properties aren’t always a problem, however – here’s just one example of a hacker trying to put them to good use.
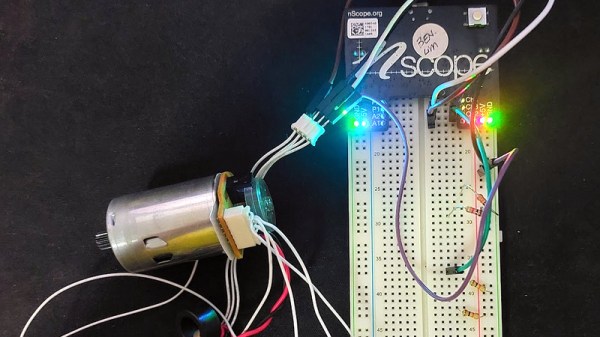
If you follow the world of small microcontrollers you will certainly be familiar with the usual fare of Atmel, ARM Cortex, PIC, and others. But these aren’t the smallest or cheapest devices, below them is an entire category of grain-of-dust microcontrollers with minimal capabilities and at rock bottom prices. Maybe the most well known are the Padauk series of chips, whose PIC12-like architecture can be had for literal pennies. These are the famous 3 cent microcontrollers, but despite their fame they have a bit of a reputation in our community for being difficult to work with. [Ben Lim] dispels some of those ideas, by Padauk-enabling a motor and encoder from a printer to make a three cent motor controller.
The Padauk doesn’t have on-chip peripherals such as SPI, instead its IDE provides bit-banging code to do the job. This and some PID motor controller code makes for a straightforward task on the little chip, and with the help of a probably considerably more expensive MAX14870 it can drive the motor. For the curious, the code can be found in a Git Hub repository. There may be more accomplished motor controllers to be found, but we doubt you’ll find one with a cheaper microcontroller.
When [Vitor Melon] found out there was a custom firmware (CFW) available for his Xiaomi Mijia M365 Pro electric scooter that would increase his top end speed, naturally he installed it. Who wouldn’t want a little more performance out their hardware? But while the new firmware got the scooter running even better than stock, he does have a cautionary tale for anyone who might decide to ride their Mijia a bit harder than the fine folks at Xiaomi may have intended.
Now to be clear, [Vitor] does not blame the CFW for the fact that he cooked the control board of his Mijia. At least, not technically. There was nothing necessarily wrong with the new code or the capabilities it unlocked, but when combined with his particular riding style, it simply pushed the system over the edge. The failure seems to have been triggered by his penchant for using the strongest possible regenerative breaking settings on the scooter combined with a considerably higher than expected velocity attained during a downhill run. Turns out that big 40 flashing on the display wasn’t his speed, but an error code indicating an overheat condition. Oops.
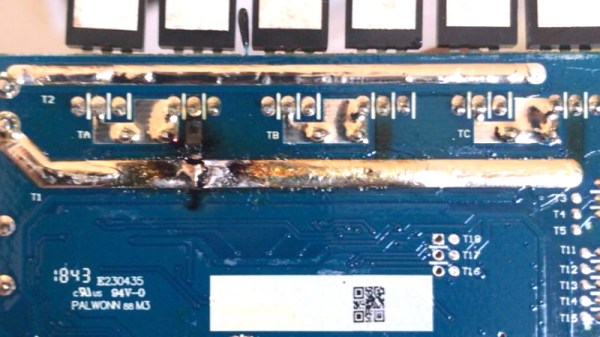
Results of the PCB repair.
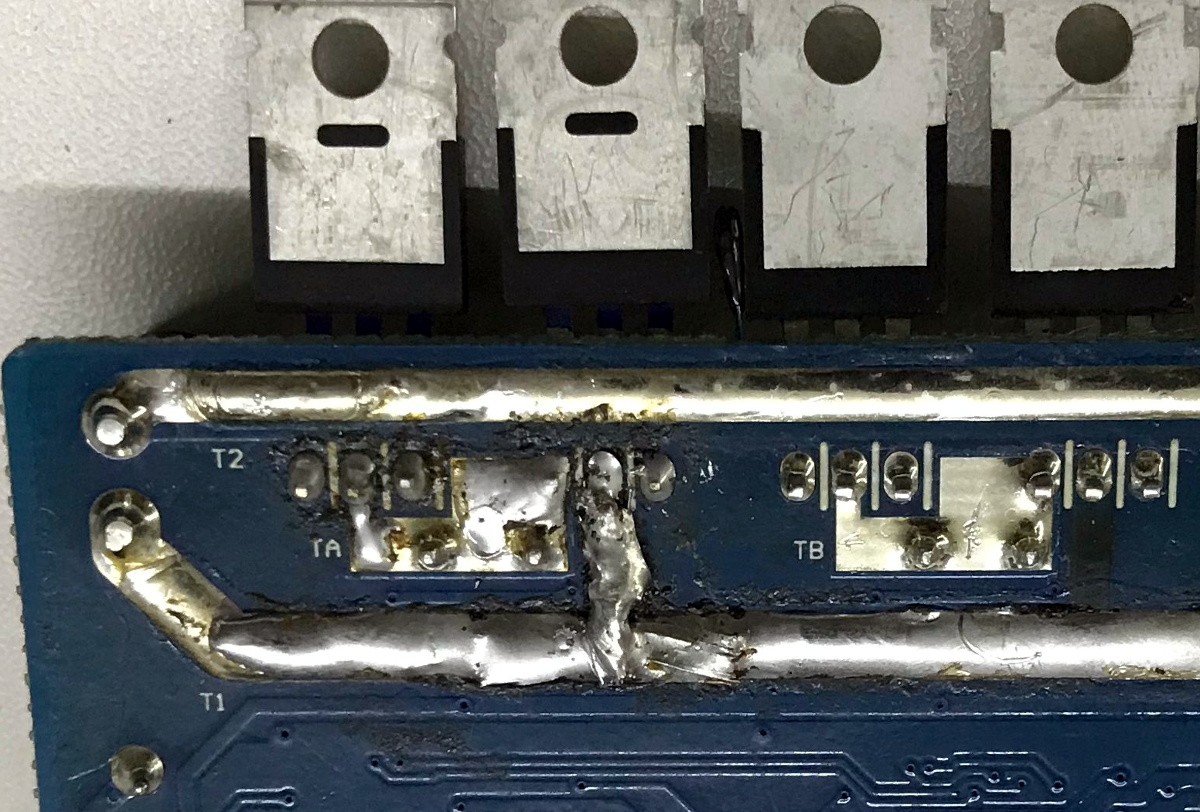
After a long and embarrassing walk home with his scooter, complete with a passerby laughing at him, [Vitor] opened the case and quickly identified the problem. Not only had the some of the MOSFETs failed, but a trace on the PCB had been badly burned through. Judging by the discoloration elsewhere on the board, it looks like a few of its friends were about to join in the self-immolation protest as well.
After a brief consultation with his graybeard father, [Vitor] replaced the dead transistors with higher rated versions and then turned his attention to the damaged traces. A bit of wire and a generous helping of solder got the main rail back in one piece, and he touched up the areas where the PCB had blackened for good measure.
A quick test confirmed the relatively simple repairs got the scooter up and running, but how was he going to prevent it from happening again? Reinstalling the original firmware with its more conservative governor was clearly no longer an option after he’d tasted such dizzying speeds, so instead he needed to find out some way to keep the controller cooler. The answer ended up being to attach the MOSFETs to the controller’s aluminum enclosure using thermal pads. This allows them to dissipate far more heat, and should keep a similar failure from happening again. You might be wondering why the MOSFETs weren’t already mounted this way, but unfortunately only Xiaomi can explain that one.
It may have been designed for a sewing machine, but [Haris Andrianakis] found his imported DC brushed motor was more than up to the challenge of powering his mini lathe. Of course there’s always room for improvement, so he set out to reverse engineer the motor’s controller to implement a few tweaks he had in mind. Unfortunately, things took an unexpected turn when plugging his AVR programmer into the board’s ISP socket not only released the dreaded Magic Smoke, but actually tripped the breaker and plunged his bench into darkness.
Studying how the Hall-effect sensors in the motor are wired.
Upon closer inspection, it turned out the board has no isolation between the high voltage side and its digital logic. When [Haris] connected his computer to it via the programmer, the 330 VDC coming from the controller’s rectifier shorted through the USB bus and tripped the Earth-leakage circuit breaker (ELCB). The good news is that his computer survived the ordeal, and even the board itself seemed intact. But the shock must have been too much for the microcontroller he was attempting to interface with, as the controller no longer functioned.
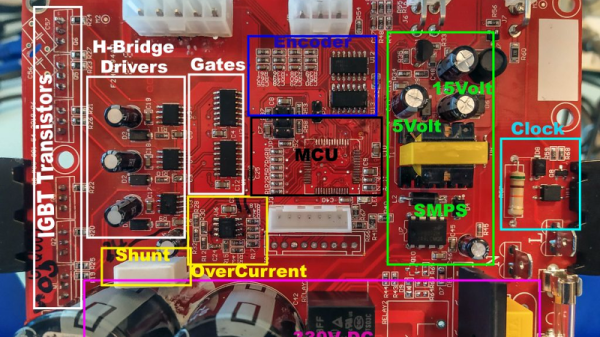
Now fully committed, [Haris] started mapping out the rest of the controller section by section. In the write-up on his blog, he visually masks off the various areas of the PCB so readers have an easier time following along and understanding how the schematics relate to the physical board. It’s a nice touch, and a trick worth keeping in mind during your own reverse engineering adventures.
In the end, [Haris] seems to have a good handle on what the majority of the components are up to on the board. Which is good, since getting it working again now means replacing the MCU and writing new firmware from scratch. Or perhaps he’ll just take the lessons learned from this controller and spin up his own custom hardware. In either event, we’ll be keeping an eye out for his next post on the subject.
There’s no project that dives into existential quandaries more than a useless machine, as they can truly illustrate the futility of existence by turning themselves off once they have been powered on. Typically this is done with a simple switch, but for something that can truly put the lights out, and then re-illuminate them, [James]’s latest project is a useless machine that performs this exercise with a candle.
The project consists of two arms mounted on a set of gears. One arm has a lighter on it, and the other has a snuffer mounted to a servo motor. As the gears rotate, the lighter gets closer to the candle wick and lights it, then the entire assembly rotates back so the snuffer can extinguish the flame. Everything is built around an Arduino Nano, a motor driver powering a Pitman gear motor, and a set of Hall effect sensors which provide position data back to the microcontroller.
If you’re in the mood for a little existential angst in your own home, [James] has made the project files available on his GitHub page. We always appreciate a useless machine around here, especially a unique design like this one, and one which could easily make one recognize the futility of lighting a candle at all.
Assistive devices for people with disabilities can make an inestimable difference to their lives, but with a combination of technology, complexity, and often one-off builds for individual needs, they can be eye-wateringly expensive. When the recipient is a young person who may grow out of more than one device as they mature, this cost can be prohibitive. Some way to cut down on the expense is called for, and [Phil Malone] has identified the readily available hoverboard as a possible source of motive power for devices that need it.
Aside from being a children’s toy, hoverboards have been well and truly hacked; we’ve featured them in Hacky Racers, and as hacker camp transport. But this is an application which demands controllability and finesse not needed when careering round a dusty field. He’s taken that work and built upon it to produce a firmware that he calls HUGS, designed to make the hoverboard motors precisely controllable. It’s a departure from the norm in hoverboard hacking, but perhaps it can open up new vistas in the use of these versatile components.
There is much our community can do when it comes to improving access to assistive technologies, and we hope that this project can be one of the success stories. We would however caution every reader to avoid falling into the engineer savior trap.