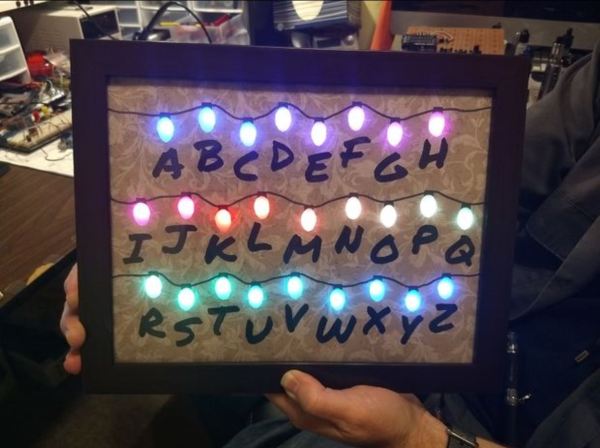
An IoT Christmas Tree For Your Hacker-Mas Celebrations

Smart Christmas trees may soon come to mean something more than a fashionably decorated tree. Forging ahead with this new definition, [Ayan Pahwa], with help from [Akshay Kumar], [Anshul Katta], and [Abhishek Maurya] turned their office’s Christmas Tree into an IoT device you can watch live!

As an IoT device, the tree relies on the ever-popular ESP8266 NodeMCU — activated and controlled by Alexa, as well as from a web page. The LEDs for the tree — and the offline-only tree-topper controlled by an Arduino Pro Mini — are the similarly popular Neopixels.

For those viewing online, a Raspberry Pi and camera have been attached to this project to check out the tree’s lighting. To make that possible, [Pahwa] had to enlist the use of ngrok to make the Pi’s –normally — LAN-only camera server accessible over the internet. The aforementioned web page was coded in Javascript/CSS and hosted on a server running an instance of Ubuntu 16.04.

Continue reading “An IoT Christmas Tree For Your Hacker-Mas Celebrations”

Touch Panels Make This Christmas Tree Interactive

The city of Liverpool, famously known as both the home port of the Titanic and the birthplace of The Beatles, also seems to have a thing for interactive public art installations. Witness this huge interactive Christmas tree that can be played by passersby.

The display in the city’s busy Williamson Square was commissioned by a municipal business group and built by [Adrian McEwen]. The idea was to adorn the 10-meter natural tree with large geometric ornaments covered with Neopixel strips. [Adrian] documents the build process in some detail, including that fact that over 170 meters of WS2812b strips went into the ornaments for the tree. While the strips themselves at IP68 rated, the connections needed when attaching them to the custom-made frames were not, and that had to be overcome with ample application of heat-shrink tubing. OctoWS2811 adapter boards were dangled about the tree to control the lights and connected together with garlands of Ethernet cables. Pressure sensors were used to control the lights when the EMI from the beefy power supplies needed to run everything proved too much for the original touch sensors. After a lot of bench testing and a few long nights working with the city crew to hang the display, passing Liverpudlians can now play the tree and enjoy the Christmas season.

Would you rather a smaller display for your own Christmas tree? This somewhat hyperactive indoor light show might be what you’re looking for.

Continue reading “Touch Panels Make This Christmas Tree Interactive”

The Smartest Air Freshener In The Room

Many automatic air fresheners are wasteful in that they either ceaselessly spritz the room, and manual ones need to be — well — manually operated. This will not do in an era of smart products, so Instructables user [IgorF2] has put together an air freshener that does more than check if you’re around before freshening things up.

The air freshener uses a NodeMCU LoLin and an MG 995 servomotor, with a NeoPixel ring acting as a status light. Be aware — when the servo is triggered there is a significant spike in current, so be sure you aren’t powering the air freshener from a PC USB port or another device. After modeling the air freshener’s case in Fusion 360 — files available here — [IgorF2] wired the components together and mounted them inside the 3D printed case.

Hardware work completed, [IgorF2] has detailed how to set up the Arduino IDE and ESP8266 support for a first-time-user, as well as adding a few libraries to his sketch. A combination of an Adafruit.IO feed and ITTT — once again, showing the setup steps — handles how the air freshener operates: location detection, time specific spritzing, and after tapping a software button on your phone for those particularly lazy moments.

Continue reading “The Smartest Air Freshener In The Room”

Color Changing Clock Uses PCB Digits

There’s an old saying, that you should do everything at least twice. Once to learn how to do it, and then a second time to do it right. Perhaps [Zweben] would agree, since he wasn’t satisfied with his first Neopixel clock and proceeded to build another one. One lesson learned: soldering 180 tiny solder joints isn’t much fun. This time, [Zweben] set out to make a printed circuit board and redesign the clock to make it easier to assemble.

The clock uses multiple copies of a single circuit board. The board holds Neopixel strips in a 7-segment arrangement. Each board can also hold all of the electronics needed to drive the clock. Only the first board gets the microcontroller and other circuits.

Continue reading “Color Changing Clock Uses PCB Digits”

A Minimalist Weather Clock With A Unique Display

If you’re looking for a home hub to display weather, time, and important family information, the formula is pretty simple: build yet another “magic mirror” project. We’re not complaining — magic mirrors look great. But if all you need is time and weather, this elegant pixel display is something just a little bit different.

Among his many criteria for the perfect hack, [Dominic] lists usefulness, visual appeal, and low cost. We’ll agree that his minimalist weather clock hits all those marks, and with the careful selection of a 16 x 32-pixel RGB display module, [Dominic] ended up giving back to the community by developing an Arduino driver for it. He points out that strips of Neopixels could have been used for the display, but they’d have ended up costing more, so the LED matrix was a sensible choice. A 3D-printed separator grid and a paper diffuser provide the proper pixelated look, and some simple animated icons display the two-day weather forecast. We find the time and temperature numerals a little hard to read, but it’s not bad considering the limited resolution of the display. And the case is a nice bit of woodworking too. Not a bad result for only €43.

We’re intrigued by the P10 LED matrix module [Dominic] used for this one. It might be a good choice for a word clock and weather station, or with his driver, a display for just about anything.

Look Out DotStar, Here Comes Lumenati

Adafruit has long been the undisputed ruler of the smart LED product, with their WS2812B (NeoPixel) and APA102C (DotStar) product lines dominating due to the robust assortment of sizes and form factors, as well as their ease of use. SparkFun Electronics recently announced Lumenati, their new line of APA102C breakouts that feature some intriguing features which do a good job of distinguishing the two lines.

First, the screen-printing on the boards include pixel numbers. We were working on NeoPixel assemblies the other day and keeping track of pixels was a nightmare. In addition, the Lumenati boards are meant to combine into larger creations, allowing you to make complicated shapes. SparkFun supports this by giving the boards castellated headers — far better than the solder pads! If you are running into logic conflicts with the boards you can solder in jumpers to bypass the data connections and control individual boards separately. On the down side, SparkFun’s intitial offerings — 6 products — still can’t compete with Adafruit’s, like their 255-LED disk, shields, strips, matrices, and flexible PCBs.

We’ve published a few DotStar builds over the years, like this violin bow lightsaber and the Magicshifter POV stick. Maybe we’ll start seeing some Lumenati builds? Continue reading “Look Out DotStar, Here Comes Lumenati”

A Solar Freakin’ Walkway

Looking to add a little pizzazz to your back garden? Are those strings of lights hung in the trees looking a little dated? Why not try lighting your garden path with DIY solar-powered pavers?

If [jfarro]’s project looks like a miniature version of the much-touted solar freakin’ roadways concept, rest assured that there are huge differences. For one, these lighted pavers actually work — trust me on this; I live not far from the demo site for the Solar Roadways and the degree to which it underwhelms cannot be overstated. Granted, a garden path is a lot simpler to engineer than a road, but many of the challenges remain.

Using recycled glass blocks that are usually reserved for walls and windows, [jfarro] figured out how to attach Neopixel rings to the underside and waterproof them with a silicone conformal coating. The 12 lighted pavers he built draw considerable current, so a 45-watt solar array with charge controller and battery were installed to power the pavers. An Arduino and a motion sensor control the light show when someone approaches; more complicated programs are planned.

Hats off the [jfarro] for taking on a project like this. We don’t often see builds where electrical engineering meets civil engineering, and even on a small scale, dealing with dirt, stone, and water presents quite a few challenges. Here’s hoping his project lasts longer than the Solar Roadways project did.

Continue reading “A Solar Freakin’ Walkway”