Repairs You Can Print: 3D Printing Is For (Solder) Suckers

[Joey] was about to desolder something when the unthinkable happened: his iconic blue anodized aluminium desoldering pump was nowhere to be found. Months before, having burned himself on copper braid, he’d sworn off the stuff and sold it all for scrap. He scratched uselessly at a solder joint with a fingernail and thought to himself: if only I’d used the scrap proceeds to buy a backup desoldering pump.

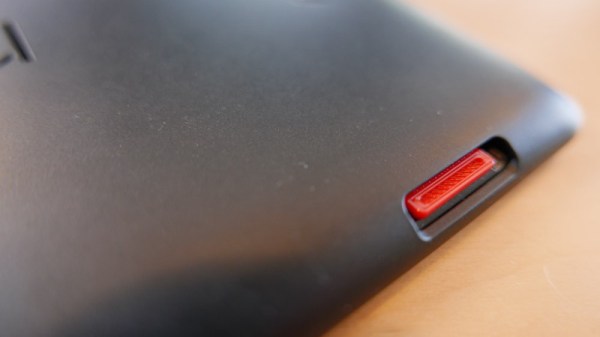
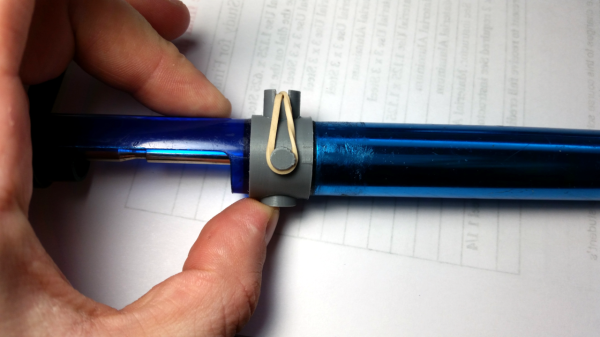
Determined to desolder by any means necessary, [Joey] dove into his junk bin and emerged carrying an old pump with a broken button. He’d heard all about our Repairs You Can Print contest and got to work designing a replacement in two parts. The new button goes all the way through the pump and is held in check with a rubber band, which sits in a groove on the back side. The second piece is a collar with a pair of ears that fits around the tube and anchors the button and the rubber band. It’s working well so far, and you can see it suck in real-time after the break.

We’re not sure what will happen when the rubber band fails. If [Joey] doesn’t have another, maybe he can print a new one out of Ninjaflex, or build his own desoldering station. Or maybe he’ll turn to the fire and tweezers method.

Continue reading “Repairs You Can Print: 3D Printing Is For (Solder) Suckers”

Careful Testing Reveals USB Cable Duds

What’s worse than powering up your latest build for the first time only to have absolutely nothing happen? OK, maybe it’s not as bad as releasing the Magic Smoke, but it’s still pretty bewildering to have none of your blinky lights blink like they’re supposed to.

What you do at that point is largely a matter of your troubleshooting style, and when [Scott M. Baker]’s Raspberry Pi jukebox build failed to chooch, he returned to first principles and checked the power cable. That turned out to be the culprit, but instead of giving up there, he did a thorough series of load tests on multiple USB cables to see which ones were suspect, with interesting results.

[Scott] originally used a cable with a USB-A on one end and a 3.5-mm barrel plug on the other with a switch in between, under the assumption that the plug on the Pi end would be more robust, as well as to have a power switch for the jukebox. Testing that cable using an adjustable DC load would prove that the cable was unfit for Pi duty, dropping the voltage to under 2 volts at a measly 500-mA load. Other cables proved much better under load, even those with USB mini jacks and even one with a 5.5-mm barrel. But the larger barrel-plug cable also proved to be a stinker when it was paired with an inline switch. In the video below, [Scott] walks through not only the testing process, but also gives a quick tour of his homebrew DC load.

The lesson is clear: not all USB cables are created equal, so caveat hacker. And if you’ve got a yen to check the cables in your junk bin like [Scott] did, this full-featured smart DC load might be just the thing.

Continue reading “Careful Testing Reveals USB Cable Duds”

You Can Learn A Lot From A Blinkenrocket

At this year’s Chaos Communication Congress, we caught up with [muzy] and [overflo], who were there with a badge and soldering project they designed to teach young folks how to solder and program. Blinkenrocket is a basically a 64-LED matrix display and just enough support hardware to store and display animations, and judging by the number of blinking rockets we saw around the necks of attendees, it was a success.

Their talk at 34C3 mostly concerns the production details, design refinements, and the pitfalls of producing thousands of a thing. If you’re thinking of building a hardware kit or badge on this scale, you should really check it out and crib some of their production optimization tricks.

For instance, instead of labelling the parts “C2” or “R: 220 Ohms”, they used a simple color-coding scheme. This not only makes it easier for kids to assemble, but it also means that they didn’t have to stick 1,000 part labels on every component. Coupled with [overflo]’s Zerhacker, SMD parts in strips were cut to the right length and color-coded in one step, done by machine.

The coolest feature of the Blinkenrocket itself is the audio programming interface. It’s like in the bad old days of software stored on cassette tapes, but it’s a phenomenal interface for getting a simple animation out of a web app and straight into a piece of minimal hardware — just plug it into a laptop or cell phone’s audio out and press “play” in the browser. The original design tried to encode the data in the pulse-length of square waves, but this turned out to be very hardware dependent. The final design used frequency-shift keying. What’s old is new again.

Everything you could want to know about the design, its code, and even the website itself are up on the project’s GitHub page, so go check it out. If you’d like to arrange a Blinkenrocket workshop yourself, shoot [muzy] or [overflo] an e-mail. Full disclosure: [overflo] gave us a kit, the “hard-mode” SMD one with 0805 1206 parts, and it was fun to assemble and program.

Next Week: Vintage Computer Festival Pacific Northwest

Next week something magical is happening. Seattle is getting a Vintage Computer Festival. It’s the Vintage Computer Festival Pacific Northwest, and it’s happening Saturday, February 10th and Sunday, February 11th at the Living Computers Museum and Labs.

As with all Vintage Computer Festivals, this is one with plenty of exhibits, speakers, and the ever-popular consignment shop. A few of the more interesting exhibits include a demonstration of the Syntauri alphaSyntauri, a synthesizer card and controller designed for the Apple II. When it was released in 1980, this was the first affordable digital synthesizer that competed against the Synclavier and Fairlight CMI. The difference? Synclaviers cost as much as a house, where the alphaSyntauri cost as much as a car. Also on deck is the dis-integrated MOnSter6502, a complete NMOS 6502 constructed out of individual, surface mount transistors. The Digi-Comp II from Evil Mad Scientist will be there, there will be BlinkenBones, and for anyone who wants to assemble their own front panel for a vintage minicomputer, [Oscar Vermeulen] will be there with the Pi-DP/8. This isn’t an event to miss.

As an aside, we’d really like to commend the Vintage Computer Federation for their incredible work in putting these shows together. The VCF West at the Computer History Museum in Mountain View is an incredible show, VCF Southeast has some amazing displays, and VCF East in New Jersey is a pretty incredible gathering going down May 18th through the 20th this year. The people working behind the scenes to make these shows happen are doing a service for all vintage computers and performing digital archeology that benefits us all.

Hackaday is proud to be a sponsor of VCF Pacific Northwest.

Printed Nexus 7 SIM Tray Is Good ‘Nuff

When repairing something, there are in effect two schools of thought: you can craft a repair that seamlessly blends into the original hardware and doesn’t look like a repair, or you can slap that thing together and keep it moving. A lot of variables go into this decision making process, such as the complexity of the repair, the available materials, and of course whether or not you need to keep the fact you broke the thing from your significant other.

When the SIM holder on his Nexus 7 tablet broke recently, [Alex Whittemore] did the mental arithmetic and came to the conclusion that it wasn’t worth his time trying to figure out how to model an exact replacement. But he was able to print something that works well enough for his purposes, which is all that matters in the end. A perfect entry for our ongoing “Repairs You Can Print” contest.

You must be this small to ride

Apparently the SIM holder in the 2013 Nexus 7 is notoriously poor, and of course since this is a known issue, online retailers are trying to get as much as $100 USD out of you for a tiny sliver of plastic. Sometimes it really seems like Google was determined to run the Nexus line into the ground before bailing on it.

Printing such a tiny part, especially with the little details like the channel for you to hook your fingernail into, requires a fairly well calibrated printer. If you can’t muster up a 0.1mm first layer you might as well sit this one out; and if you haven’t mastered the art of bridging, that little valley to help you get the SIM back out may end up overflowing into a river of tears.

For [Alex], the piece ended up working perfectly. It might look a little weird, but if you’ve got the tablet in a case you’ll never see it anyway. It’s also worth noting that this design may work on other devices with a similar SIM arrangement, or at the very least, might be a good starting point to work from if you’ve got to come up with your own.

Remember, there’s still plenty of time to enter your own printed fix into our “Repairs You Can Print” contest. The top 20 repairs will take home $100 in Tindie credit, and for the best repair done by a Student or Organization, there’s two Prusa i3 MK3 printers with the Quad Material upgrade kits on the line.

I’ll Have A Beer With A Compliment Chaser

[Andrew MacPherson] found out that compliments, even insincere ones, make the recipients feel better. So, he put together a thermal printer and a hilariously large button with an Arduino and created a machine that prints compliments. And where best to put a machine that prints out compliments? The local bar, where else?

An Arduino Nano clone runs the show connected to a thermal printer. The Nano clone didn’t like the 9 volt power supply, so a buck converter was used to reduce the voltage down to 5 volts for the Nano, while the printer gets the full power. During initial trials, the printer was very slow to print and it took [Andrew] a while to adjust the parameters – after tweaking the speed as well as the heating time, he was able to get the printer working without burning the paper or taking forever to print.

Once the machine was working, it was time to add a button. A large, light-up button was connected and glued to the side of the printer. More glue was used (after some “modifications” to the printer chassis) to secure a barrel connector for the power adapter.

[Andrew] decided that since he’s down at his favorite bar quite a lot, he’d set it up there. The customers could push the button and receive a compliment while drowning their sorrows. He got a friend of his who’s a copywriter to come up with some nicely written compliments to print out. The printer was such a hit that the bartender sent [Andrew] a message on Facebook saying so. If you have a thermal printer lying around, you can use this tutorial to connect it to the internet, or, if you don’t have one, you can build your own.

Continue reading “I’ll Have A Beer With A Compliment Chaser”

Linux Fu: A Little Help For Bash

It isn’t uncommon these days for a programmer’s editor to offer you help about what you are typing, ranging from a pop up with choices to a full-blown code template. If you have written a million lines of code in the language, this might even annoy you. However, if you use it only occasionally, these can be very helpful. I’ve used Unix and Linux for many years, but I realize that there are people who don’t use it every day. With the Raspberry Pi, Linux servers, and Windows 10 having a bash shell, there are more people using a shell “every once in a while” than ever before. Could you use a little help? If so, you might try bashelp: a little something I put together while writing about bash completion.

There’s good news and bad news. The good news is that Unix has a built-in help command — man — and has for some time. The bad news is that you need to stop what you are typing and enter a man command to use it. Man, by the way, is short for manual.

There are GUI front-ends to man (like yelp, on the left) and you can even use a web browser locally or remotely. However, none of these are connected to what you are typing. You have to move to another window, enter your search term, then go back to your typing. That got me to thinking about how to get a sort of context-sensitive inline help for bash.

Continue reading “Linux Fu: A Little Help For Bash”