Don’t Miss The Bus: A One-Day Build

Sometimes the most satisfying hacks are those that spring from a situation where resources are limited, either by choice or by chance. Constraints tend to stir the creative juices.

Serial Hackaday poster [limpkin] limited himself to a one-day build with what he had on hand for this bus-route countdown timer. Full points for actually building something useful, and extra credit for making something to keep his wife from being late for work.

The principle is simple: scrape a web page to find out how much time is left before either of two busses leaves his wife’s stop, and display the number of minutes left on a huge LED display. The parts bin gave up everything needed, including an ESP8266, a boost converter, a charge controller, and the display and driver. We’re skeptical that the PCB was fabricated the same day; looks like [limpkin] is only counting the design and coding time in his 10-hour build. Still, it’s a testament to what’s possible with a deep inventory and the skills to put it to use.

Check out some of [limpkin]’s other hacks, like this Formula-E race car PCB or his adventures in laundry larceny. Oh, and he also used to write for Hackaday.

Drag Your Office Aircon Into The 21st Century With Wi-Fi Control

We’ll all have worked in offices that have air-conditioning, but a little too much of it. It’s wonderful on a baking-hot day to walk into the blessèd cool of an air-conditioned office, but after an hour or two of the icy blast you’re shivering away in your summer clothing and you skin has dried out to a crisp. Meanwhile on the other side of the building [Ted] from Marketing has cranked up the whole system to its extreme because he’s got a high metabolism and an office in the full force of the midday sun.

Wouldn’t it be nice if individual air-conditioning units could be easily controlled. To that end, [Maya Posch] has made a rather nicely designed board that takes a NodeMCU board with its ESP8266 processor, and uses four of its outputs as PWM to produce 0-10 volt analogue outputs via filters and op-amps to control individual units. In addition there is an onboard CO2 sensor and a temperature sensor, with provision for an external temperature sensor. The whole fits very neatly into a standard electrical outlet enclosure.

Software wise, the system uses the Sming framework providing an MQTT  communication with a backend server that allows the users to control their aircon experience. This is very much a work in progress, so the software has yet to be put up. (Hint, [Maya], hint!) The whole project though is an extremely tidy build, in fact a thing of beauty to a standard you’d expect from a high-quality commercial product. It’s this that tipped the balance into our featuring it before the software is released, it’s one to keep an eye on, because quality like this doesn’t come every day.

This isn’t the first aircon control we’ve brought you, take a look at this one controlled through Slack.

Custom Parts Put IKEA Window Shades On IoT

No matter what the project is about, we’re always suckers for nicely integrated builds with good fit and finish. There’s a certain appeal to rat’s nest wiring on a breadboard, and such projects are valuable because they push the limits. But eventually you need to go from prototype to product, and that’s where this IKEA window shade automation project shines.

Integration is more than just putting everything in a nice box, especially for home automation gear – it really needs to blend. [ehsmaes] roller blind motorization project accomplishes that nicely with a 3D-printed case for the electronics, as well as a custom case for the geared stepper motor to drive the shade. The drive replaces the standard spring-loaded cap on the end of the IKEA Tupplur shade, and the neutral color of both cases blends nicely with the shade and surroundings. The control electronics include a NodeMCU and a motor shield; [eshmaes] warns that narrow shades work just fine off of USB power, but that wider windows will need a power boost. The IoT end of things is taken care of by MQTT and OpenHab, allowing the shades to be raised and lowered to any position. The short video below shows the calibration procedure for the shade.

Need a primer on MQTT? We’ve got you covered. Or perhaps you need to control the windows rather than the treatments.

Continue reading “Custom Parts Put IKEA Window Shades On IoT”

Broadcasting Bluetooth Beacons With Bubbles

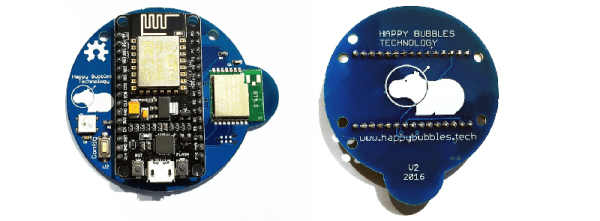
Bluetooth beacons have only been around for a few years, but the draw is incredible. With Bluetooth beacons, your phone is location aware, even with location services are turned off. They’re seen in fast food joints, big box retailers, and anywhere else there’s a dollar to be made. [Nemik] has been working on a home automation project, and came up with a use for Bluetooth beacons that might actually be useful. It’s a WiFi-based Bluetooth beacon notifier that scans the area for beacons and forwards them to an MQTT server.

[Nemik]’s ‘Presence Detector’ for Bluetooth advertisements is actually a surprisingly simple build, leveraging the unbelievably cheap wireless modules available to us today. The WiFi side of the equation is a NodeMCU v2 ESP8266 dev board that provides all the smarts for the device via Lua scripting. The Bluetooth side of the board is a PTR5518 module that has a nRF51822 tucked inside. With the right configuration, this small board will listen for BLE advertisements and forward them to an MQTT server where they can be seen by anyone on the network.

[Nemik] is selling these beacon to WiFi bridges, but in the spirit of Open Hardware, he’s also giving away the designs and firmware so you can make your own. If you ever have an abundance of Bluetooth beacons sitting around and want to make a beacons of Things thing, this is the build for it.

Hackaday Prize Entry: DIY Automatic Tool Changer

Choosing between manually changing endmill bits on a CNC machine and investing in an expensive automated solution? Not for [Frank Herrmann], who invented the XATC, an eXtremely simple Automated Tool Changer. [Frank’s] ingenious hack achieves the same functionality as an industrial tool changer using only cheap standard hardware you might have lying around the workshop.

xatc_carouselLike many ATCs, this one features a tool carousel. The carousel, which is not motorized, stores each milling bit in the center bore of a Gator Grip wrench tool. To change a tool, a fork wrench, actuated by an RC servo, blocks the spindle shaft, just like you would do it to manually change a tool. The machine then positions the current bit in an empty Gator Grip on the carousel and loosens the collet by performing a circular “magic move” around the carousel. This move utilizes the carousel as a wrench to unscrew the collet. A short reverse spin of the spindle takes care of the rest. It then picks another tool from the carousel and does the whole trick in reverse.

The servo is controlled via a WiFi connected NodeMCU board, which accepts commands from his CNC controller over HTTP. The custom tool change sequences are provided by a few JavaScript macros written for the TinyG workspace on chilipeppr.com, a browser-based G-code host. Enjoy the video of [Frank Herrmann] explaining his build!

Thanks to Smoothieboard creator [Arthur Wolf], who is currently working on a similar project, for the tip!

The HackadayPrize2016 is Sponsored by:

Minimal MQTT: Power And Privacy

In this installment of Minimal MQTT, I’m going to cover two loose ends: one on the sensor node side, and one on the MQTT server side. Specifically, I’ll tackle the NodeMCU’s sleep mode to reduce power and step you through bridging MQTT servers to get your data securely out of your home server and into “the cloud”, which is really just other people’s servers.

If you’re just stepping into this series now, you should really check out the other three posts, where I set up a server, then build up some sensor nodes, and then flesh-out a few ways to control everything from your phone or the web. That’s the coolest material, anyway. This last installment just refines what we’ve built on. Let’s go!

Continue reading “Minimal MQTT: Power And Privacy”

Minimal MQTT: Control And Clients

So you’ve built a central server and filled your house with WiFi-connected nodes all speaking to each other using the MQTT protocol. In short, you’ve got the machine-to-machine side of things entirely squared away. Now it’s time to bring the humans into the loop! We’re going to explore a couple graphical user interfaces.

You could build a physical knob and/or LED display for every little aspect of your entire system, but honestly, this is where GUIs really shine. In this installment of Minimal MQTT, we’re going to look at human-friendly ways of consuming and producing data to interact with your connected sensors, switches, and displays. There are a ton of frameworks out there that use MQTT to build something like this, but we’re going to cut out the middle-man and go straight for some GUI MQTT clients.

Continue reading “Minimal MQTT: Control And Clients”