Hackaday Prize Entry: Glow In The Dark Plotting

We like big displays, whether they’re gigantic LED displays, CNC whiteboards, or a gigantic laser projectors. For his Hackaday Prize entry, [nilo] has come up with an easy way to create a huge graphical display. It might only work at night, but the Glowboard Plotter is still really cool.

[nilo]’s display is simply a very large glow in the dark sheet wrapped around two rollers, controlled by a stepper motor. By running the motor, the blank glow in the dark sheet slowly scrolls across.

To add some color to this display, [nilo] fixed 64 UV LEDs to one end of the display. By lighting these LEDs up at specific intervals and specific intensities, a ghostly green glowboard image appears across this display. Is it useful? About as much as any other gigantic LED matrix. Is it cool? About as much as any other gigantic LED matrix.

Right now, [nilo] is working on mk. 2 of the Glowboard Plotter, upgrading the control system and increasing the number of UV LEDs to 128. It may seem useless, but it’s still very cool and an excellent entry into the Anything Goes portion of this year’s Hackaday Prize.

The HackadayPrize2016 is Sponsored by:

Paraffin Oil And Water Dot Matrix Display

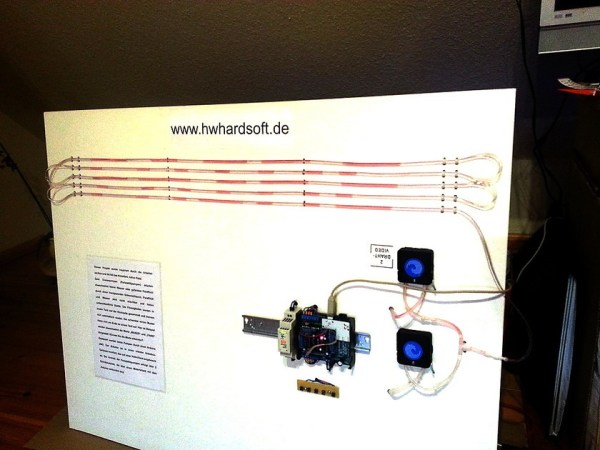
In preparation for Makerfaire, [hwhardsoft] needed to throw together some demos. So they dug deep and produced this unique display.

The display uses two synchronized peristaltic pumps to push water and red paraffin through a tube that switches back over itself in a predictable fashion. As visible in the video after the break, the pumps go at it for a few minutes producing a seemingly random pattern. The pattern coalesces at the end into a short string of text. The text is unfortunately fairly hard to read, even on a contrasting background. Perhaps an application of UV dye could help?

Once the message has been displayed, the water and paraffin drop back into the holding tank as the next message is queued up. The oil and water separate just like expected and a pump at the level of each fluid feeds it back into the system.

We were deeply puzzled at what appeared to be an Arduino mounted on a DIN rail for use in industrial settings, but then discovered that this product is what [hwhardsoft] built the demo to sell. We can see some pretty cool variations on this technique for art displays.

Continue reading “Paraffin Oil And Water Dot Matrix Display”

The Minima Is An All-Band HF Transceiver For Under $100

If you have ever browsed an amateur radio magazine you could be forgiven for receiving the impression that it is a pursuit exclusively for the wealthy. Wall-to-wall adverts for very large and shiny transceivers with hefty price tags abound, and every photograph of someone’s shack seems to sport a stack of them.

Of course, this is only part of the story. Amateur radio is and always has been an astonishingly diverse interest, and away from the world of shiny adverts you’ll find a lot of much more interesting devices. A lot of radio amateurs still design and build their own equipment, and the world of homebrew radio is forever producing new ideas.

One such project came to our attention recently, the Minima, an all-band HF SSB transceiver. It’s an interesting device for several reasons, it uses readily available components, it’s an impressively simple design, and it should cost under $100 to build. This might sound a little far-fetched, were it not from the bench of [Ashhar Farhan, VU2ESE], whose similarly minimalist BITX single band SSB transceiver set a new standard for accessible SSB construction a few years ago.

The circuit shares some similarities with the tried-and-tested BITX, using bi-directional amplifier building blocks. The mixers are now FETs rather than diodes, the intermediate frequency has moved from 9MHz to 20MHz, and the local oscillator is now an Arduino-controlled clock generator. The whole thing is designed to be built dead-bug-style if necessary, and two prototypes have been built. We’d expect this design to follow a similar evolution to the BITX, with the global community of radio amateurs contributing performance modifications, and no doubt with some kit suppliers producing PCBs and kits. We think this can only be a good thing, and look forward to covering some of the results.

We’ve featured [Ashhar]’s work here at Hackaday before, when we covered a BITX build. if you’re left wondering what this amateur radio business is all about, we suggest you have a read of [Bill Meara]’s guest post on the subject.

Thanks [Seebach] for the tip.

3D Printing Compressed Air Tanks

Using PVC pipe as a pressure vessel for compressed air can be a fun and enjoyable hobby. It’s safe, too: while there are are reports of PVC pipe being the cause of accidents, these accidents include a black powder potato gun[1], and welding too close to a PVC pipe containing compressed air[2]. Compressed air stored in a PVC pipe is never a proximal cause in any accident, and the OSHA’s Fatality and Catastrophe Investigation Summaries bear this out; there was no industrial or occupational accident recorded in these summaries where a pressure vessel made out of PVC was the cause of any injury or death[3].

Although PVC pipe can be a perfectly safe, effective, and cheap pressure vessel for hobby applications, it’s not always the best choice. A group of students in Renens, Switzerland are building autonomous robots for the Eurobot competition, and this year’s robot uses pneumatics. That means compressed air, and that means a pressure vessel. Since just about everything else on this robot is 3D printed, they asked the obvious question. Is it possible to 3D print a tank for compressed air?

The tank for this robot would only be used up to about 4 bar (400kPa), and after a few quick calculations, the team discovered the wall thickness – even in a pressure vessel with corners – would be pretty low. The first prototype, a 40mm cube with 20% infill and a hole drilled in the side, held 6.5 bar (650kPa) for an hour. This success didn’t last, though: he second prototype, a 65x40x80mm rectangular prism printed without as much infill, exploded at 5.5bar (550kPa).

The third time’s the charm, and with filleted ribs inside the tank, the third prototype was able to hold pressure up to 6.5 bar. Of course no 3D print is perfect, and the third prototype did leak, but a bit of acrylic spray paint applied to the outer surfaces held the air in.

While it’s not as fun, easy, cheap, rewarding, or safe as using PVC pipe as a pressure vessel, the team did manage to build a 3D printed pressure vessel with a custom shape. You can’t do that very easily with round pipe. And 3D printing opens up all manner of internal structure to experiment with. We’d like to see this developed even further!

Sources: [1], [2], [3]

Minimal MQTT: Power And Privacy

In this installment of Minimal MQTT, I’m going to cover two loose ends: one on the sensor node side, and one on the MQTT server side. Specifically, I’ll tackle the NodeMCU’s sleep mode to reduce power and step you through bridging MQTT servers to get your data securely out of your home server and into “the cloud”, which is really just other people’s servers.

If you’re just stepping into this series now, you should really check out the other three posts, where I set up a server, then build up some sensor nodes, and then flesh-out a few ways to control everything from your phone or the web. That’s the coolest material, anyway. This last installment just refines what we’ve built on. Let’s go!

Continue reading “Minimal MQTT: Power And Privacy”

Shipwreck Exploration Vessels Fit In Minivan; Stream To Internet

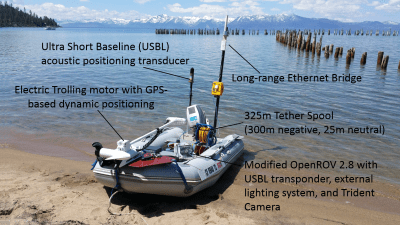
Having to work away from the convenience of a workshop can be tough. But it’s sometimes unavoidable and it always means planning ahead. When the work area also happens to be 150m under a lake’s surface, it’s much more of a challenge – but it’s both doable and more accessible than you might think. To prove it, this DIY research vessel will be part of the robotic exploration of an underwater shipwreck. It is complete with an Ethernet bridge, long-range wireless communications, remotely operated underwater vehicle (ROV), the ability to hold a position, and more. The best part? It can all be packed up and fit into a minivan. We can’t put it any better than the folks at the OpenROV Forums:

In just over a week (June 6th – 9th), a bunch of people from OpenROV are going to attempt to dive a set of specially modified deep-capable ROVs to a 50m-long shipwreck at a depth of 150m below lake Tahoe. We’ll be using a deployment architecture that we’ve been perfecting over the years that involves a very small boat keeping station over the dive site while the rest of the people on the expedition run the mission from a remote location via long-range broadband radio. Since the mission control site will have an internet connection, we’ll be able to live stream the entire dive over the internet.

OpenROV DIY Research VesselThe purpose of the design was “to demonstrate that many of the capabilities one might think would require a large research vessel can actually be achieved with off-the-shelf parts that are more portable and much less expensive. […] There’s a lot to discover down there, and the technology readily available these days can allow us to explore it.” This mindset happens to wonderfully complement the kickoff of the Citizen Scientist Challenge portion of the 2016 Hackaday Prize.

For those times when your work can remain on solid ground, one method is to sidestep the entire issue of working away from the workshop by simply making your whole work area mobile like this incredible conversion of a truck trailer to a mobile lab.

Hackaday Meetup In The Middle Of Nowhere

Come one, come all, as the Hackaday community gathers at the childhood home of the worst president of the United States of America. Raise a glass, feast on roast pig, and don’t forget to Bring-A-Hack to show and tell. We’ll give away Hackaday Omnibus, stickers, and as a very special door prize a few people are going to walk away with a Raspberry Pi Zero.

The preamble about not-so-great heads of state is due to the venue. This gala is at the James Buchanan Pub & Restaurant in Mercersburg, PA on Sunday, June 5th, starting at 3PM. But that doesn’t really answer the question of why Mercersburg, does it? This is the location of one of the Hackaday World Create Day meetups. It caught my eye and since I live only 20 minutes away this is a great time for another get together.

Let’s fill the place with south central Pennsylvania’s greatest hardware hackers. There will be food, alcohol, and interesting people to talk to.