[Pabr] is trying to make dry ice the hard way by building a thermoelectric dry ice generator. The project is a well planned round trip through thermodynamics and cryogenics with a hard landing on the icy grounds of trial and error.
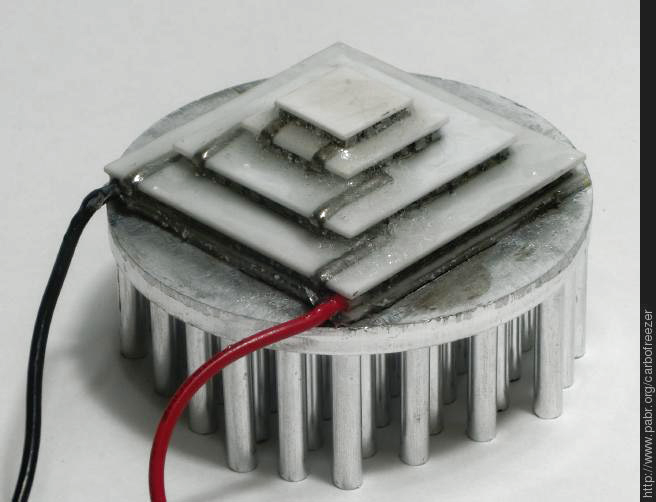
[Pabr’s] four stage Peltier element on a heatsink.While dry ice can be obtained with simpler methods, for example by venting gaseous CO2 from fire extinguishers and collecting the forming CO2 flakes, [pabr’s] method is indeed attractive as a more compact solid-state solution. The setup employs a four stage Peltier element, which uses four Peltier stages to achieve a high temperature differential.
With sufficient cooling on the high-temperature side of the element, it should be well capable of achieving temperatures below -78.5 °C, the sublimation temperature of CO2. So far, [pabr] has built three different setups to expose small amounts of CO2 to the cold of the Peltier element, hoping to observe the formation of little dry ice flakes.
If you get tired of charging batteries, you might be interested in [Hackarobot’s] energy harvesting demo. He uses a peltier device (although he’s really using it as a thermocouple which it is). A 1 farad super capacitor stores energy and an LTC3108 ultra low voltage converter with a 1:100 ratio transformer handles the conversion to a useful voltage.
The truth is, the amount of energy harvested is probably pretty small–he didn’t really characterize it other than to light an LED. In addition, we wondered if a proper thermocouple would work better (some old Russian radios used thermocouples either in fireplaces or kerosene lamps to avoid requiring batteries). Although a Peltier device and a thermocouple both use the Seebeck effect, they are optimized for different purposes. Thermocouples generate voltage from a temperature differential and Peltier modules generate temperature differentials from voltage.
However, as [Hackarobot] points out, the same technique might be useful with other alternate power sources like solar cells or other small generators. The module used has selectable output voltages ranging from 2.35V to 5V.
Ever play with a Peltier plate? They’re these really cool components that kind of look like a ceramic sandwich, and when you put power into them, one side gets hot, and one side gets freezing cold! [Joseph Rautenbach] decided he wanted to try making his own mini fridge out of one — which is typically how most modern mini fridges work these days.
The peltier plate he’s using draws 12v at about 3.5 amps — so about 50W — and if you don’t heat sink it properly you could burn it out in a matter of seconds. Peltier plates only care about the temperature differential between the two sides — if you don’t take the heat away from the hot side, it will soon overheat and destroy itself.
[Joe’s] using a styrofoam cooler for the fridge with a pair of computer heat sinks and fans for the peltier plate, and a temperature PID controller he bought off eBay. The external heat sink sucks away the excess heat generated by the peltier plate, and the internal one helps spread cooled air around the inside of the styrofoam cooler. The PID controller allows him to set a preferred temperature to maintain in the box, which will then control the outputs to keep it that way.
The Midwest RepRap Festival is over – forever. This was the last one. Apparently enough people complained that Goshen, Indiana wasn’t in the midwest. The number of Dairy Queens I passed contradicts this, but whatever. Next year, there’s going to be a different con in Goshen. Same content, different name. If you have a suggestion, you know where to put it.
What the infill looks like on the PartDaddy
The Groot fail
Contaminated with masterbatch
The world’s largest 3D printed trash can. People were taking pictures of them standing next to it.
I promised the world’s largest 3D printed trash can, and I gave you the world’s largest 3D printed trash can. This gigantic orange vase was printed on the PartDaddy, SeeMeCNC’s 18-foot tall delta printer a few months ago at the NYC Maker Faire. I have been using this as a trash can in my basement since then, making me one of the only people who have their trash can on Wikipedia.
A failed print on Saturday morning
Speaking of the PartDaddy, this is what a fail looks like. The first PartDaddy print was a Groot, a 13-hour long print job. It was left running overnight, but it ran out of PLA pellets sometime around 4 in the morning. If you’re wondering what the black band is around the Groot’s face is, here’s the breakdown:
The PartDaddy sucks PLA pellets up from a trash can (that’s not 3D printed), and dispenses it into a hopper above the print head. This hopper was 3D printed on the PartDaddy, and there is still a little bit of colarant dust in there. When the PLA pellets run out, that dust is embedded in the extrusion. When you realize that masterbatch is only about 5% of the finished plastic, it doesn’t take much black dust to discolor a print.
Yes, this is a print fail that could have been fixed by having an all-night bash. A few other people left their printers running overnight including [The Great Fredini] and his Scan-A-Rama. This was a Rostock Max that had something wonky happen with the Bowden. There was filament everywhere.
How about some Star Wars droids? An R2 from the Droid Builder’s Club was there, but there was also the beginnings of a completely 3D printed Roger. While we’re on the subject of plastic robots that will fall apart at a moment’s notice, there was a K’NEX 3D printer. Yes, it’s made almost entirely out of K’NEX, and it did work at one time. Those orange parts sitting next to it? Those came out of the K’NEX printer. If you’re looking for the definitive RepStrap, there ‘ya go.
Roger Roger, or a B1 Battle Droid
K’NEX Printer
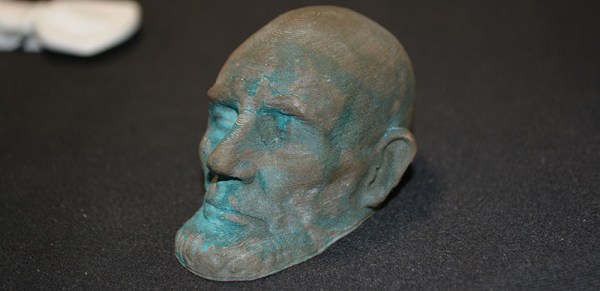
Lincoln death mask in bronzefill. Patinaed with vinegar.
NEW FILAMENTS
For the last few months, metal filaments – PLA with tiny particles of copper, brass, bronze, iron, or aluminum have been available. MRRF was the first place where you could see them all together. A few things of note: these filaments are heavy – the printed objects actually feel like they’re made out of metal. They’re actually metal, too: the iron-based filaments had a tiny bit of red corrosion, and the Lincoln death mask above was treated with acetic acid. These filaments are also expensive, around $100 for 1kg. Still, if you want to print something that will be around in 100 years, this is what you should get.
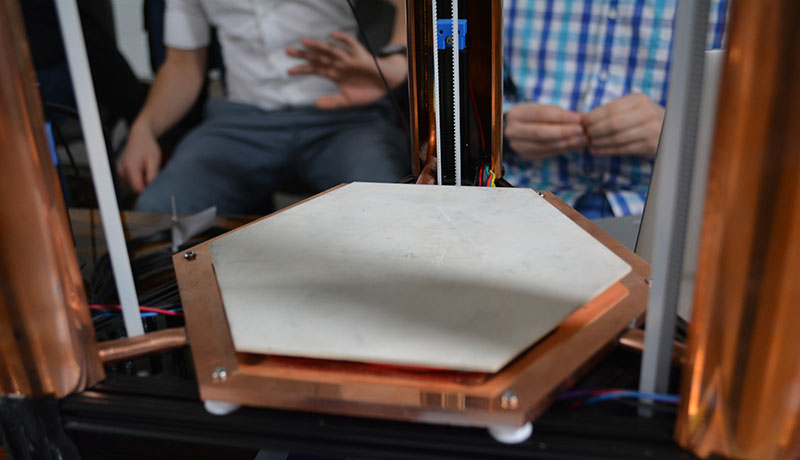
The most beautiful printer ever
MRRF should have had a contest for the best looking 3D printer at the show. A beautiful delta from Detroit Rock City would have won:
That white hexagon in the center is a ceramic PCB that I’m told cost an ungodly amount of money. Underneath the ceramic build plate, there’s a few Peltiers between the bed and the large copper heat sink. The heat sink is connected to the three risers by heat pipes, making the entire printer one gigantic heat sink. Why would anyone make such an amazing art deco printer? For this.
Because you can use Peltiers to heat and cool a bed, a little bit of GCode at the end of a print will cool the bed to below room temperature. If you do your design right, this means the print will just fall over when it’s done. When the print bed is cooling, you can actually hear the bond between the bed and print cracking. It’s beautiful, it’s cool, and I’m told this printer will make its way to hackaday.io soon.
There you go, the best and coolest from the last Midwest RepRap Festival ever. There will never be another one. It only needs a better name, and [John] at SeeMeCNC is great at coming up with names. Just ask what VIP is a backronym of.
If you are unfamiliar with Dune, then you may not know what the pain box is. The pain box is a fictional device that produces an excruciating burning sensation without causing any actual damage. [Bryan] has been working on a project to duplicate this effect in the real world. It sounds like he may be on the right path by using the “thermal grill illusion”.
The thermal grill illusion is a sensory trick originally demonstrated back in 1896. The trick is made up of two interlaced grills. One is cool to the touch, and the other is warm. If the user touches a single grill, they won’t experience any pain because neither temperature is very extreme. However if the user places their hand over the interlaced grills simultaneously they will immediately experience a burning heat. This usually causes the person to pull their hand away immediately. It’s a fun trick and you can sometimes see examples of it at science museums.
The thermal grill illusion sounded like the perfect way to make the pain box a reality. [Bryan] has set specific constraints on this build to make it more true to the Dune series. He wants to ensure the entire package fits into a small box, just big enough to place an adult hand inside. He also wants to keep safety in mind, since it has the potential to actually cause harm if it were to overheat.
[Bryan] has so far tried two methods with varying success. The first attempt involved using several thermoelectric coolers (TECs). [Bryan] had seen PCBs etched a certain way allowing them to radiate heat. We’ve seen this before in 3D printer surfaces. He figured if they could become hot, then why couldn’t they become cold too? His idea was very simple. He etched a PCB that had just two large copper pours. Each one branched out into “fingers” making up the grill.
Each side of the grill ultimately lead to a flat surface to which a TEC was mounted. One side was cold and the other was hot. Heat sinks we attached to the open side of the TECs to help with performance. Unfortunately this design didn’t work. The temperature was not conducted down to the fingers at all. The back side of the PCB did get hot and cold directly under the TECs, but that wouldn’t work for this illusion.
The latest version of the project scraps the PCB idea and uses small diameter copper tubing for the grill. [Bryan] is working with two closed loop water systems. One is for warm water and the other is for cold. He’s using an aquarium pump to circulate the water and the TECs to actually heat or cool the water. The idea is that the water will change the temperature of the copper tubing as it flows through.
While the results so far are better than the previous revision, unfortunately this version is having problems of its own. The hot water eventually gets too hot, and it takes over an hour for it to heat up in the first place. On top of that, the cold water never quite gets cold enough. Despite these problems, [Bryan] is hopefully he can get this concept working. He has several ideas for improvements listed on his blog. Maybe some Hackaday readers can come up with some clever solutions to help this project come to fruition.
Like many of us, [C] enjoys an ice-cold, refreshing soda while coding. Driven by a strong desire to keep a soda ice-cold indefinitely without using ice, [C] started Project Frosty Mug.
[C]’s stated goal is to keep a 20oz plastic bottle of soda at ~35F indefinitely while it sits in a room temperature environment. He started with a thermoelectric unit to cool an aluminium disc, like a cold coaster. Builds one and two made him realize that dealing with the generated heat was a big issue: it got so hot that it deformed the PLA frame. [C] also realized that bottom-only cooling wasn’t going to get the job done.
This project is now in its third build, which is pictured above. As you can see, it’s more koozie than coaster. That 3-D printed holster is lined with aluminium sheeting. Another flat piece covers the opening and attaches to the cooling element. A beefy CPU heat sink does its best, and a couple of U-brackets hold it all together.
[C]’s tested it with a glass bottle of Diet Sun Drop chilled to 38F. After 30 minutes in an ambient temperature of ~70F, the soda measured 45F. [C] lamented having not used a control bottle for comparison and reports that the power supply became quite warm. [C] isn’t going to give up that easily. Do you have any ideas for the fourth build?
Editor’s Note: This is one of the last Fail of the Week tips we have stored up. If you want to see the series continue on a weekly basis, we need help finding more documented fails! Please look back through your projects and document the ones that didn’t go quite right. We also encourage you to send in links to other fails you’ve found. Just drop the links in our tips line. Thanks!
Fail of the Week is a Hackaday column which runs every Thursday. Help keep the fun rolling by writing about your past failures and sending us a link to the story — or sending in links to fail write ups you find in your Internet travels.
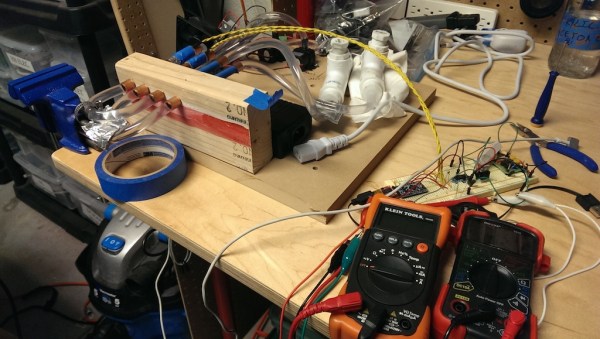
September was warmish in many places around the world including [Ole]’s native Denmark. But that did not stop him from brewing lager flavored with plums from his own garden, and neither did his indifference to lagers in general.
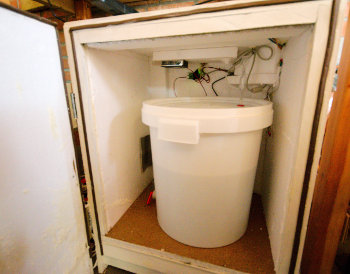
Lager fermentation requires a consistent, low temperature. While many homebrewers might modify an electric refrigerator, [Ole] wasn’t interested in the cost of running a second one just for brewing beer. Instead, he built a climate box to work with the cool temperature in his garage. Starting with scrap wood from other projects, he lined the walls with polystyrene and put a layer of wood on the floor to help support the fermentation bucket.
Maintaining a consistent temperature in the box called for both heating and cooling. He pulled the Peltier from a 12V cooler meant to run off a car’s cigarette lighter, and used a spare ceramic heater that was lying around in case his primary reptile warmer went on the fritz.
An Arduino and a custom shield drive separate PID controllers for the Peltier and the heater. The shield has a temperature probe, and he extended the USB outside the climate box so the PIDs can be adjusted without disturbing the inside temperature. The schematic, board file, and code are all available in a zip you can get from his post.
The Peltier couldn’t quite compensate for the overly warm weather and the heat caused by the fermentation, but it was stable enough to produce a nice, plum-flavored lager he has dubbed Lektor Blommes maltbolche, which is a triple Danish pun he explains in the write-up.


 That white hexagon in the center is a ceramic PCB that I’m told cost an ungodly amount of money. Underneath the ceramic build plate, there’s a few Peltiers between the bed and the large copper heat sink. The heat sink is connected to the three risers by heat pipes, making the entire printer one gigantic heat sink. Why would anyone make such an amazing art deco printer?