NES Zapper Becomes Telephone

Although there was a time in the 80s (and early 90s for fans of the SuperScope) where light guns were immensely popular, with games like DuckHunt cultural touchstones, their time in the video game world has largely come to an end. We might occasionally pick up a Zapper for the NES and play this classic out of nostalgia, but plenty of people are looking for other things that these unique video game controllers can do instead. [Nick] has turned one of his old NES peripherals into a wireless phone.

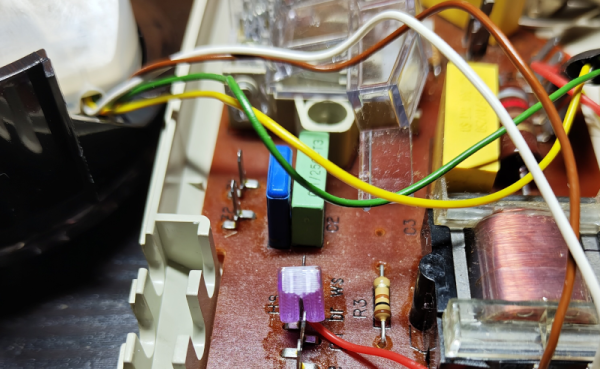
The way the original Zapper worked was by looking for a certain pattern of pixels that displayed for a fraction of a second whenever the trigger was pulled. Bypassing the anti-cheat mechanism that looks only for qualities of light coming from CRT screens of the day effectively turns the light gun into an analog light sensor which is used for receiving the audio from the phone’s base station via a laser. Of course there were no microphones present within the original hardware so one is added, wiring its output to another laser that communicates to the base station. With the light gun pointed directly at this base station, audio is communicated back and forth by varying the strengths of these small lasers and listening to them on the other end with photodiodes.

[Nick] does point out that this isn’t a great phone, largely because it needs to be pointed exactly at the right spot to work at all, although we do agree that it’s an interesting project that demonstrates what the original hardware could do with a few of its limitations removed. There are a few other ways of bringing these devices into the modern world, with one of our favorites being this laser pointer with additional hardware from a Wiimote that could also function as a mouse.

Continue reading “NES Zapper Becomes Telephone”

Rayhunter Sniffs Out Stingrays For $30

These days, if you’re walking around with a cellphone, you’ve basically fitted an always-on tracking device to your person. That’s even more the case if there happens to be an eavesdropping device in your vicinity. To combat this, the Electronic Frontier Foundation has created Rayhunter as a warning device.

Rayhunter is built to detect IMSI catchers, also known as Stingrays in the popular lexicon. These are devices that attempt to capture your phone’s IMSI (international mobile subscriber identity) number by pretending to be real cell towers. Information on these devices is tightly controlled by manufacturers, which largely market them for use by law enforcement and intelligence agencies.

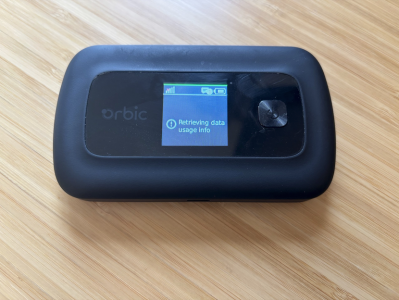
Rayhunter in use.

To run Rayhunter, all you need is an Orbic RC400L mobile hotspot, which you can currently source for less than $30 USD online. Though experience tells us that could change as the project becomes more popular with hackers. The project offers an install script that will compile the latest version of the software and flash it to the device from a  computer running Linux or macOS — Windows users currently have to jump through a few extra hoops to get the same results.

Rayhunter works by analyzing the control traffic between the cell tower and the hotspot to look out for hints of IMSI-catcher activity. Common telltale signs are requests to switch a connection to less-secure 2G standards, or spurious queries for your device’s IMSI. If Rayhunter notes suspicious activity, it turns a line on the Orbic’s display red as a warning. The device’s web interface can then be accessed for more information.

While IMSI catchers really took off on less-secure 2G networks, there are developments that allow similar devices to work on newer cellular standards, too. Meanwhile, if you’ve got your own projects built around cellular security, don’t hesitate to notify the tipsline!

The Nokia 3310 Finally Gets A USB-C Upgrade

The Nokia 3310 has a reputation of being one of the most indestructible devices ever crafted by humanity. It’s also woefully out of date and only usable in a handful of countries that still maintain a GSM network. It might not be easy to bring it into the 5G era, but you can at least convert it to work with modern chargers, thanks to [Andrea].

[SGCDerek] whipped up their own solution for USB-C charging.
If you don’t want to buy the parts, you can just DIY the same mod. [SGCDerek] did just that a few years ago. From what it looks like, you likely don’t even need to worry about doing any fancy charger handshaking. The 3310 will happily grab a charge from a low-current 5V supply straight off the USB pins.

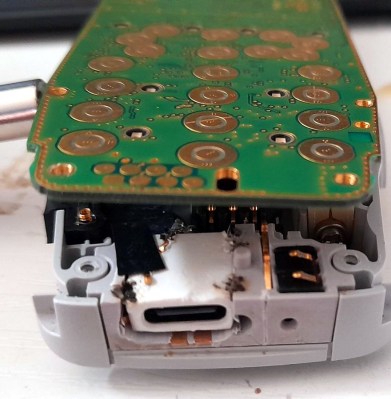
You might think this is a messy, complicated mod, but [Andrea] engineered it as a drop-in upgrade. He’s combined a USB-C port with a small plastic adapter that enables it to sit in place of the original phone’s charge port module.  Contact between the port and the rest of the phone is via spring-loaded contacts. The only additional step necessary is popping out the mic from the original charge module and putting it in the new one. You need only a screw driver to disassemble the phone, swap out the parts, and put it all back together.

If you want to upgrade your own handset, [Andrea] is more than happy to provide the parts for a reasonable price of 25 euros. It’s almost worth it just for the laughs—head around to your friend’s house, ask to borrow a charger, and then plug in your USB-C 3310. You’ll blow some minds.

Once upon a time, it was big news that someone hacked a USB-C port into the iPhone. Video after the break.

Continue reading “The Nokia 3310 Finally Gets A USB-C Upgrade”

A design sketch of a partially disassembled candybar mobile phone. The enclosure is a clamshell of plastic that envelops the functional internals of the device and is illustrated to the right upper corner of the image, slightly overlapping the internals evoking the idea of the internals being inserted into the cover. The words "buttons part of the cover" are written toward the top with an arrow toward the numpad and "plastic shell with various design" is written toward the bottom with an arrow toward the translucent blue shell.

The Nokia Design Archive Is Open For Viewing

During the Cambrian Explosion of cellphone form factors at the turn of the millenium, Nokia reigned supreme. If you’d like to see what they were doing behind the scenes to design these wild phones, you’ll love the Nokia Design Archive from Aalto University.

Featuring images, presentations, videos and a number of other goodies (remember transparencies?), this collection gives us some in-depth insight into how consumer products were dreamed up, designed, and brought to market. Some projects require more reading between the lines than others as the Archive is somewhat fragmented, but we think it could still be an invaluable peek into product design, especially if you’re working on projects that you want to be usable outside of a hacker audience.

The Archive also includes approximately 2000 objects including many unreleased “unknown” models and prototypes of phones that actually did make it into the wild. While we’d love to get our hands on some of these devices IRL, having images with reference colors is probably the next best thing. Having replaced a number of smartphone screens, we hope more hackers take up the buttons and indestructible casing of these elegant devices for a more civilized age.

Thanks to [Michael Fitzmayer] for the tip! Be sure to checkout his work on Nokia N-Gage phones, including an SDK if you too love to taco talk.

An IPhone Case Study

Way back in 2008, Apple unveiled the first unibody Macbook with a chassis milled out of a single block of aluminum. Before that, essentially all laptops, including those from Apple, were flimsy plastic screwed together haphazardly on various frames. The unibody construction, on the other hand, finally showed that it was possible to make laptops that were both lightweight and sturdy. Apple eventually began producing iPhones with this same design style, and with the right tools and a very accurate set of calipers it’s possible to not only piece together the required hardware to build an iPhone from the ground up but also build a custom chassis for it entirely out of metal as well.

The first part of the project that [Scotty] from [Strange Parts] needed to tackle was actually getting measurements of the internals. Calipers were not getting the entire job done so he used a flatbed scanner to take an image of the case, then milled off a layer and repeated the scan. From there he could start testing out his design. After an uncountable number of prototypes, going back to the CAD model and then back to the mill, he eventually settles into a design but not before breaking an iPhone’s worth of bits along the way. Particularly difficult are the recessed areas inside the phone, but eventually he’s able to get those hollowed out, all the screw holes tapped, and then all the parts needed to get a working iPhone set up inside this case.

[Scotty] has garnered some fame not just for his incredible skills at the precision mill, but by demonstrating in incredible detail how smartphones can be user-serviceable or even built from scratch. They certainly require more finesse than assembling an ATX desktop and can require some more specialized tools, but in the end they’re computers like any other. For the most part.

Continue reading “An IPhone Case Study”

Unexpectedly Interesting Payphone Gives Up Its Secrets

Reverse engineering a payphone doesn’t sound like a very interesting project, at least in the United States, where payphones were little more than ruggedized versions of residential phones with a coin mechanism attached. Phones in other parts of the world were far more interesting, though, as this look at the mysteries of a payphone from Israel reveals (in Hebrew; English translation here.)

This is a project [Inbar Raz] worked on quite a while ago, but only got around to writing up recently. The payphone in question was sourced from the usual surplus market channels, and appears to have been removed from service by Israeli telecommunications company Bezeq only shortly before he found it. It was in pretty good shape, and was even still locked tight, making some amateur locksmithing the first order of the day. The internals of the phone are surprisingly complex, with a motherboard that looks more like something from a PC. Date codes on the chips and through-hole construction date the device to the early- to mid-1990s.

With physical access gained, [Inbar] turned to the firmware. An Atmel flash chip seemed a good place to look, and indeed he was able to pull code off the chip. That’s where things took a turn thanks to the CPU the code was written for — the CDP1806, a later version of the more popular but still fringe CDP1802. This required [Inbar] to fall down the rabbit hole of writing a new processor definition file for Ghidra so that the firmware could be reverse-engineered. This got him to the point of understanding 1806 assembly well enough that he was able to re-flash the phone to print debugging messages on the built-in 16×2 LCD screen, which allowed him to figure out which routines were being called under various error conditions.

It doesn’t appear that [Inbar] ever completed the reverse engineering project, but as he points out, what does that even mean? He got inside, took a look around, and made the phone do some cool things it couldn’t do before, and in the process made things easier for anyone working with 1806 processors in Ghidra. That’s a pretty complete win in our books.

Building A Stylish IPhone Standby Dock

[Scott Yu-Jan] is a big fan of the iPhone’s standby mode. Put the phone on charge horizontally, and it looks all stylish, with sleek widgets and clocks and stuff showing you information you presumably care about. [Scott] enjoyed this so much, in fact, he whipped up a custom charging dock to make the most of it.

The design was a collaboration with artist [Overwork], who mentioned the DN 40 alarm clock created by legendary designer [Dieter Rams]. [Overwork] sent [Scott] a draft inspired by that product, and he printed one up. It featured an integrated MagSafe charger to juice up the iPhone, and pressing into one side of the phone would pop it free. It was cool, but a little clumsy to use.

[Scott] liked the basic concept, but shows us how he iterated upon it to make it even nicer. He added in a wireless charger for AirPods in the back, gave the device adhesive feet, and a big chunky eject button to release the phone when desired.

You can also grab the files to print your own if you so desire! We’ve seen [Scott’s] work before, too, like his neat 3D scanner build. Video after the break.

Continue reading “Building A Stylish IPhone Standby Dock”