DIY Pipe Inspector Goes Where No Bot Has Gone Before

If you think your job sucks, be grateful you’re not this homebrew sewer inspection robot.

Before anyone gets upset, yes we know what [Stargate System] built here isn’t a robot at all; it’s more of a remotely operated vehicle. That doesn’t take away from the fact that this is a very cool build, especially since it has to work in one of the least hospitable and most unpleasant environments possible. The backstory of this project is that the sewer on a 50-year-old house kept backing up, and efforts to clear it only temporarily solved the problem. The cast iron lateral line was reconfigured at some point in its history to include a 120-degree bend, which left a blind spot for the camera used by a sewer inspection service. What’s worse, the bend was close to a joint where a line that once allowed gutters and foundation drains access to the sewer.

To better visualize the problem, [Stargate] turned to his experience building bots to whip up something for the job. The bot had to be able to fit into the pipe and short enough to make the turn, plus it needed to be — erm, waterproof. It also needed to carry a camera and a light, and to be powered and controlled from the other end of the line. Most of the body of the bot, including the hull and the driving gear, was 3D printed from ABS, which allowed the seams to be sealed with acetone later. The drive tracks were only added after the original wheels didn’t perform well in testing. Controlling the gear motors and camera was up to a Raspberry Pi Zero, chosen mostly due to space constraints. An Ethernet shield provided connectivity to the surface over a Cat5 cable, and a homebrew PoE system provided power.

As interesting as the construction details were, the real treat is the down-hole footage. It’s not too graphic, but the blockage is pretty gnarly. We also greatly appreciated the field-expedient chain flail [Stargate] whipped up to bust up the big chunks of yuck and get the pipe back in shape. He did a little bit of robo-spelunking, too, as you do.

And no, this isn’t the only sewer bot we’ve ever featured.

Continue reading “DIY Pipe Inspector Goes Where No Bot Has Gone Before”

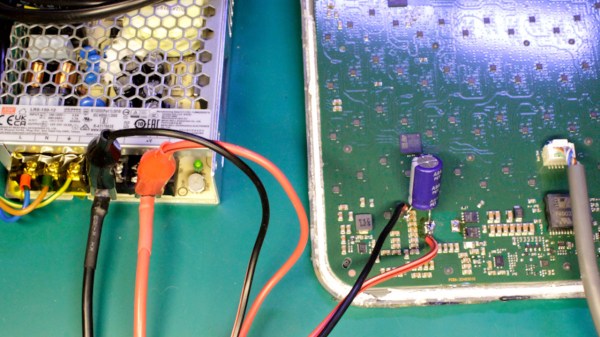
Starlink terminal being injected with 12V from an external PSU

Bypass PoE And Power Your Starlink Terminal Directly

Sometimes, you will want to power a device in a way it wasn’t designed for, and you might find that the device in question is way too tailored to the original power source. Today, [Oleg Kutkov] is here to give us a master class on excising unnecessary power conversion out of your devices, with the Starlink terminal as an example. This device can only be officially powered from 48V PoE, but can technically work from about 12V – and, turns out, many people want to mount a Starlink terminal to their cars.

[Oleg] shows us the power circuit of the Starlink terminal, explaining which component is responsible for what, and gives us a block diagram. Then, he shows you the 12V rail that all internal components actually draw power from, and where to feed power into it. Plus, he warns you about possible caveats, like having to disable the builtin 12V regulator to prevent it from backfeeding-induced damage. If you’re looking to modify a similar device, this tutorial gives you heaps of insight on what you might need on your foray.

Thinking to modify your own Starlink terminal, perhaps, and wondering about the power consumption? [Oleg] has current consumption graphs for you, collected with a data logger for Uni-T UT800 of his own design, providing detailed figures on just how much energy you ought to supply to power the terminal from 12V, and where to (not) get it. After all, even a seemingly suitable power supply might not do.

Ethernet For Hackers: Transformers, MACs And PHYs

We’ve talked about Ethernet basics, and we’ve talked about equipment you will find with Ethernet. However, that’s obviously not all – you also need to know how to add Ethernet to your board and to your microcontroller. Such low-level details are harder to learn casually than the things we talked about previously, but today, we’re going to pick up the slack.

You might also have some very fair questions. What are the black blocks near Ethernet sockets that you generally will see on boards, and why do they look like nothing else you see on circuit boards ever? Why do some boards, like the Raspberry Pi, lack them altogether? What kind of chip do you need if you want to add Ethernet support to a microcontroller, and what might you need if your microcontroller claims to support Ethernet? Let’s talk.

Transformers Make The Data World Turn

One of the Ethernet’s many features is that it’s resilient, and easy to throw around. It’s also galvanically isolated, which meansĀ  you don’t need a ground connection for a link either – not until you want a shield due to imposed interference, at which point, it might be that you’re pulling cable inside industrial machinery. There are a few tricks to Ethernet, and one such fundamental Ethernet trick is transformers, known as “magnetics” in Ethernet context.

Each pair has to be put through a transformer for the Ethernet port to work properly, as a rule. That’s the black epoxy-covered block you will inevitably see near an Ethernet port in your device. There are two places on the board as far as Ethernet goes – before the transformer, and after the transformer, and they’re treated differently. After the transformer, Ethernet is significantly more resilient to things like ground potential differences, which is how you can wire up two random computers with Ethernet and not even think about things like common mode bias or ground loops, things we must account for in audio, or digital interfaces that haven’t yet gone optical somehow.

Continue reading “Ethernet For Hackers: Transformers, MACs And PHYs”

Ethernet For Hackers: Equipment Exploration

Last time, we talked about the surface-level details of Ethernet. They are fundamental to know for Ethernet hacking, but they’re also easy to pick up from bits and pieces online, or just from wiring up a few computers in your home network. Now, there’s also a bunch of equipment and standards that you will want to use with Ethernet – easy to find whether used or new, and typically as easy to work with. Let’s give you a few beacons!

Routers And Switches

Whenever you see a box with a few Ethernet ports, it’s either referred to as a router, or a switch, sometimes people will even use the word “hub”! Fortunately, it’s simpler than it may seem. A router is a smart device, typically with an OS, that ties two or more networks together – routing packers from one network to another, and typically taking care of things like handing out local IP addresses via DHCP. A switch merely helps Ethernet devices exchange packets between each other on the same level – it’s typically nowhere near as smart as a router gets. Oftentimes, a home router will contain a switch inside, so that you can plug in multiple of your home devices at once. That’s the main difference – a switch merely transmits packets between Ethernet-connected devices, while a router is a small computer taking care of packet forwarding between networks and possibly including an Ethernet switch on the side.
Continue reading “Ethernet For Hackers: Equipment Exploration”

Adding Power Over Ethernet Support To A Mac Mini

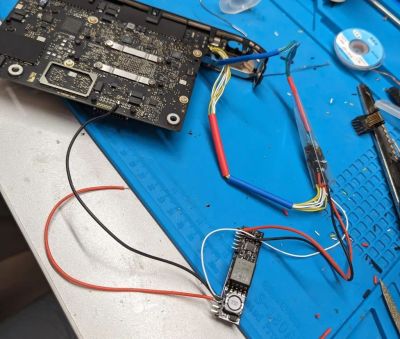
Wiring up a Mac Mini's new PoE module. (Credit: Ivan Kuleshov)
Wiring up a Mac Mini’s new PoE module. (Credit: Ivan Kuleshov)

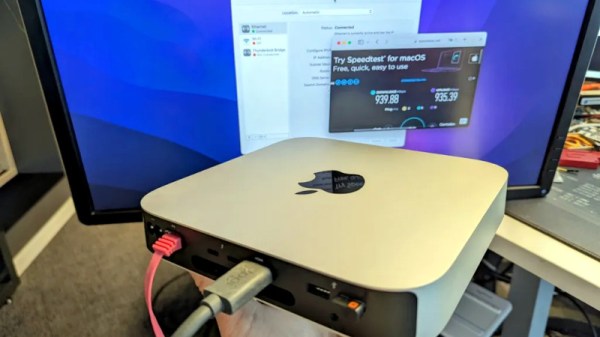
Despite all the fancy features on modern Apple Mac systems like USB-C and Thunderbolt, they have one glaring omission: the absolute lack of any form of Power-over-Ethernet (PoE). This is an issue that [Ivan Kuleshov] sought to rectify with some delicate board-level surgery. Since the original Ethernet jack on the lucky vic^Wrecipient M1 Mac Mini does not have integrated magnetics (magjack), tapping into the appropriate lines would have been rather awkward, with questionable results on the side of the PCB traces that would suddenly be used for PoE purposes they were never designed for.

Rather than choosing this level of experimentation, [Ivan] decided to patch in the Silvertel AG5412 PoE module with plentiful patch wires. This involved removing the Ethernet jack and bypassing the PCB and the magnetics module completely for the new PoE functionality, instead using the magnetics pilfered from a magjack and routing from there back to the mainboard as well as to the PoE module’s inputs. Continue reading “Adding Power Over Ethernet Support To A Mac Mini”

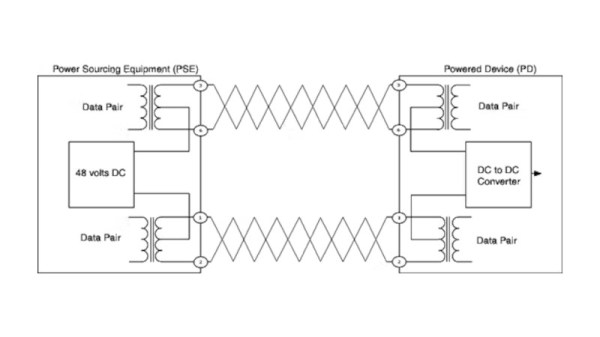
Power Over Ethernet, Explained

Most readers will be familiar with Ethernet networks in some form, in particular the Cat5 cables which may snake around the back of our benches. In a similar vein, we’ll have used power over Ethernet, or PoE, to power devices such as webcams. Buy a PoE router or switch, plug in a cable, and away you go! But what lies behind PoE, and how does it work? [Alan] has written a comprehensive guide, based on experience working with the technology.

What we get first is a run-down of the various topographies involved. Then [Alan] dives into the way a PoE port polls for a PoE device to be connected, identifies it, and ramps up the voltage. Explaining the various different circuits is particularly valuable. The final part of the show deals with the design of a PoE module, with a small switching power supply to give the required 48 volts.

All in all, this should be required reading for anyone who works with Ethernet, because it’s one of those things too often presented as something of a black box. If you’re thirsty for more, it’s a subject Hackaday have touched on too in the past.

A PoE adapter's RJ45 jack added inside an Acer laptop

Laptop Empty Space Filled With RS485 And PoE

Out of all the laptop upgrade options typically available, you wouldn’t expect this specific one. [controlmypad] decided to take a part of his RS485 device programming workflow and put it inside of a spare laptop he picked up for cheap. Typically, he’d occupy some desk space and lay out an unwieldy combination of a USB-RS485 dongle, a PoE power injector, a PSU for that injector, and a few cables to join it all – being extra weight in the tool bag, cluttering the workspace when laid out, and the RS485 adapter slowly wearing out the USB ports during the work-related motions. No reason that all of this couldn’t be packed inside a laptop, however.

What helps a lot is that, in many modern cheap laptops, the motherboard is fairly small, and the DVD drive plastic placeholder can be omitted without second thought. Cutting off the plastic molding from both of the adapters turns them into a nicely reusable circuit board and a small PoE module, respectively. After laborious yet careful cutting of the laptop case with a hobby knife, the PoE injector fits right in and, essentially, adds an extra RJ45 port to the laptop. From where the Hackaday.io write-up left off, it doesn’t seem like this mod got fully completed, but most of the important details are there for us to learn from. What got left out is connecting it to an internal USB port (should help that the motherboard’s schematics are available online), as well as creating 12V-24V from the laptop’s power rails. At this point, however, this mod is a big step forward usability-wise, even if it still requires an external PSU.

Laptop internal upgrade projects are rare but cherished – it’s a combination of “daring”, “inquisitive” and “meticulous” that results in people successfully hacking on a thing they certainly were not meant to hack, and have that thing serve their needs better. Apart from all the EEE PC upgrade options that set the bar for a generation of laptop modders, there’s a myriad of unconventional laptop modification vectors – you could do a thorough from-scratch Type-C charging port conversion, replace your webcam with an FSF-endorsed open firmware WiFi dongle, build in a “12-axis” sensor for auto-orientation and data-logging, or invent a remote self-destruct mechanism for your laptop. Those are, indeed, quite a few things you won’t typically find in the list of available options while customizing your laptop at the manufacturer website.