A Peek Into A Weed-Eating Robot’s Test Fixtures

When it comes to production, fast is good! But right the first time is better. Anything that helps prevent rework down the line is worth investing in. Some of the best tools to catch problems are good test fixtures. The folks at Tertill (a solar-powered robot for killing weeds that kickstarted last year) took the time to share two brief videos of DIY test fixtures they use to test components before assembly.

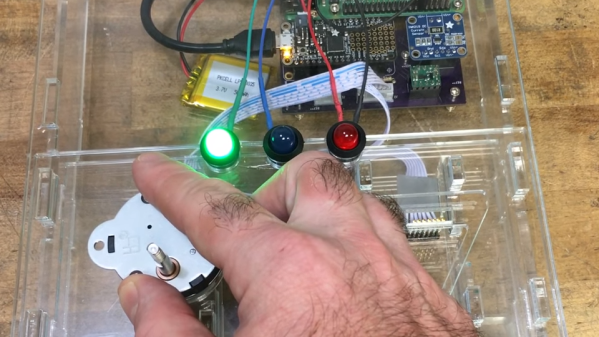
The videos are short, but they demonstrate all the things that make a good test: on the motor tester there are no connectors or wires to fiddle with, the test starts automatically, and there is clear feedback via prominent LEDs. The UI board tester also starts automatically and has unambiguous LED feedback, and sports a custom board holder with a recess just the right shape for the PCB. Once the board is in, the sled is pushed like a drawer to make contact with the test hardware and begin the test. The perfectly formed recesses in both units serve another function as well; they act as a go/no-go test for the physical shape of the components and contacts being tested.

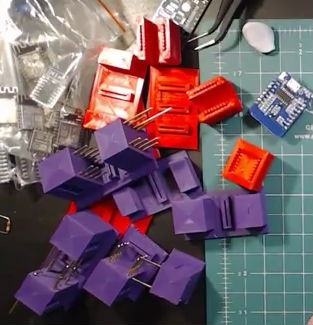
Both videos are embedded below; and while there isn’t much detail on the actual test hardware, we do spy a Raspberry Pi and at least two Adafruit logos among other hacker-familiar elements like laser-cut acrylic, 3D printed plastic, pogo pins, and a PVC junction box.

Continue reading “A Peek Into A Weed-Eating Robot’s Test Fixtures”

3D Printed ESP8266 Programming Jig

The various development boards such as the NodeMCU or Wemos D1 make working with the ESP8266 an absolute breeze. If they have a downside, it is that they are larger than the bare ESP2866, and of course cost a bit more. Just as with the Arduino, once you have the wiring sorted out and the code more or less finalized, your best bet is to ditch the unnecessary support hardware and use the bare module to save space and money in your final design.

The design took a few revisions to get right

Unfortunately, the ESP8266 form factor isn’t terribly forgiving when it comes time for hooking up a programmer. Rather than having to solder a serial adapter to the chip to flash it, [Ryan] came up with a slick 3D printed programming jig that uses pogo pins. If you have to program these boards in bulk, a jig like this can save a massive amount of time and aggravation.

Beyond the 3D printed holder for the pogo pins, this programmer uses a FTDI USB-to-serial adapter, a couple passive components to smooth out the power going into the chip, and a couple buttons.

In the video after the break, [Ryan] walks through the many iterations it took to get the 3D printed aspect of the jig worked out. The design went through a few rather large revisions, including one that fundamentally changed the whole form factor. Even with the jig now working, he mentions that he might circle back around and try it from a different angle.

Programming jigs are a staple of electronics manufacturing, and we’ve covered quite a few that have helped transformed a proof of concept into a small scale production runs.

Continue reading “3D Printed ESP8266 Programming Jig”

Hackaday Links Column Banner

Hackaday Links: December 3, 2017

Remember the Psion? Back when PDAs were a thing, the Psion was the best you could get. It was, effectively, a palm-top computer with a real qwerty keyboard. It didn’t have Bluetooth, it couldn’t browse the web, and it didn’t have WiFi, but this was an AA-powered productivity machine that could fit in your pocket. Now there’s a new palmtop from Psion engineers. The Gemini PDA is basically a smartphone with a real keyboard that runs Ubuntu. It’s also has a smaller battery than other devices with this form factor, meaning the TSA thinks it’s a smartphone. This thing is going to be cool.

TechShop, Inc. has reached an agreement to sell the company to TechShop 2.0, LLC. New ownership seeks to re-open, continue running makerspaces. Details coming soon.

Arcade monitors are cool, and vector monitors are even cooler. [Arcade Jason] created a gigantic 36″ vector monitor. It’s thirty-six inches of Gravitar, in all its vector glory.

A few links posts ago, I pointed out someone was selling really awesome, really cheap LED panels on eBay. I got my ten panels, and [Ian Hanschen] bought sixty or some other absurd amount. Now, these panels are going for $300 for a 10-pack instead of $50. Sorry about that. Nevertheless, the reverse engineering adventure is still ongoing, and eventually, someone is going to play Mario on these things.

The ESP32 is finding its way into all sorts of consumer electronics. Check this thing out. It’s an ESP32, four buttons, and a circular display. If you want to make your own Nest thermostat, or anything else that needs an awesome circular display, there you go.

Speaking of circular displays, are there any non-CRT displays that come with a polar coordinate system? Every circular LCD or OLED I’ve ever seen uses a Cartesian system, which doesn’t really make sense when you can’t see 30% of the pixels.

Hold the phone, this is far too clever. [Eduardo] needed to flash an ESP-12 module before soldering it onto a PCB. The usual way of doing this is with an absurd pogo pin jig. You know what’s cheaper than pogo pins? Safety pins. Clever overwhelming.

Pogo Pin Serial Adapter Thing

A few weeks ago, I was working on a small project of mine, and I faced a rather large problem. I had to program nearly five hundred badges in a week. I needed a small programming adapter that would allow me to stab a few pads on a badge with six pogo pins, press a button, and move onto the next badge.

While not true for all things in life, sometimes you need to trade quality for expediency. This is how I built a terrible but completely functional USB to serial adapter to program hundreds of badges in just a few hours.

Continue reading “Pogo Pin Serial Adapter Thing”

Jump Into Pogo

A lot of modern PCBs have small pads with no components attached. They are often used as test points, JTAG ports, or programmer connections. There’s no connector on the board, just pads. To use those, test equipment and programmers utilize pogo pins. These are small pins with a spring inside, reminiscent of a tiny pogo stick.

To use pogo pins effectively, you need a way to hold them in the right position and something to put pressure on them while they are in use. [Joshua Brooks] used a strip board to hold them in place and clothes pin to keep the pressure on them.

Continue reading “Jump Into Pogo”

Truly Versatile ESP8266 WiFi Webcam Platform

[Johan Kanflo] built a sweet little ESP8266-based wireless camera. It’s a beautiful little setup, and that it’s all open and comes with working demo code is gravy on the cake! Or icing on the potatoes. Or something.

[Johan]’s setup pairs an ESP8266-12 module with an Arducam, which looks like essentially an SPI breakout board for the ubiquitous small CMOS image sensors. The board naturally has a power supply and headers for programming the ESP module as well as connectors galore. Flash in some camera code, and you’ve got a custom WiFi webcam. Pretty slick.

pogo_pin_animBut since [Johan] designed the ESP-8266 board with standard female headers connecting to the ESP, it could also be used as a general-purpose ESP dev board. [Johan] built a few daughterboards to go along with it, including a bed-of-nails ESP8266 tester (since you can never tell when you’re going to get a dud ESP unit) and WiFi-to-RFM69 radio bridge. That’s two awesome applications for a tidy little system, and a reminder to design for extensibility when you’re laying out your own projects.

We’ve previously covered [Johan]’s Skygrazer project, which tracks planes as they fly overhead and displays them on a gutted old Mac. Is it any surprise, then, that he’s also created an ADS-B-controlled moodlight? This guy is on fire!

Hackaday Links: November 22, 2015

There’s a new documentary series on Al Jazeera called Rebel Geeks that looks at the people who make the stuff everyone uses. The latest 25-minute part of the series is with [Massimo], chief of the arduino.cc camp. Upcoming episodes include Twitter co-creator [Evan Henshaw-Plath] and people in the Madrid government who are trying to build a direct democracy for the city on the Internet.

Despite being a WiFi device, the ESP8266 is surprisingly great at being an Internet of Thing. The only problem is the range. No worries; you can use the ESP as a WiFi repeater that will get you about 0.5km further for each additional repeater node. Power is of course required, but you can stuff everything inside a cell phone charger.

I’ve said it before and I’ll say it again: the most common use for the Raspberry Pi is a vintage console emulator. Now there’s a Kickstarter for a dedicated tabletop Raspi emulation case that actually looks good.

Pogo pins are the go-to solution for putting firmware on hundreds of boards. These tiny spring-loaded pins give you a programming rig that’s easy to attach and detach without any soldering whatsoever. [Tom] needed to program a few dozen boards in a short amount of time, didn’t have any pogo pins, and didn’t want to solder a header to each board. The solution? Pull the pins out of a female header. It works in a pinch, but you probably want a better solution for a more permanent setup.

Half of building a PCB is getting parts and pinouts right. [Josef] is working on a tool to at least semi-automate the importing of pinout tables from datasheets into KiCad. This is a very, very hard problem, and if it’s half right half the time, that’s a tremendous accomplishment.

Last summer, [Voja] wrote something for the blog on building enclosures from FR4. Over on Hackaday.io he’s working on a project, and it’s time for that project to get an enclosure. The results are amazing and leave us wondering why we don’t see this technique more often.