Tiny Websites Have No Server

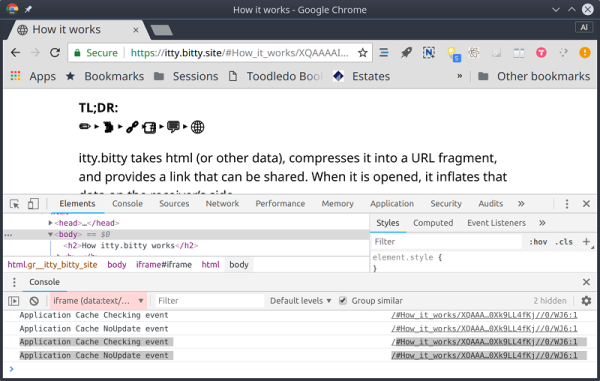
A big trend in web services right now is the so-called serverless computing, such as Amazon’s Lambda service. The idea is you don’t have a dedicated server waiting for requests for a specific purpose. Instead, you have one server (such as Amazon’s) listening for lots of requests and on demand, you spin up an environment to process that request. Conceptually, it lets you run a bit of Javascript or some other language “in the cloud” with no dedicated server.  https://itty.bitty.site takes this one step farther. The site creates self-contained websites where the content is encoded in the URL itself.

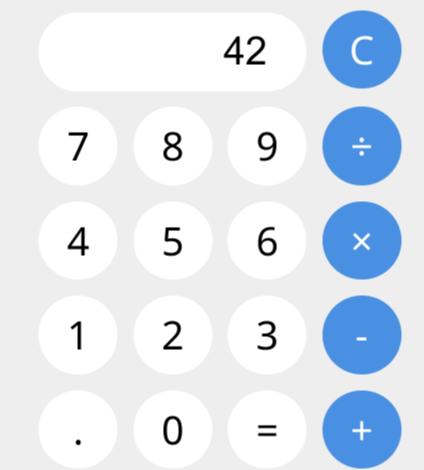
Probably the best example is to simply go to the site and click on “About itty bitty.” That page is itself encoded in its own URL. If you then click on the App link, you’ll see a calculator, showing that this isn’t just for snippets of text. While this does depend on the itty.bitty.site web host to provide the decoding framework, the decoding is done totally in your browser and the code is open source. What that means is you could host it on your own server, if you wanted to.

At first, this seems like a novelty until you start thinking about it. A small computer with an Internet connection could easily formulate these URLs to create web pages. A bigger computer could even host the itty.bitty server. Then there’s the privacy issue. At first, we were thinking that a page like this would be hard to censor since there is no centralized server with the content. But you still need the decoding framework. However, that wouldn’t stop a sophisticated user from “redirecting” to another — maybe private — decoding website and reading the page regardless of anyone’s disapproval of the content.

Continue reading “Tiny Websites Have No Server”

Multi-Board Solder Stencils Explained

There was a time when reflow soldering was an impossibly exotic process at our level, something that only the most superhuman of hackers could even dream of attempting. But a demystification of the process plus the ready availability of affordable PCB and stencil manufacture has rendered into the range of almost all constructors, and it is likely that many of you reading this will have done it yourself.

Screen-printing solder paste onto a single board presents a mild alignment challenge, but how about doing it with many boards at once? [Eric Gunnerson] had this problem with a small-volume board he’s selling, and not being in the happy position of having his PCBs supplied on a panel, had to create his own multi-board alignment jig and stencil. His write-up provides a comprehensive and fascinating introduction to the process whether you are an occasional dabbler or embarking on a production run as he is.

The problem facing any would-be stenciler is that the board has to be held in place reliably in the same alignment as the stencil. With a single board, it’s easy enough to do the usual thing of taping scraps of PCB board to constrain its edges and hold it in place as a rudimentary jig, then lower the stencil onto it. Perhaps you’ve used one of those commercial stencil jigs, in which a set of magnets hold the stencil in place, or maybe you use pins to line everything up.

[Eric] takes us through the process of creating a laser-cut alignment jig for twelve boards, and cutting a matching twelve-board stencil. This includes all the software side using Inkscape, the selection of materials to match PCB thickness, and some of the issues with cutting Mylar sheet for the stencil without shrinkage at the corners. He’s using pins for alignment, and he even finds a handy supply of those in the form of shelf support pins.

We’ve visited the world of reflowing many times before. If you’d like a primer, here’s our Tools of the Trade piece on it, and if you aren’t daunted by larger projects, here’s an account of a prototype run of a significantly complex board.

A Peek Into A Weed-Eating Robot’s Test Fixtures

When it comes to production, fast is good! But right the first time is better. Anything that helps prevent rework down the line is worth investing in. Some of the best tools to catch problems are good test fixtures. The folks at Tertill (a solar-powered robot for killing weeds that kickstarted last year) took the time to share two brief videos of DIY test fixtures they use to test components before assembly.

The videos are short, but they demonstrate all the things that make a good test: on the motor tester there are no connectors or wires to fiddle with, the test starts automatically, and there is clear feedback via prominent LEDs. The UI board tester also starts automatically and has unambiguous LED feedback, and sports a custom board holder with a recess just the right shape for the PCB. Once the board is in, the sled is pushed like a drawer to make contact with the test hardware and begin the test. The perfectly formed recesses in both units serve another function as well; they act as a go/no-go test for the physical shape of the components and contacts being tested.

Both videos are embedded below; and while there isn’t much detail on the actual test hardware, we do spy a Raspberry Pi and at least two Adafruit logos among other hacker-familiar elements like laser-cut acrylic, 3D printed plastic, pogo pins, and a PVC junction box.

Continue reading “A Peek Into A Weed-Eating Robot’s Test Fixtures”

Smart pill with stomach acid _battery

This Smart Pill Uses A Stomach Acid Battery

[Curt White] is working on a smart pill whose copper-zinc battery will use his own stomach acid as the electrolyte. It’s not that unusual of an idea, MIT tested a similar approach in a pig. It’s also better than using lithium ion batteries, something we covered in this PSA.

Smartpill circuit diagram

His starting point is a small, hacked activity tracker with its Nordic nRF51822 ARM Cortex-M0 and Bluetooth LE SoC. Most everything else is removed. The battery electrodes are sewn onto a plastic mesh cut to the activity tracker’s dimensions. Three coin type super capacitors and a boost converter sit between the battery and the SoC.

He uses the Bluetooth LE for communication, sort of. BLE devices constantly transmit information about themselves and it’s this which you see when scanning for available devices. Included in that transmission is a UUID (Universally Unique Identifier) and a name (e.g. “smartpillxyz”). He has the pill transmit data by putting it in that name. This saves power by minimizing the time which the pill’s Bluetooth radio is turned on. The smartphone app extracts the data from these transmissions without ever connecting.

His goal is to monitor the voltage and the maximum current. This will tell him if his stomach acid battery works and what can be powered by it. First tests will use regurgitated gastric fluid and then later he’ll swallow the pill himself. As he puts it, why not, “people swallow and pass all kinds of weird stuff without a problem.” Thay may sound cavalier but judging by his hackaday.io page, he’s doing his homework.

Pinball Wizard Hacks Table For Tommy Stage Show

Ever since he was a young hacker
[Mark Gibson] has messed with the silver ball.
From Soho down to Denver
he must have fixed them all.
But we ain’t seen anything like this
in any amusement hall.
That darn devious hacker
sure hacks a mean pinball.

He hacks it like an expert,
Becomes part of the machine
Automating all the bumpers
Always wiring clean
His table plays by automation,
And radio control for all
That darn devious hacker
sure hacks a mean pinball.

Continue reading “Pinball Wizard Hacks Table For Tommy Stage Show”

A Unique Microphone Preamp

We live in a world in which nearly any kind of gadget or tool you can imagine is just a few clicks away. In many respects, this has helped fuel the maker culture over the last decade or so; now that people aren’t limited to the hardware that’s available locally, they’re able to create bigger and better things than ever before. But it can also have a detrimental effect. One has to question, for instance, why they should go through the trouble of building something themselves when they could buy it, often for less than the cost of the individual components.

The critic could argue that many of the projects that grace the pages of Hackaday could be supplanted with commercially available counterparts. We don’t deny it. But the difference between buying a turn-key product and building an alternative yourself is that you can make it exactly how you want it. That is precisely why [Sam Izdat] created this truly one of a kind microphone preamplifier. Could he have bought one online for cheaper? Probably. Could he have saved himself an immense amount of time and effort? Undoubtedly. Do we care? Not in the slightest.

The amplifier is based on the Texas Instruments INA217 chip, with an Arduino Nano and 128×64 OLED display providing the visualization. [Sam] was able to find a bare PCB for a typical INA217 implementation on eBay for a few bucks (see what we mean?), which helped get him started and allowed him to spend more time on the software side of things. His visualization code offers a number of interesting display modes, uses Fast Hartley Transforms, and very nearly maxes out the Arduino.

But perhaps no element of this build is as unique as the case. The rationale behind the design is that [Sam] wanted to compartmentalize each section of the device (power supply, amplifier, visualization) to avoid any interference. The cylindrical shapes were an issue of practicality: the compartments were constructed by using a hole saw to make wooden discs, which were then glued together and hollowed out. The case was stained and coated with polyurethane, but due to some slightly overzealous use of glue and fillers, the coloring isn’t uniform. This gives the final piece a somewhat weathered look, in sharp contrast to the decidedly high-tech looking display.

Overall, this build reminds us of the modular 3D printed amplifier we saw earlier in the year combined with these speaker-integrated Arduino VU meters.

Continue reading “A Unique Microphone Preamp”

There’s A Computer In This Hard Drive

Throughout the history of personal computers, there are some unique form factors. The 3com Audrey was sold as a computing appliance, meant to sit on a kitchen counter, to display recipes or something. For some reason, Macs were cubes once, and it actually wasn’t a bad machine. At one point, you were supposed to put a monitor on top of your computer.

A few years ago, [glitch] read about an interesting system from the early 80s. The SIIG S286 was designed by the same people that made SCSI cards and external hard drives, and it shows: this is a complete 286-based system stuffed into what was probably an external enclosure for a 5 1/4 drive at some point. After finding one of these bad boys on an auction site a few months ago, he finally got it working. It’s weird, but it can get on a network, and you can read Hackaday with it.

The entire computer is stuffed into a case that’s about 5″ wide, 4″ tall, and 10″ long. There’s a motherboard with built-in VGA, ‘game port’, and a printer port. There’s a riser card for real 16-bit ISA cards, two serial ports, and a connector for a hard disk and floppy drive. Basically, it’s an entire 286 system wrapped up in a tiny box.

After acquiring this machine, [glitch] took it apart and found the usual damage. The CMOS battery leaked, but not too bad. This was replaced with a hermetically sealed lithium thionyl chloride battery. These are non-rechargable, but a quick swipe of the soldering iron disable the motherboard’s charging circuitry. The hard drive was replaced with a 128 MB Flash module, and an Ethernet card was installed.

With that, [glitch] has a complete system that can connect to the Internet. Of course, getting on the Internet with a 286 is a challenge, but we have a Hackaday Retro Edition for just the occasion. The browser is Arache, with the mTCP package. That’s about as low as you can go in Intel-land, and excellent proof that the computer will work for another 35 years or so.