3D Printed ESP8266 Programming Jig

The various development boards such as the NodeMCU or Wemos D1 make working with the ESP8266 an absolute breeze. If they have a downside, it is that they are larger than the bare ESP2866, and of course cost a bit more. Just as with the Arduino, once you have the wiring sorted out and the code more or less finalized, your best bet is to ditch the unnecessary support hardware and use the bare module to save space and money in your final design.

The design took a few revisions to get right

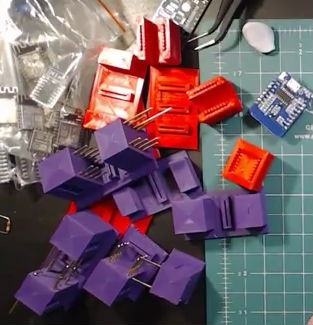
Unfortunately, the ESP8266 form factor isn’t terribly forgiving when it comes time for hooking up a programmer. Rather than having to solder a serial adapter to the chip to flash it, [Ryan] came up with a slick 3D printed programming jig that uses pogo pins. If you have to program these boards in bulk, a jig like this can save a massive amount of time and aggravation.

Beyond the 3D printed holder for the pogo pins, this programmer uses a FTDI USB-to-serial adapter, a couple passive components to smooth out the power going into the chip, and a couple buttons.

In the video after the break, [Ryan] walks through the many iterations it took to get the 3D printed aspect of the jig worked out. The design went through a few rather large revisions, including one that fundamentally changed the whole form factor. Even with the jig now working, he mentions that he might circle back around and try it from a different angle.

Programming jigs are a staple of electronics manufacturing, and we’ve covered quite a few that have helped transformed a proof of concept into a small scale production runs.

Continue reading “3D Printed ESP8266 Programming Jig”

Forth Version 1 Runs Again

Some people love Forth and some people hate it. However, you usually think of Forth as something running on a little computer such as an 8-bit microcomputer. When [Chuck Moore] developed the system back in the 1960s though, it ran on an IBM 1130. [Carl Claunch] took a scanned listing of the original code and got it running once again.

There are actually a few blog posts with details. Luckily, Forth is pretty simple — especially the core parts. However, there are a lot of differences from a modern Forth. The most obvious is that the dot keyword starts a definition and does not print the top of stack. However, internal details are different too — the system, for example, stores characters in packed EBCDIC — an ASCII-like code used by IBM computers.

Continue reading “Forth Version 1 Runs Again”

Terrible RC Transmitter Made Less Terrible

It should probably go without saying that we’ve got nothing against the occasional bout of elaborate troubleshooting and repair, in fact it’s one of the most common things we cover here. As it turns out, people aren’t overly fond of being fleeced, and there are a lot of smart people out there who will put a lot of work in to keep from having to toss a favorite piece of gear into the trash. We can’t fault them for that.

But we have to say, we generally don’t see those kind of elaborate repairs for something brand new. Unfortunately, that’s exactly what [Marek Baczynski] had to do when trying to review the new iRangeX transmitter for his YouTube channel “dronelab”. He found a transmitter that was so poorly designed and constructed that he had to address a laundry list of issues to make the thing halfway tolerable. As you might expect, he’s not suggesting anyone go run and pick this one up.

The biggest problem is a fundamental flaw with how the gimbals are constructed. Due to poorly mated surfaces between the potentiometer and the stick itself, the accuracy of the controller is very low. The potentiometers don’t even return to zero when the sticks are released. Some tape was used to tighten up the connection and make the controller usable, but such poor tolerances are hard to forgive when accurate control is essentially the whole point of the device.

The other issues took a bit more debugging to figure out. The TX made an absolutely terrible screeching sound when turned on, but [Marek] was sure he was hearing a little bit of melody under the din. Putting the signal through the oscilloscope, he was able to confirm his suspicions. As it turns out, the buzzer used in the TX has a built in tone generator that was overriding the intended melody. Switching it out for a basic buzzer fixed the issue. Similarly, an issue where the radio wouldn’t turn on if it was recently turned off was tracked back to a resistor of the wrong value. Putting a higher lower value resistor in its place sorted that out as well.

It’s hard to imagine how this device made it out of the factory with so many wrong or unsuitable components, but here we are. Not that this would be acceptable at any price point, but as [Marek] points out in the video, it isn’t as if this radio is even all that cheap. For nearly $90 USD, it doesn’t seem unreasonable to expect something that actually works.

This isn’t the first time he’s put “cheap” RC hardware through the wringer. We recently covered his efforts to quantify latency in different transmitters. As the RC transmitter world gets increasingly competitive, detailed analysis like these help separate the real gear from the toys.

Continue reading “Terrible RC Transmitter Made Less Terrible”

“Attempt” At Wristwatch Is A Solid Success

Sometimes silence is the best compliment to a DIY project, and that doesn’t just apply to homemade lockjaw toffee. When a watch is so well-made that it looks like one from a jewelry store, it is easy to keep quiet. [ColinMerkel] took many pictures of his fourth wristwatch attempt but “attempt” is his word because we call this a success. This time around he didn’t forget the crown for adjusting the time so all the pieces were in place.

His second “attempt” at wristwatch making was featured here and it had a classical elegance. Here, the proverbial game has been stepped up. Instead of using stock steel, the body is constructed of 303 stainless steel. The watch dial will definitely draw compliments if its DIY nature is revealed, which is equally mathematical and charming. Pictures of this process were enough to convey the build without words which is always a bonus if you only want a quick look or English isn’t your first choice for language.

Not only is [Colin] an upstanding horologist, he has a reputation with aftermarket door security and a looping guitar pedal.

Neon Display For A Vacuum Tube Calculator

When it comes to vintage displays, everyone gravitates to Nixies. These tubes look great, but you’re dealing with a certain aesthetic with these vintage numeric tubes. There is another option. For his Hackaday Prize entry, [castvee8] is making seven-segment displays out of vintage neon lamps. It looks great, and it’s the basis of an all-vacuum tube calculator.

The core of this build are a few tiny NE-2 neon bulbs. These are the same type of bulbs you’ll find in old indicators, and require somewhere around 100 volts to fire. These bulbs are then installed in a 3D-printed frame, giving [castvee] a real seven-segment display, a plus or minus sign, and an equals sign. It’s the beginnings of a calculator, right there.

One of the recent updates to this project is controlling these displays with modern logic. That might be a bit of a misnomer, because [castvee] is using diode steering and a TTL chip to cycle through the numbers 1 to 4. The actual code to do this is running on a microcontroller, though, so that might get a pass. This is just a test, though, and the real project looks to be an all-vacuum calculator. The project is still in its early stages, but there are still months to go in the Hackaday Prize, and we can’t wait to see what comes out of this project.

Scotty Allen Visits Strange Parts, Builds An IPhone

Scotty Allen has a YouTube blog called Strange Parts; maybe you’ve seen his super-popular video about building his own iPhone “from scratch”. It’s a great story, and it’s also a pretext for a slightly deeper dive into the electronics hardware manufacturing, assembly, and repair capital of the world: Shenzhen, China. After his talk at the 2017 Superconference, we got a chance to sit down with Scotty and ask about cellphones and his other travels. Check it out:

The Story of the Phone

Scotty was sitting around with friends, drinking in one of Shenzhen’s night markets, and talking about how bizarre some things seem to outsiders. There are people sitting on street corners, shucking cellphones like you’d shuck oysters, and harvesting the good parts inside. Electronics parts, new and used, don’t come from somewhere far away and there’s no mail-ordering. A ten-minute walk over to the markets will get you everything you need. The desire to explain some small part of this alternate reality to outsiders was what drove Scotty to dig into China’s cellphone ecosystem.

Continue reading “Scotty Allen Visits Strange Parts, Builds An IPhone”

Everything You Wanted To Know About Transformers (But Were Afraid To Ask)

[Jim Pytel] has a lot of very good instructional videos on his channel, and he recently added one you’ll enjoy on transformers. You probably know that transformers convert one AC voltage into another AC voltage. Some step up voltage, some step down voltage, and others simply pass voltage through but isolate the input from the output.

The 40 minute video covers basics including how the transformer works, the meaning of the turns ratio, and how transformers reflect impedance. You probably should understand how to compute AC power, but if you need a refresher [Jim] has a video for that, too.

Continue reading “Everything You Wanted To Know About Transformers (But Were Afraid To Ask)”