Lucky Cat POV Display Ditches The Waving And Windmills Out Of Control

If you’ve been in a Japanese restaurant, you’ve probably seen a maneki-neko, the lucky cat charm, where a cat welcomes you with a beckoning arm. It’s considered to bring good luck, but we’re not sure if [Martin Fitzpatrick] is pushing his luck with this Lucky Cat POV display. He hacked one of the figurines so the arm forms a persistence of vision (POV) display, where blinking LEDs on the paw create a dot-matrix style display.

Inside the hapless neko is a Wemos D1, motor driver, and a few other components that turn the cat into a working display. The five LEDs he attached to the paw are wide enough to display 5×7 characters. The tricky part in the mechanical design is getting signals from a stationary base to a spinning arm(ature). In this case it was easily solved with a 6-wire slip ring from Adafruit. [Martin] revs the lucky cat up using a brushed DC motor and a couple of gears.

The ESP8266 is running MicroPython — the combination should make this a snap to hook into any web service API you want to display your own messages. Right now the arm doesn’t have positional awareness so the message isn’t locked in a single position like it would be if a hall effect sensor was used. But [Martin] says there’s plenty of room left inside the cat and a future upgrade could include stashing the batteries inside for a cordless, all-in-one build. If he takes that on it’s a perfect time to add some type of shaft encoding as well.

Check the Lucky Cat showing off in the clip after the break.

Continue reading “Lucky Cat POV Display Ditches The Waving And Windmills Out Of Control”

Building A POV Display On A PC Fan

We’ve covered plenty of persistence of vision (POV) displays before, but this one from [Vadim] is rather fun: it’s built on top of a PC fan. He’s participating in a robot building competition soon and wanted to have a POV display. So, why not kill two birds with one stone and build the display onto a fan that could also be used for ventilation?

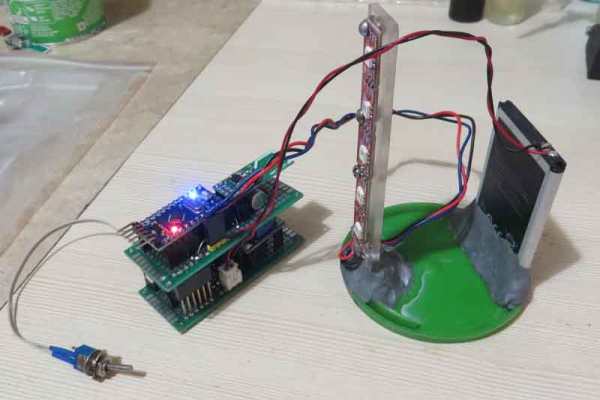
The display is a stand-alone module that includes a battery, Neopixels, Arduino and an NRF240L01 radio that receives the images to be displayed. That might seem like overkill, but putting the whole thing on a platform that rotates does get around the common issue of powering and sending signals to a rotating display: there is no need for slip connections.

[Vadim] goes into a good level of detail on how he built the display, including the problems he had diagnosing a faulty LED chip, and why it is important to test at each stage as it is easier to debug when the display isn’t whizzing around at high speed.

It’s a bit of a rough build that uses more protoboard than might be necessary, but we’re keeping our fingers crossed that it doesn’t fly off during the competition.

Continue reading “Building A POV Display On A PC Fan”

Pavement Projection Provides Better Bicycle Visibility At Night

Few would question the health benefits of ditching the car in favor of a bicycle ride to work — it’s good for the body, and it can be a refreshing relief from rat race commuting. But it’s not without its perils, especially when one works late and returns after dark. Most car versus bicycle accidents occur in the early evening, and most are attributed to drivers just not seeing cyclists in the waning light of day.

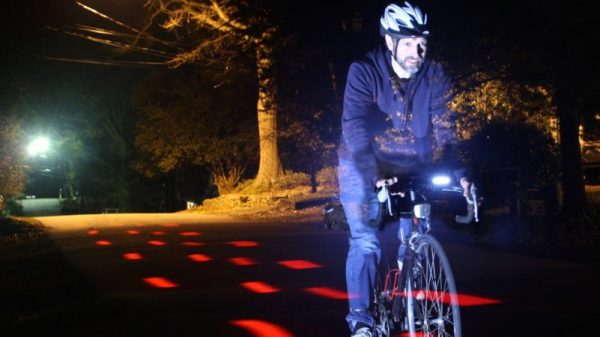
To decrease his odds of becoming a statistics and increase his time on two wheels, [Dave Schneider] decided to build a better bike light. Concerned mainly with getting clipped from the rear, and having discounted the commercially available rear-mounted blinkenlights and wheel-mounted persistence of vision displays as insufficiently visible, [Dave] looked for ways to give drivers as many cues as possible. Noticing that his POV light cast a nice ground effect, he came up with a pavement projecting display using four flashlights. The red LED lights are arranged to flash onto the roadway in sequence, using the bike’s motion to sweep out a sort of POV “bumper” to guide motorists around the bike. The flashlight batteries were replaced with wooden plugs wired to the Li-ion battery pack and DC-DC converter in the saddle bag, with an Arduino tasked with the flashing duty.

The picture above shows a long exposure of the lights in action, and it looks very effective. We can’t help but think of ways to improve this: perhaps one flashlight with a servo-controlled mirror? Or variable flashing frequency based on speed? Maybe moving the pavement projection up front for a head-down display would be a nice addition too.

A Simple POV Business Card

The business card is an odd survivor from the past, when you think about it. When a salesman in a Mad Men style suit stepped out of his Studebaker and walked past a room full of typists to the boss’s wood-paneled office, he would have handed over a card as a matter of course. It would get filed away in the Rolodex.

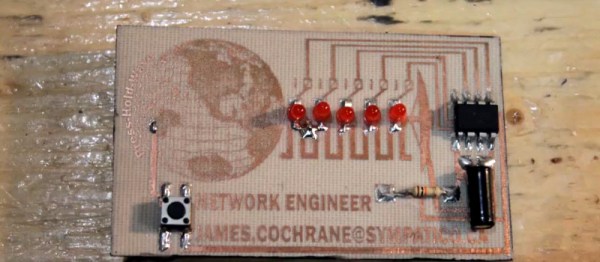
These days, making your card stand out from the crowd of print-shop specials has become an art form. In our community this extends to cards with integrated electronics, such as this one with a persistence-of-vision display driven by an ATtiny from [James Cochrane], shown in the video below.  It’s by no means the first such card, but he takes us through its design and construction in great detail which makes the video below the break worth a look. If you have never made a toner transfer PCB for example, you can see how his was made.

He makes the point that while a POV spinner needs only to display in one direction, a card has to be waved back and forth. Thus it needs to change the direction of its display, and needs a tilt sensor to activate this. His construction method uses through-hole components, but is surface mount in that they are soldered to the top surface of the board. The result is a rather attractive POV card that maybe isn’t something you’d hand out to all and sundry, but perhaps that’s not the point.

Continue reading “A Simple POV Business Card”

Not Your Typical POV Clock

Persistence of vision displays are fun, and a natural for clocks, but they’re getting a little Nixie-ish, aren’t they? There are only so many ways to rotate LEDs and light them up, after all. But here’s something a little different: a POP, or “persistence of phosphorescence” clock.

[Chris Mitchell] turned the POV model around for this clock and made the LEDs stationary, built into the tower that holds the slowly rotated display disk. Printed from glow-in-the-dark PLA, the disk gets charged by the strip of UV LEDs as it spins, leaving behind a ghostly dot matrix impression of the time. The disk rotates on a stepper, and the clock runs on a Nano with an RTC. The characters almost completely fade out by the time they get back to the “write head” again, making an interesting visual effect. Check it out in the video after the break.

Our only quibble is the choice to print the disk rather than cut it from sheet stock. Seems like there has to be commercially available phosphorescent plastic, or even the glow-in-the-dark paper used for this faux LED scrolling sign. But if you’ve got glowy PLA, why not use it?

Continue reading “Not Your Typical POV Clock”

POV Display Is FAN-tastic

Persistence-of-vision displays come in all shapes and sizes. But when you get a couple of [Bruce Land’s] students involved, well let’s just say they tend to up the ante. When [Emily] and [Han] decided to make a POV display for their next class project, they did so with style. Unsatisfied with smaller displays they saw on YouTube – they decided to make a larger one out of an old box fan and a DotStar LED strip, which are similar to NeoPixels except they use SPI, which means you can update the LEDs at a much faster rate. This makes them perfect for a POV display!

As usual with projects out of Cornell’s EE class – this POV project is extremely well documented and it’s nice to see the fundamental details of a POV display explained. So be sure to check out this project if you’re rusty on the inner workings of POV displays.

We’ve seen some interesting POV displays here at Hackaday, including one strapped to a dog to display its running speed. What’s the coolest POV display you’ve seen?

Finally, A Fidget Spinner We Can Love

We’ve been frankly mystified at the popularity of fidget spinners. After all, we can flip an ink pen around just fine. However, [MakersBox] just sold us on what he calls the geek spinner. The fact that the spinner is actually a PCB and has parts on it, would probably have been cool enough. However, the spinner also has a persistence of vision LED set up and can display 12 characters of text as it spins. Because the board is simple and uses through hole components, it would be a great project for a budding young hacker. You can see a video below.

The instructions are geared towards someone attempting their first project, too. If you know how to solder and insert a DIP IC, you might find you’ll skim them, but it is pretty straightforward. The 8 LEDs on one side operate from an ATTiny CPU, which you can program with an Arduino. The spinner has a hall effect sensor and a magnet to figure out the index position of the spin — crucial for displaying text.

Although the board attempts to balance the components, the battery side is apparently a little heavy. The suggestion is to add some weight using some hardware or solder to that side. Speaking of solder, the bearing in the center solders to the PCB. That’s going to take a lot of heat, so maybe you can finally use Dad’s soldering gun that has been gathering dust under your bench.

We liked the polar graph provided to help you set up the code for your own messages. The text implies there is a picture of one of these graphs filled out, but we think he forgot to include that picture. However, it is clear enough how to use it, and it would make it very easy to make your own text or any design that the spinner could produce.

This isn’t the first POV spinner, by the way. [MakersBox] has a nice set of acknowledgments for projects he’s seen or borrowed from, but the other one he mentions uses surface mount. Granted, surface mount isn’t a problem for most people these days, but starting out, it might be nice to stick with a through-hole design. If you want a more useful spinner, you can always make some music.

Continue reading “Finally, A Fidget Spinner We Can Love”