A Real Working Lego NES

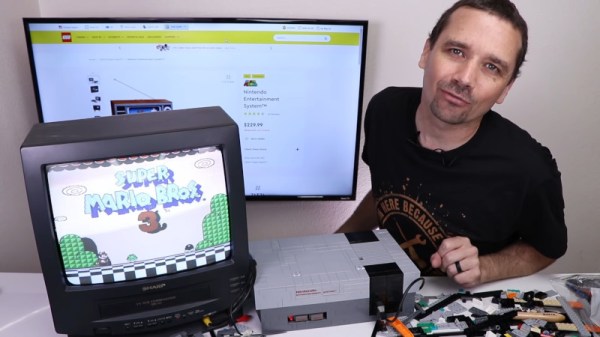
Lego is an entry into the world of engineering for many a youngster, and an enjoyable pursuit for many more. These days, high quality kits are available to make everything from the Tower of Pisa to Nintendo’s venerated NES console. [TronicsFix] picked up the latter set, and decided it needed to be fully functional.

Consisting of 2646 pieces, the official Lego NES is a faithful recreation of the original, albeit at approximately 80% of the size. After building the kit to spec, [TronicsFix] noted that there was no way a cartridge would fit in the slot.

Given this failing, a ground-up rebuild was in order. Starting with the internals from an original NES, [TronicsFix] set about building an appropriately sized base and working from there. Supports were built to mount the various components, with the controller ports being particularly well done, and the video output and power switches being a little more tricky. The many cosmetic pieces from the official kit came in handy here, giving the final product the aesthetic touches it needed to fit the bill.

The final result is an authentic, functional NES in a LEGO case. [TronicsFix] demonstrates as such, showing the console playing Super Mario 3. Nintendo consoles remain a favorite amongst modders; some going so far as to build fire-breathing creations. Video after the break.

Continue reading “A Real Working Lego NES”

Upgraded Infotainment Options On A 14 Year Old Mercedes

It used to be that upgrading a car stereo was fairly simple. There were only a few mechanical sizes and you could find kits to connect power, antennas, and speakers. Now, though, the car stereo has interfaces to steering wheel controls, speed sensors, rear-view cameras, and more. [RND_ASH] was tired of his 14-year-old system so he took an Android head unit, a tablet, and an Arduino, and made everything work as it was supposed to.

The key is to interface with the vehicle’s CAN bus which is a sort of local area network for the vehicle. Instead of having lots of wires running everywhere, today’s cars are more likely to have less wiring all shared with many devices.

Continue reading “Upgraded Infotainment Options On A 14 Year Old Mercedes”

Digital Pregnancy Tests Use LEDs To Read Between The Lines

[Foone] saw a tweet a few weeks ago alleging that digital pregnancy tests are a rip-off. Regular, cheap tests have an absorbent strip running the length of the plastic, with one end exposed for collecting urine. A few excruciating minutes later, a little plastic window in the middle will show one line, two lines, or a plus or minus sign depending on the presence of human chorionic gonadotropin (HCG) in the urine.

As it turns out, at least two digital tests out there are the exact same thing, but with more steps. Instead of a window, they include circuitry that interprets the lines and publishes the result to a little screen in plain English. It can even tell you if you’re doing it wrong by flashing a little RTFM icon.

[Foone]’s teardown reveals a CR1616 coin cell, an 8-bit microcontroller, and a little phototransistor setup that shines LEDs on the strip and reads the incoming light. Unfortunately, the micro is the mask ROM version, so [Foone] can’t reprogram it to run Doom.

The original tweet’s author is probably not alone in assuming that digital tests are supposed to be more accurate somehow. We think the accuracy claim is more about removing the frazzled and/or incompetent human variable from the equation. If the test interprets the results for you, then there’s no mistaking the results, which is technically a higher degree of accuracy. But if you’re in doubt, you get a test from a doctor.

There’s been some discussion about the e-waste aspect of these all these tests — that it’s a shame to produce a microcontroller just to pee on it and throw it away. Sure, you could look at it that way, but unlike a lot of e-waste, these are tools. It’s unfortunate that this is the industry’s idea of higher accuracy, but what should we expect? It’s just testing for the presence of a hormone in urine. Interpreting the results is up to the viewer. We should probably be astounded that they got the cost down to two for $7.

Many people choose to wait a while to start spreading the news. With a Bluetooth-enabled pregnancy test, everyone can find out together.

Thanks for the tip, [Jay]!

Third Time’s A Charm For This Basketball-Catching Robot

We all know that version one of a project is usually a stinker, at least in retrospect. Sure, it gets the basic idea into concrete form, but all it really does is set the stage for a version two. That’s better, but still not quite there. Version three is where the magic all comes together.

At least that’s how things transpired on [Shane Wighton]’s quest to build the perfect basketball robot. His first version was a passive backboard that redirected incoming shots based on its paraboloid shape. As cool as the math was that determined the board’s shape, it conspicuously lacked any complicated systems like motors and machine vision — you know, the fun stuff.  Version two had all these elaborations and grabbed off-target shots a lot better, but still, it had a limited working envelope.

Enter version three, seen in action in the video below. Taking a page from [Mark Rober]’s playbook, [Shane] built a wickedly overengineered CoreXY-style robot to cover his shop wall. Everything was built with the lightest possible materials to keep inertia to a minimum and ensure the target ends up in the right place as quickly as possible. [Shane] even figured out how to mount the motor that tilts the backboard on the frame rather than to the carriage. A Kinect does depth-detection duty on the incoming ball — or the builder’s head — and drains pretty much every shot it can reach.

[Shane] has been doing some great work automating away the jobs of pro athletes. In addition to basketball, he has tackled both golf and baseball, bringing explosive power to each. We’re looking forward to versions two and three on both of those builds as well.

Continue reading “Third Time’s A Charm For This Basketball-Catching Robot”

Wooden Tank’s Movement Hinges On Hinges

When we first looked at this tank, we thought it was pretty cool. The sides are unpainted 1/2″ (12mm) plywood, so it is not flashy. The dimensions came from Google-fu-ing the heck out of the WWII Hetzer and scaling them to 1:6. What knocks our socks off is how much [Bret Tallent] made use of parts you would find in a hardware store or bicycle shop. He uses twin motors from electric bikes, and the wheels look like replacement shopping cart wheels. The best part is the treads, which are dozens of hinges fastened with pairs of bolts and nylon-insert nuts. Something is reassuring about knowing that a repair to your baby is no further than a bike ride.

We don’t know what started [Bret] on his path to sidewalk superiority, but we suspect he is cooped up like the rest of us and looking to express himself. Mini-Hetzer is not licensed by Power Wheels and never will be, so it probably won’t turn into a business anytime soon. There is a complete gallery starting with an empty plywood base, and the pictures tell the story of how this yard Jäger got to this point. There are plans to add a paintball gun and streaming video, so we’d advise that you don’t mess with the jack-o-lanterns on his block this year. Give his gallery a view and see if you don’t become inspired to cobble something clever from the hardware store too. Then, tell us about it.

Another creative hacker used wood for their tank body and the treads as well. If you like your treaded vehicles functional, we have one meant to taxi small planes over the tarmac.

AUTOVON: A Phone System Fit For The Military

It’s a common enough Hollywood trope that we’ve all probably seen it: the general, chest bespangled with medals and ribbons, gazes at a big screen swarming with the phosphor traces of incoming ICBMs, defeatedly picks up the phone and somberly intones, “Get me the president.” We’re left on the edge of our seats as we ponder what it must be like to have to deliver the bad news to the boss, knowing full well that his response will literally light the world on fire.

Scenes like that work because we suspect that real-life versions of it probably played out dozens of times during the Cold War, and likely once or twice since its official conclusion. Such scenes also play into our suspicion that military and political leaders have at their disposal technologies that are vastly superior to what’s available to consumers, chief among them being special communications networks that provide capabilities we could only have dreamed of back then.

As it turns out, the US military did indeed have different and better telephone capabilities during the Cold War than those enjoyed by their civilian counterparts. But as we shall see, the increased capabilities of the network that came to be known as AUTOVON didn’t come so much from better technology, but more from duplicating the existing public switched-telephone network and using good engineering principles, a lot of concrete, and a dash of paranoia to protect it.

Continue reading “AUTOVON: A Phone System Fit For The Military”

Building An Affordable Press For Heat Set Inserts

If you’re building mechanical assemblies with 3D printed parts, you’ll quickly realize that driving machine screws into thermoplastic isn’t exactly an ideal solution. It can work in a pinch, but you can easily strip the threads if you crank down too hard. The plastic holes can also get worn down from repeated use, which is a problem if you’re working on something that needs to be taken apart and reassembled frequently. In those situations, using brass heat set inserts gives the fasteners something stronger to bite into.

You can install these inserts by hand, but if you plan on doing a lot of them, a dedicated press station like the one [Chris Chimienti] recently put together will save you a lot of aggravation in the long run. In the video after the break he walks viewers through the design and use of the device, which itself relies on a number of 3D printed parts using the very same inserts it’s designed to install.

The spring-loaded arm can slide up and down the extrusion to adjust for height.

To build this tool you’ll need a piece of aluminum extrusion, some smooth rod, a couple springs, and an assortment of fasteners. Nothing that wouldn’t likely be in the parts bin of anyone who’s been tinkering with 3D printers for awhile, though even if you had to buy everything, the Bill of Materials will hardly break the bank. For the base you can use a piece of scrap wood, though [Chris] has opted to make it a storage compartment where he can store the inserts themselves. We really like this approach, but obviously you’ll need to have access to woodworking tools in that case.

Clearly shopping on the top shelf, [Chris] purchased a kit that actually came with a Weller soldering iron and the appropriate tips for the various sized inserts. If you’re like us and just buy the inserts that come in a plastic baggie, you may need to adapt the arm to fit your iron of choice. That said, the idea of having a dedicated iron that you can leave mounted in the press makes a lot of sense to us if you can swing it.

[Joshua Vasquez] wrote up a phenomenal guide to getting started with heat set inserts last year that’s an absolute must-read for anyone interested in the concept. Whether you build a dedicated press or just push them in freehand, his tips and tricks will help insure you get the best result possible.

Continue reading “Building An Affordable Press For Heat Set Inserts”