An Elegant Modular Enclosure System For The Raspberry Pi 4

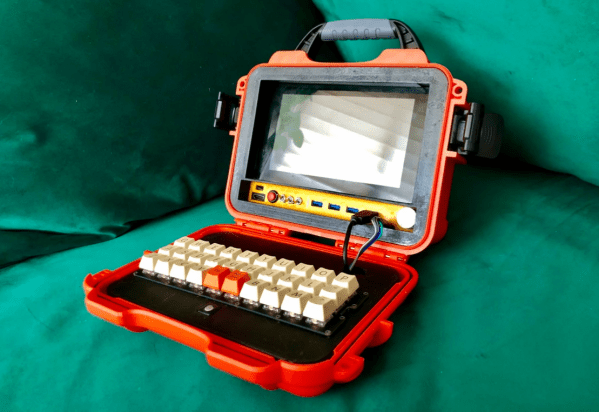
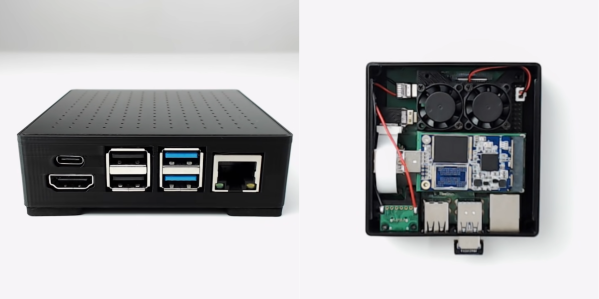
[NODE] has been experimenting with Raspberry Pi servers and mini computers for a long time, and knows all too well how the wiring can quickly turn into a rat’s nest. His latest creation is  the Mini Server version 3, a modular enclosure system for the Raspberry Pi 4, is designed to turn it into practical computing box.

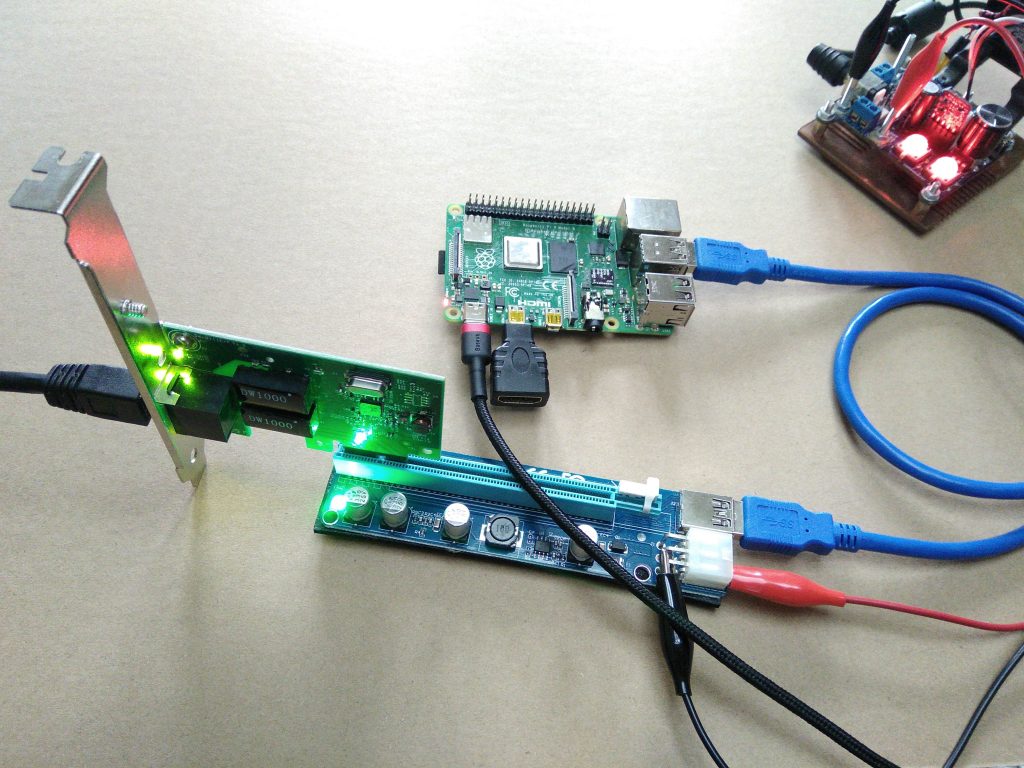
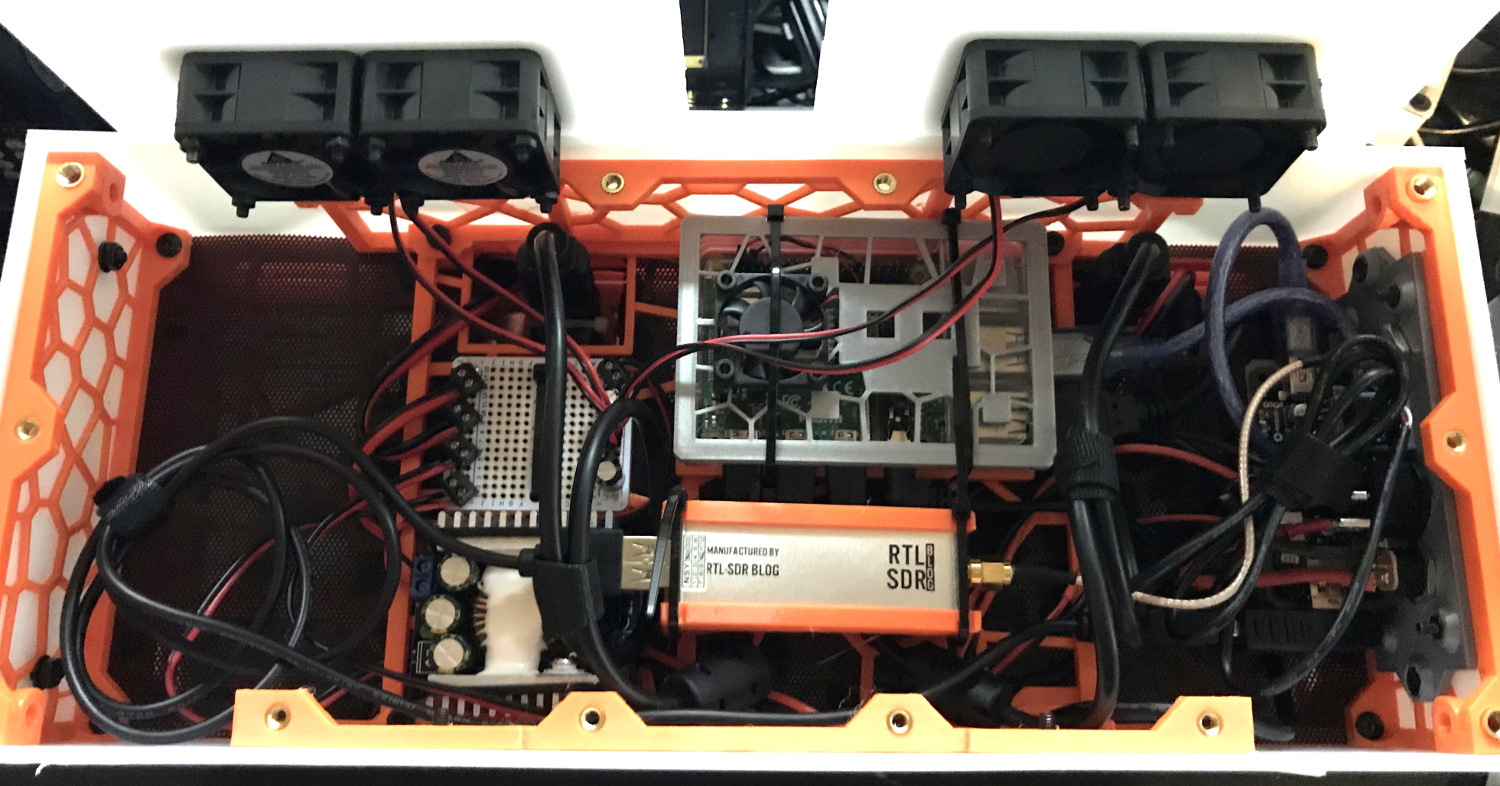
The basic enclosure is a 92 mm x 92 mm x 26 mm 3D printed frame with a custom PCB top cover. One of the main goals was to collect all the major connectors on one side and make the micro SD slot easily accessible. To do this [NODE] created a set of custom PCB adaptors to route the USB-C and an HDMI port to the same side as the other USB ports, and move the micro SD slot to the bottom of the enclosure. A low profile adaptor was also designed to connect a mSATA SSD to one of the USB 3 ports, and there is space inside the enclosure for one or two cooling fans. Unlike previous version of the mini server, no hardware modifications are required on the Pi itself.

The only downside that we can see is that it doesn’t allow external access to the GPIO ports, but the entire project is open source specifically to allow people to make their own modifications.

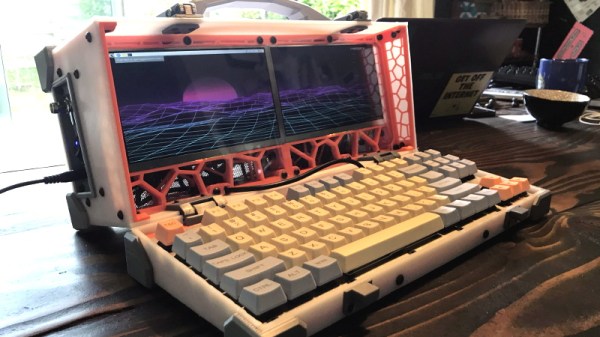
[NODE] is a big fan of turning Raspberry Pis into custom computing devices, ranging from small terminal devices and pocket servers, to complete laptops.

IOT Pinball Puts Oktoberfest Fun On Tap

We don’t really miss going out to bars all that much, unless you’re talking about the one downtown with all the pinball machines. Don’t get us wrong — pinball emulators have gotten crazy good, and you can find exact digital replicas of most machines to play on your phone or whatever. But it just doesn’t compare to the thrill of playing a real cabinet.

Don’t despair, because for the next couple of weeks, you can queue up to play on a real Oktoberfest pinball machine that’s sitting in Espoo, Finland. The controls are hooked up to a Raspberry Pi 4 through a custom HAT, along with a camera pointed at the playfield and another focused on the backglass screen. The game development/video streaming company Surrogate is hosting a tournament over the internet, and will be giving prizes to the top ten high rollers.

We usually have to wait until the holiday season to come across these remote-reality gaming opportunities. Having played it several times now, we recommend spamming the flippers until you get a feel for the lag. Also, just holding the flippers up while the ball is in the upper half of the playfield will catch a lot of balls that you might otherwise lose due to flipper lag, and sometimes they end up back in front of the launcher to shoot again. After the break, check out a brief but amusing video of setting up the cameras and Pi that includes a taste of the Oktoberfest music.

The tournament runs until the end of August, which should be enough time for somebody to set up CV and a keyboard to play this automatically. Need inspiration? Here’s an open-source pinball machine that can play itself.

Continue reading “IOT Pinball Puts Oktoberfest Fun On Tap”

RadioGlobe Takes The World Of Internet Radio For A Spin

There’s no denying that the reach and variety of internet radio is super cool. The problem is that none of the available interfaces really give the enormity of the thing the justice it deserves. We long for a more physical and satisfying interface for tuning in stations from around the globe, and [Jude] has made just the thing.

RadioGlobe lets the user tune in over 2000 stations from around the world by spinning a real globe. It works by using two absolute rotary encoders that each have a whopping 1024 positions available. One encoder is stuck into the South Pole, and it reads the lines of longitude as the user spins the globe.

The other encoder is on the left side of the globe, and reads whatever latitude is focused in the reticle. Both encoder are connected to a Raspberry Pi 4, though if you want to replicate this open-source project using the incredibly detailed instructions, he says a Raspberry Pi 3 B+ will work, too.

In the base there’s an LCD that shows the coordinates, the city, and the station ID. Other stations in the area are tune-able with the jog wheel on the base. There’s also an RGB LED that blinks red while the station is being tuned in, and turns green when it’s done. We totally dig the clean and minimalist look of this build — especially the surprise transparent bottom panel that lets you see all the guts.

There are three videos after the  break – a short demo that gives you the gist of how it works, a longer demonstration, and a nice explanation of absolute rotary encoders. Those are just the tip of the iceberg, because [Jude] kept a daily vlog of the build.

Maybe you just long for a web radio that dials in vintage appeal. This antique internet radio has a lot of features, but you wouldn’t know it from the outside.

Continue reading “RadioGlobe Takes The World Of Internet Radio For A Spin”

Adding PCIe To Your Raspberry Pi 4, The Easier Way

Ever since people figured out that the Raspberry Pi 4 has a PCIe bus, the race was on to be the first to connect a regular PCIe expansion card to a Raspberry Pi 4 SBC. Now [Zak Kemble] has created a new approach, using a bridge PCB that replaces the VL805 USB 3 controller IC. This was also how the original modification by [Tomasz Mloduchowski] worked, only now it comes in a handy (OSHPark) PCB format.

After removing the VL805 QFN package and soldering in the bridge PCB, [Zak] confirmed that everything was hooked up properly and attempted to use the Raspberry Pi 4 with a PCIe extender. This showed that the Raspberry Pi would happily talk with a VL805-based USB 3.0 PCIe expansion card, as well as a Realtek RTL8111-based Ethernet card, but not a number of other PCIe cards. Exactly why this is is still unclear at this point.

As a bonus, [Zak] also found that despite the removal of the VL805 IC from the Raspberry Pi rendering its USB 3 ports useless, one can still use the USB-C ‘power input’ on the SBC as a host controller. This way one can have both PCIe x1 and USB on a Raspberry Pi 4.

This is the third iteration we’ve seen for using PCIe with the Pi. If you’re building on the work of [Thomasz Mloduchowski], which inspired [Colin Riley] to add expanders, and now this excellent hack by [Zak], we want to hear about it!

(Thanks to Itay for the tip)

Plant’m If You Got’m And Keep’m Alive

Having a few plants around is a great way to liven up your living and/or working space. They look nice, you get to watch them grow and change, and some types of plants can actively improve the room’s air quality. But let’s face it — even the easy ones require a baseline level of care that can easily fall by the wayside. After all, the poor things can’t scream out for water or get up and find a sunnier spot for themselves.

[Ine Hocedez] was tired of watching her plants die and not knowing why. The two main culprits involve water and light, though there can be other issues like soil pH and bugs. It’s easy to get the balance wrong, so why not automate everything?

Plant’m is a complete, portable package that [Ine] designed for a school project. A soil moisture sensor dictates the watering schedule via Raspberry Pi, and water is automatically pumped from an elevated tank.

The lamp is meant to supplement the sunlight, not replace it. But that’s the real beauty of this botanical box — [Ine] can just pick it up and try a different spot if the plant droops or shows burnt spots.

Got the sunlight part down for your plant, but can’t remember to water it? Re-purpose an old Keurig and give it an automatic drip.

Lunchbox Cyberdeck Is A Tasty Build

One of our favorite things about the cyberdeck concept has got to be the versatility of this mobile computing medium. Some cyberdecks lean toward making the user into a full-on Snow Crash gargoyle, and others are more fold-and-go like laptops. This discreet deck from [Andres Borray] looks as though it might have a PB&J and a bag of chips inside.

Instead, there’s a Gherkin. What? For the uninitiated, that’s a handmade 40% 30% mechanical keyboard right there and it’s called the Gherkin. It has more keys than it appears, thanks to layers in the firmware. By long pressing any key on the bottom row, the entire map changes to access stuff like numbers and F keys.

This lunchbox is powered by a Raspberry Pi 4 and uses the official Pi display with the touch input enabled. Even so, there’s a baby trackball right there under the thumbs. [Andres] designed and printed panels for both sides to mount everything, and those files will be available soon along with a more detailed build log.

You can do anything you want with a cyberdeck build — it’s kind of the point. Want to program microcontrollers wherever? Get your feet wet with a cyberduck.

Via reddit

A Dual Screen Luggable With Integrated RTL-SDR

It’s been fascinating to watch the development of bespoke mobile computers go from a few sheets of foam board and a Raspberry Pi into hardware that looks like it’s actually been transported here from an alternate reality. Granted a Raspberry Pi is more often than not still onboard, but the overall design and construction techniques of these very personal computers has improved by leaps and bounds.

The latest of these cyberdecks, a dual screen “luggable” reminiscent of classic computers like the Compaq Portable or Kaypro, comes our way from [dapperrogue]. Powered by the Raspberry Pi 4 and featuring a scratch-built mechanical keyboard to perfectly fit the machines’s specific dimensions, this is easily one of the more practical builds we’ve seen. As visually striking as they may be, few would argue that the small offset display that seems characteristic of most decks are ideal from a usability standpoint.

While the keyboard plate was milled out on a CNC, [dapperrogue] says the design of the HDPE body panels and rear polycarbonate viewing window were simple enough they could be done by hand on a band saw. The PETG internal frame uses a Voronoi pattern that not only reduces the amount of time and material required to print it, but maximizes airflow. The fact that it looks like some kind of alien biological life form only helps the retro-futuristic aesthetics.

There’s still plenty of room inside the enclosure, which is good, as [dapperrogue] says there’s more goodies to come. Adding internal battery power is a logical next step, and now that the Pi 4 can boot to external drives, and SSD is also on the list of future upgrades.

For readers who might be getting a sense of déjà vu from this project, [dapperrogue] notes this design was inspired by the phenomenal Reviiser that [Dave Estes] released earlier this year.