An Open Hardware Modem For The Modern Era

Readers of a certain age will no doubt remember the external modems that used to sit next to their computers, with the madly flashing LEDs and cacophony of familiar squeals announcing your impending connection to a realm of infinite possibilities. By comparison, connecting to the Internet these days is about as exciting as flicking on the kitchen light. Perhaps even less so.

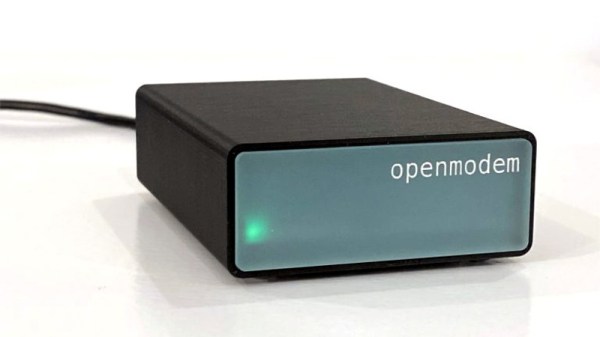
But while we don’t use them to connect our devices to the Internet anymore, that doesn’t mean the analog modem is completely without its use. The OpenModem by [Mark Qvist] is an open hardware and software audio frequency-shift keying (AFSK) modem that recalls some of the charm (and connection speeds) of those early devices.

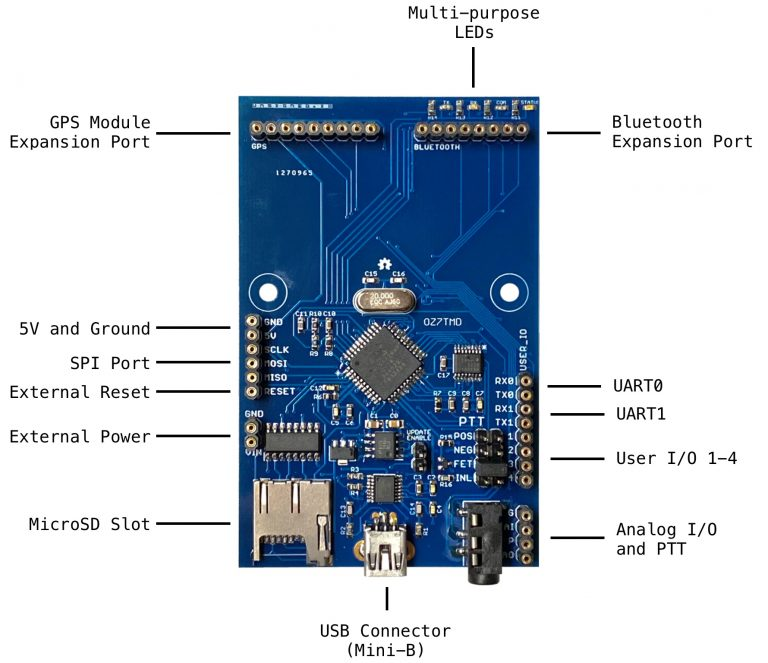
It’s intended primarily for packet radio communications, and as such is designed to tie into a radio’s Push-to-Talk functionality with a standard 3.5 mm jack connector. Support for AES-128 encryption means it will take a bit more than an RTL-SDR to eavesdrop on your communications. Though if you’re really worried about others listening in, the project page says you could even use the OpenModem over a wired connection as you would have in the old days.

If you just want a simple and reliable way to get a secure AFSK communication link going, the OpenModem looks like it would be a great choice. But more than that, it offers a compelling platform for learning and experimentation. The hardware is compatible with the Arduino IDE, so you can even write your own firmware should you want to spin up your own take on this classic communications device.

The OpenModem is the evolution of the MicroModem that [Mark] developed years ago, and it’s clear that the project has come a long way since then. Of course, if you’re more about the look than the underlying technology, you could always just put a WiFi access point into the case of an old analog modem.

[Thanks to Boofdas for the tip.]

Xilinx Makes MIPI CSI And DSI Controller IP Blocks Free To Use With Vivado

If you want to use a display or camera with an FPGA, you will often end up with a MIPI-based solution. As of the Xilinx Vivado 2020.1 release, the MIPI DSI (display serial interface) and CSI (camera serial interface) IP blocks are now bundled with the IDE to be used freely with Xilinx FPGAs.

The Xilinx MIPI CSI2 receiver block implements the CSI-2 v1.1 specification, which although a bit older is essentially the same CSI implementation as on the Raspberry Pi boards. This means that it would allow one to use this IP block on an FPGA with many common CSI camera modules out there. The IP block offers a standard AXI4 interface for connecting up to the rest of a design.

Similarly, the Xilinx MIPI DSI transmitter block implements DSI v1.3 specification. This offers a maximum data rate of 1.5 Gbps, with an AXI4-lite interface to communicate with the rest of the design. Both IP blocks are subject to the Core license agreement, which doesn’t appear to preclude it from being used in a specific fashion, whether commercial or personal.

This is not the only way to use MIPI devices with an FPGA, of course. Take for example [Daveshah]’s CSRIx project on Github.

Header image: Kwapix / CC BY-SA 4.0

External Battery Mod For Action Camera Does It Non-destructively

[Facelesstech] owns an SJCAM SJ4000 action camera, but the internal battery was no longer functional. Not wishing to buy a replacement and unwilling to hook up an ungainly USB cable to feed power, the solution was to design and 3D print an adapter to power the camera from a single rechargeable 14500 sized battery (which is the same size as an AA cell, and a good match for the width of the camera.)

The adapter works by mimicking the original battery, so the camera never knows the difference. A 3D-printed holder for the 14500 battery (which doubles as a GoPro compatible mount) has an extension the same size and shape of the camera’s original internal battery. The tricky part was interfacing to the power connectors buried inside the camera’s battery bay. For a solution, [Facelesstech] eventually settled on the small connectors harvested from inside a female header, using them to connect to the small blades inside the camera. We broke open a spare female 0.1″ header, shown here, to make it clear where these little pieces come from. The only other battery hardware needed are the contacts for an AA cell, but those are also easy to harvest and reuse.

The GitHub repository for the project includes STL files as well as the FreeCAD files for the parts. A video overview is embedded below.

Continue reading “External Battery Mod For Action Camera Does It Non-destructively”

Lunchbox Cyberdeck Is A Tasty Build

One of our favorite things about the cyberdeck concept has got to be the versatility of this mobile computing medium. Some cyberdecks lean toward making the user into a full-on Snow Crash gargoyle, and others are more fold-and-go like laptops. This discreet deck from [Andres Borray] looks as though it might have a PB&J and a bag of chips inside.

Instead, there’s a Gherkin. What? For the uninitiated, that’s a handmade 40% 30% mechanical keyboard right there and it’s called the Gherkin. It has more keys than it appears, thanks to layers in the firmware. By long pressing any key on the bottom row, the entire map changes to access stuff like numbers and F keys.

This lunchbox is powered by a Raspberry Pi 4 and uses the official Pi display with the touch input enabled. Even so, there’s a baby trackball right there under the thumbs. [Andres] designed and printed panels for both sides to mount everything, and those files will be available soon along with a more detailed build log.

You can do anything you want with a cyberdeck build — it’s kind of the point. Want to program microcontrollers wherever? Get your feet wet with a cyberduck.

Via reddit

The Hackaday Prize: Field Ready Is Changing The Face Of Humanitarian Relief

It’s one of the enduring images of a humanitarian aid mobilization: military transport planes lined up on runways, ready to receive pallets of every conceivable supply. The cardboard boxes on those shrink-wrapped pallets are filled with everything from baby formula to drinking water, and will join crates filled with the tools and materials needed to shelter, clothe, feed, and heal people in places where civilization has suddenly come into short supply thanks to a disaster, sometimes natural, but often man-made.

What if it didn’t need to be that way? What if, instead of flight after flight of supplies sent in to help rebuild, perhaps just one flight was needed, one stuffed with the tools of our trade: 3D-printers, Arduinos, electronic components, machine tools, and the experts to use them. It certainly wouldn’t make up for the short-term need for food and water, but importing the ability to manufacture the items needed locally would go a long way to repairing infrastructure in the disaster area.

Rethinking disaster response is the core mission of Field Ready, one of the groups we’ve partnered with for the 2020 Hackaday Prize. By way of introduction to this non-profit with a potentially world-changing mission, and to help those who are participating in the 2020 Hackaday Prize challenges, here’s a little bit about Field Ready — what they do, how they see digital manufacturing fitting into their mission, and where they’re going in the future.

Continue reading “The Hackaday Prize: Field Ready Is Changing The Face Of Humanitarian Relief”

Bertha Benz Pushed The Automobile Toward Production

Who invented the automobile? The answer depends a little bit on your definition of the word. The first practical gas-powered carriage was built by Karl Benz, who later merged his company with Daimler Motor Group to form Mercedez-Benz.

Karl Benz was a design visionary whose first fascinations were with locomotives and bicycles. His 1886 Benz Patent Motorwagen was the first automobile to generate its own power, which was made with a two-stroke engine and transmitted to the rear axle by a pair of chains. He didn’t think it was ready for the road, and he was mostly right.

Bertha Benz, Karl’s wife and business partner, believed in her husband’s invention. She had been there since the beginning, and provided much of the funding for it along the way. If she hadn’t taken it out for a secret, illegal joyride, the Motorwagen may have never left the garage.

Continue reading “Bertha Benz Pushed The Automobile Toward Production”

Finding Perfect Part Fits With The Goldilocks Approach (and OpenSCAD)

There is something to be said for brute force or trial-and-error approaches to problems, especially when finding a solution has an empirical element to it. [Tommy] perceived that to be the case when needing to design and 3D print servo horns that would fit factory servos as closely as possible, and used OpenSCAD to print a “Goldilocks array” from which it was possible to find a perfect match for his printer by making the trial and error process much more efficient. By printing one part, [Tommy] could test-fit dozens of options.

What made doing this necessary is the fact that every 3D printer has some variance in how accurately they will reproduce small features and dimensions. A 6.3 mm diameter hole in a CAD model, for example, will not come out as exactly 6.3 mm in a 3D-printed object. It will be off by some amount, but usually consistently so. Therefore, one way around this is to empirically determine which measurements result in a perfect fit, and use those for production on that specific 3D printer.

That’s exactly what [Tommy] did, using OpenSCAD to generate an array of slightly different sizes and shapes. The array gets printed out, servos are test-fitted to them, and whichever option fits best has its dimensions used for production. This concept can be implemented in any number of ways, and OpenSCAD makes a decent option due to its programmatic nature. Interested in OpenSCAD? It will run on nearly any hardware, and you can get up and running with the basics in probably less than ten minutes.