Pi Zero Power Optimization Leaves No Stone Unturned

If you’ve ever designed a battery-powered device with a Pi Zero, you have no doubt looked into decreasing its power consumption. Generic advice, like disabling the HDMI interface and the onboard LED, is omnipresent, but [Manawyrm] from [Kittenlabs] goes beyond the surface-level, and gifts us an extensive write-up where every recommendation is backed with measurements. Armed with the Nordic Power Profiler kit and an SD card mux for quick experimentation, she aimed at two factors, boot time and power consumed while booting, and made sure to get all the debug information we could use.

Thanks to fast experimentation cycles and immediate feedback, we learn plenty of new things about what a Pi Zero does and when, and how we can tame various power-hungry aspects of its behavior. Disabling the GPU or its aspects like HDMI output, tweaking features like HAT and other peripheral probing, and even tactical overclocking during boot – it’s an extensive look at what makes a Pi Zero tick, and no chance for spreading baseless advice or myths.

All in all, this write-up helps you decrease the boot time from twelve seconds to just three seconds, and slash the power budget of the boot process by 80%. Some recommendations are as simple as config.txt entries, while others require you to recompile the kernel. No matter the amount of effort you can put into power optimization, you’ll certainly find things worth learning while following along, and [Manawyrm]’s effort in building her solar-powered Pi setup will help us all build better Pi-Zero-powered solar devices and handhelds.

Memory Box Shows Photos Based On Fingerprint

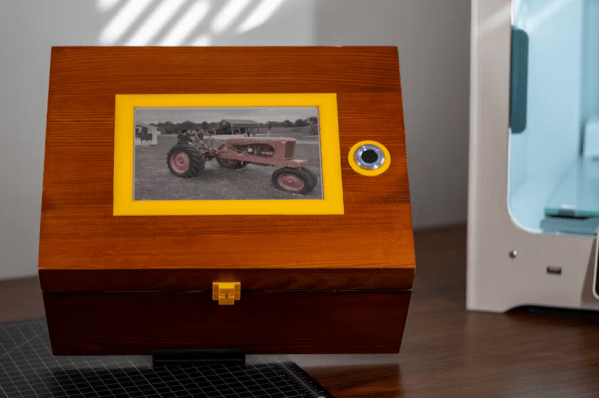
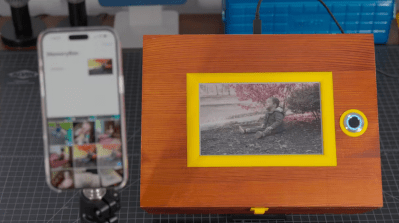
With his young son’s birthday coming up in a few weeks, [Mike Buss] wanted to build him something fun that the boy could hold on to all his life. After doing some sketching, [Mike] arrived at the idea to make a memory box uses a fingerprint scanner to show different pictures based on the fingerprint.

[Mike] started by rendering the box in Blender and then cutting a sizable hole in the lid for the E-ink screen. That’s around the time the first problem came up — there were weird vertical lines in the display. Sure enough, that screen was broken. Then he added the SD card reader, but the SD card wouldn’t work, and was heating up besides. Finally, the fingerprint scanner was causing issues, but it turned out that the power supply was at fault.

After all of that, [Mike] switched from an ESP32 to a Raspi Zero W to simplify the whole process of finding a photo tagged with the person’s fingerprint. [Mike] added a Python script that listens for new memories over Wi-Fi. A memory in this case consists of a picture, a description, a list of people tagged in the picture, and some additional metadata.

One important lesson [Mike] learned was that of balancing planning vs. just taking action. If he had taken the time to consider the complexity of the tagged-photo retrieval system, he would have arrived at an SBC solution much sooner. Be sure to check out the build video after the break.

You can have all sorts of fun with fingerprint scanners, like this one that opens a secret bookcase door.

Continue reading “Memory Box Shows Photos Based On Fingerprint”

Another Chance To Revive Your Nabaztag

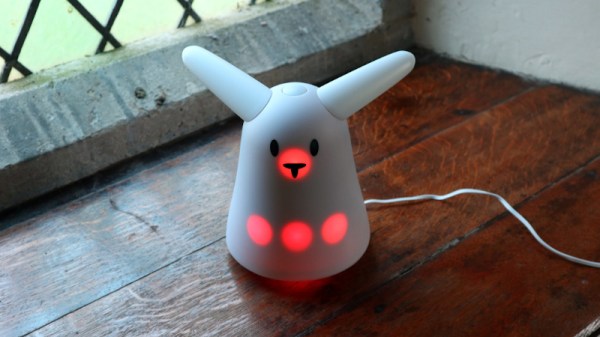
The early history of home internet appliances was replete with wonderful curios as a new industry sought to both find a function for itself and deliver something useful with whatever semiconductors were available nearly two decades ago. A favourite of ours is the Nabaztag, a French-designed information appliance in the form of a cute plastic rabbit whose ears would light up and move around as it delivered snippets of information.

The entity behind the Nabaztag folded and the servers went away years ago of course, but the original designer [Olivier Mével] never gave up on his creation. Back in 2019 he created an updated mainboard for the device packing a Raspberry Pi Zero W, which has been released in a series of crowdfunding campaigns. If you have a Nabaztag and haven’t yet upgraded, you can snag one now as the latest campaign has started.

We took a look at the Nabaztag back in 2020, at the time with out bricked original unit. Happily a year later we were able to snag one of the upgrades, so it’s now happily keeping us up to date with the time, weather, and other fun things. The upgrade motherboard is designed to slot into the same place as the original and mate with all its connectors, and even comes with that annoying triangle screwdriver. If you want to stand out against all the Alexa and Google Home owners, dig out your cute rabbit from the 2000s and give it this board!

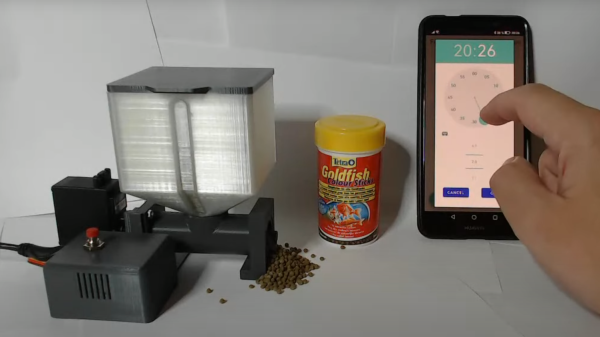
3d printed fish feeder system with food basin, electronic housing with red button on top and servo attached on the side. A pile of food is coming out of the 3D printed fish feeder mechanism. In the middle of the picture is a can of goldfish pellet food. On the right is a hand interacting with a propped up cell phone, setting a time.

Sleep Easy With The Fishes Well Fed

Sometimes daily tasks, like feeding pets, can feel like a real chore. To help with alleviate the mundane aspects of daily life, [Erik Berglund] has created an automatic fish feeder, complete with 3D print files, firmware, and an Android app for complete control over scheduling and feeding.

The mechanics of the fish feeder include a screw conveyor system that pushes the food pellets fed from a food store basin. The screw conveyor is driven by a Feetech FS5106R servo which provides enough force to overcome jamming that might occur with pellets getting stuck in the conveyor system. [Erik Berglund] writes that the system can dispense about 0.9 g/s and that it’s designed for granulated food, as flakes have problems because “their low density and large surface area tend to get them stuck in the throat of the hopper” — an issue that we’ve looked into previously.

[Erik Berglund] used [coberdas]’s fish feeder as the base, upgrading it with a better servo, adding a Raspberry Pi Zero W along with software for the Pi and an Android application to control the schedule of feedings. There’s also a DS1307 real time clock module to keep precision time and a push button for “manual” feeding. If you’re looking to follow along at home, you can find the Python scripts that run on the Pi and the source code for the Android application in their respective GitHub repositories.

Continue reading “Sleep Easy With The Fishes Well Fed”

HPi95LX Puts Linux In Your Palm

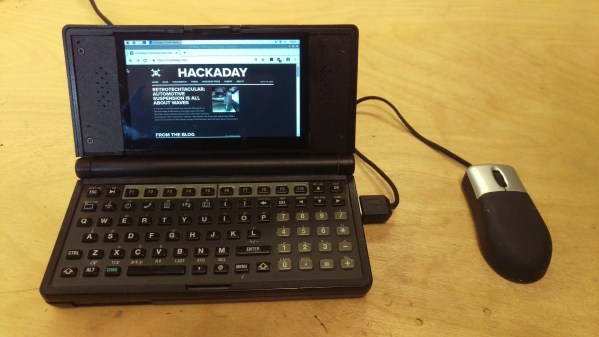
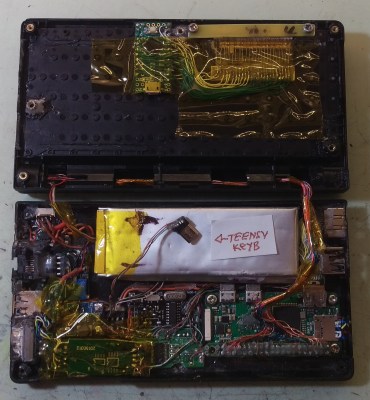
A few decades ago, palmtop computers were mostly based on MS-DOS, and while many users tried to mimic the UNIX experience, the results were mixed. Fast forward to the present and business-card-sized Linux computers modules abound. Canadian tinkerer [Rune Kyndal] decided to make his own Linux palmtop by sacrificing an old HP-95LX and replacing the guts with a Raspberry Pi Zero and a color LCD screen. We’re impressed with the rich set of features he has crammed into the limited volume of the case:

Inside View: Everything fits, barely
  • Raspberry Pi Zero W
  • Color LCD, 4.3 inch, 800×480 w/Backlight
  • Capacitive touch screen (not connected yet)
  • Stereo speakers + microphone
  • Ethernet 10/100
  • USB 2.0, 2 each
  • RS-232, DE-9 connector
  • microSD card
  • HDMI
  • IR dataport
  • Webcam (TBD)
  • LiPo Battery w/Charger

One problem that any palmtop faces is how to make a usable keyboard, and HP had one of the better designs. The keys are the same famous style as used in HP calculators. And while no human with normal hands could touch-type on it, the keyboard’s layout and tactile feel was well-suited to “thumb typing”. [Rune] made a good decision by keeping the original keyboard.

While fully functional, this is more of a proof of concept than a polished project. [Rune] primarily used bits and pieces that he had laying around. [Rune] says if he did it again, he would replace all the hot-glued accessory parts with a custom PCB, which is probably good advice. If you want to make your own, check out the project comments for some suggestions.

iPodRPi by production

IPod Mod Puts Pi Zero In New Bod

We sure love to see nicely designed products get a new lease on life. Just as the new Raspberry Pi Zero 2 was being announced, [production] was stuffing an original RPi Zero into an old iPod’s case.

[production] cites several previous, similar projects that showed how to interface with the click-wheel, a perfectly fitting color display from Waveshare, and open-source software called Rockbox to run on the pi. We all stand on the shoulders of giants.

iPodRPi by production interior wiring

Some nice innovations to look for are the Pi Zero’s micro-SD card and a micro-USB charging port aligned to the large slot left from the iPod’s original 40 pin connector. Having access for charging and reflashing the card without opening the case seems quite handy. There’s a nice sized battery too, though we wonder if a smaller battery and a Qi charger could fit in the same space. Check the project’s Hackaday.io for the parts list, and GitHub for the software side of things, and all the reference links you’ll need to build your own. It looks like [production] has plans to turn old iPods into Gameboy clones, you may want to check back for progress on that.

If you just want to rock like it’s 2004, there are options to just upgrade the battery and capacity but keep your vintage iPod too.

Continue reading “IPod Mod Puts Pi Zero In New Bod”

Lamp Sheds Light On Air Quality

It can be difficult to appreciate when the air quality is decent and when it’s poor, unless conditions are so bad that you can literally see the smog hanging in the air. Rather than try to digest a bunch of air quality numbers, [guillaume_slizewicz] built Canari — a lovely lamp that sheds light on the air pollution problem by taking local air quality data and turning it into light patterns.

Canari is of course named after the brave birds that once alerted miners to dangerous air conditions before they were forced to switch to carbon monoxide sensors. This bird has a Raspberry Pi Zero W that gets air quality data from a public API and controls the lights with a PWM bonnet based on the concentration of particulates in the air. The more particulates, the dimmer the LEDs are, and the faster they fade in and out.

The main piece of data that Canari grabs is the amount of particulate matter, and the display can switch between representing the level of PM2.5 (particulate matter with diameter less than 2.5 micrometers)  in the air and PM10. Check out the demo and setup video after the break.

More of a numbers person? All you really need is a microcontroller, an air quality sensor, and a display.

Continue reading “Lamp Sheds Light On Air Quality”