K.I.S.S. Pi Sprinkler – Just Keep The Plants Alive

A good first step in a project is knowing what you want to do. [Ben Fino] made it clear that his Raspberry Pi Sprinkler control system for his wife’s garden had one goal: keep the plants alive. The resulting project is doing just that and no more.

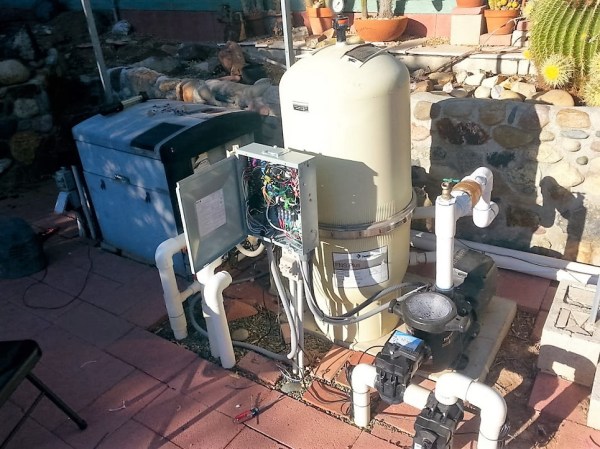
The circuitry, and plumbing, is straightforward and explained well in the Instructable. All the electronics consists of is the Pi and a MOSFET to take the 3.3v GPIO to 5v to control a relay. The valve controlling the water requires 28v AC which necessitated the relay to control it. There are also three LEDs: one is for power, one to indicate when the valve is opened, and one is an extra for some future purpose.

The intriguing part is the use of weather data from the web to determine if it’s rained recently. Python scripts provided by [Ben’s] friend [Mark Veillette] use a weather site API to get the rainfall data. The main script is set to run once every 24 hours. [Ben] set his system to water unless the previous day had sufficient rain. How much rain and the number of look-back days is programmable.

What a great application of the KISS principle: keep it simple, stupid – except for that third LED without a purpose.

Don’t Take Photos Of Your Arduino 101 Either, It’s Light Sensitive

Wafer level chips are cheap and very tiny, but as [Kevin Darrah] shows, vulnerable to bright light without the protective plastic casings standard on other chip packages.

We covered a similar phenomenon when the Raspberry Pi 2 came out. A user was taking photos of his Pi to document a project. Whenever his camera flash went off, it would reset the board.

[Kevin] got a new Arduino 101 board into his lab. The board has a processor from Intel, an accelerometer, and Bluetooth Low Energy out of the box while staying within the same relative price bracket as the Atmel versions. He was admiring the board, when he noticed that one of the components glittered under the light. Curious, he pulled open the schematic for the board, and found that it was the chip that switched power between the barrel jack and the USB. Not only that, it was a wafer level package.

So, he got out his camera and a laser. Sure enough, both would cause the power to drop off for as long as the package was exposed to the strong light. The Raspberry Pi foundation later wrote about this phenomenon in more detail. They say it won’t affect normal use, but if you’re going to expose your device to high energy light, simply put it inside a case or cover the chip with tape, Sugru, or a non-conductive paint to shield it.

EDIT: [Kevin] also tested it under the sun and found conditions in which it would reset. Videos after the break.

Continue reading “Don’t Take Photos Of Your Arduino 101 Either, It’s Light Sensitive”

An Open Source Lead Tester

If you’ve ever needed an example of colossal failure of government actors, you need only to look at Flint, Michigan’s water crisis. After the city of Flint changed water supplies from Detroit to the Flint river, city officials failed to add the correct corrosion inhibitors. This meant that lead dissolved into the water, thousands of children were exposed to lead in drinking water, a government coverup ensued, [Erin Brockovich] showed up, the foreman of the Flint water plant was found dead, and the City Hall office containing the water records was broken into.

Perhaps inspired by Flint, [Matthew] is working on an Open Source Lead Tester for his entry into the 2016 Hackaday Prize.

[Matthew]’s lead tester doesn’t test the water directly. Instead, it uses a photodiode and RGB LED to look at the color of a lead test strip. These results are recorded, and with a bit of a software backend, an entire city can be mapped for lead contamination in a few days with just a few of these devices.

One problem [Matthew] has run into is the fact the Pi does not have analog to digital conversion, making reading a photodiode a little harder than just plugging a single part into a pin header and watching an analog value rise and fall. That really shouldn’t be a problem – ADCs are cheap, especially if you only need a single channel of analog input with low resolution. [Matthew] is also looking into using the Pi webcam for measuring the lead test strip. There are a lot of decisions to make, but any functional device that comes out of this project will be very useful in normal, functioning governments. And hopefully in Flint, Michigan too.

The HackadayPrize2016 is Sponsored by:

Connect All Your IoT Through Your Pi 3

If you’re playing Hackaday Buzzword Bingo, today is your lucky day! Because not only does this article contain “Pi 3” and “IoT”, but we’re just about to type “ESP8266” and “home automation”. Check to see if you haven’t filled a row or something…

Seriously, though. If you’re running a home device network, and like us you’re running it totally insecurely, you might want to firewall that stuff off from the greater Interwebs at least, and probably any computers that you care about as well. The simplest way to do so is to keep your devices on their own WiFi network. That shiny Pi 3 you just bought has WiFi, and doesn’t use so much power that you’d mind leaving it on all the time.

Even if you’re not a Linux networking guru, [Phil Martin]’s tutorial on setting up the Raspberry Pi 3 as a WiFi access point should make it easy for you to use your Pi 3 as the hub of your IoT system’s WiFi. He even shows you how to configure it to forward your IoT network’s packets out to the real world over wired Ethernet, but if you can also use the Pi 3 as your central server, this may not even be necessary. Most of the IoT services that you’d want are available for the Pi.

Those who do want to open up to the world, you can easily set up a very strict firewall on the Pi that won’t interfere with your home’s normal WiFi. Here’s a quick guide to setting up iptables on the Pi, but using even friendlier software like Shorewall should also get the job done.

Still haven’t filled up your bingo card yet? “Arduino!”

Autograph: A String Art Printer

“String Art” is the name of the art form that transforms thousands of nails and just as many feet of thread into unique masterpieces. Some artists have developed techniques to create photorealistic string art works, but until now, there was no way around the tedious and time-consuming manufacturing process. Depending on the size, it can take months to complete a single piece by hand.

Continue reading “Autograph: A String Art Printer”

Modifying A Raspberry Pi 2 To Fit In Small Places

Still can’t get your hands on a Pi Zero? We know. Why not de-solder a few headers from a Raspberry Pi 2 to fit in your next project instead? Using a pair of 2.5″ HDD enclosures, [nodenet] made a mini linux laptop using the Raspberry Pi 2 — It even has a touch screen, and features a 1000mAh battery!

All in all it cost him about $120 for all the components, but before you JrECiM0rush out to make your own, you will need pretty good skills with a soldering iron to successfully downsize your Raspberry Pi 2. The modifications require removing both USB ports, the Ethernet plug, the GPIO pins, the HDMI port, the A/V jack and the camera connectors.

He used a combination of a mini hacksaw, and a soldering iron to remove all the components — what you’re left with his a business card sized computer — but the real fun part is re-attaching all the components with leads.

Continue reading “Modifying A Raspberry Pi 2 To Fit In Small Places”

USB-less WiFi For The Pi Zero

Since the introduction of the Raspberry Pi Zero, the hacker, maker, and hobbyist electronics world has been thrown into turmoil. ‘The Raspberry Pi Foundation is corrupt,’ the detractors said, ‘and the Pi Zero is just a marketing ploy to get their name out.’ Others chimed in that the Raspberry Pi Zero doesn’t even exist. Despite what a million monkeys on a million keyboards say, the Raspberry Pi Zero does exist and is very cool, despite how limited it is. There’s only one USB port, but that doesn’t mean you can’t have WiFi. [ajlitt] came up with a WiFi hat for the Pi Zero that goes right through the GPIO pins, and shouldn’t cost more than a few dollars to implement on any Raspberry Pi.

There is no Ethernet port on the Pi, and apart from a single USB OTG port, no apparent high-speed interfaces to the outside world. On the other hand, there’s a few things hidden deep down in the SoC on the Pi including two MMC controllers. One of these controllers is used for the SD card, but the second can be broken out on a few GPIO pins. By tapping into those pins and configuring the kernel just right, SDIO is available on the GPIO pins, giving the Pi WiFi through a cheap ESP8266 module.

We’ve seen [ajlitt]’s work on SDIO devices on the Pi before, but he’s slowly been reworking this build with the Pi Zero in mind. It didn’t begin as a project for the Hackaday Prize, but already it’s one of the more popular entries so far. Of course there are thousands of projects on Hackaday.io that aren’t entered into the Hackaday Prize this year, and if you’re behind one of those, this is your call to step up.

The HackadayPrize2016 is Sponsored by: