Complete FPV Setup For Your Drone

[Ioannis] is like anyone else who has a quadcopter or other drone. Eventually you want to sit in the cockpit instead of flying from the ground. This just isn’t going to happen at the hobby level anytime soon. But the next best option is well within your grasp. Why not decouple your eyes from your body by adding a first-person video to your quad?

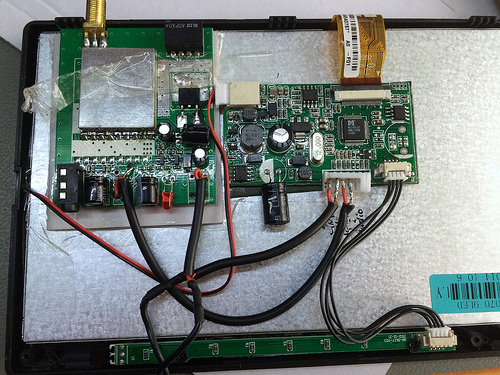
There are really only four main components: camera, screen, and a transceiver/receiver pair to link the two. [Ioannis] has chosen the Sony Super HAD CCTV camera which provides excellent quality at the bargain basement price of just $25 dollars. A bit of patient shopping delivered a small LCD screen for just $15. The insides have plenty of room as you can see. [Ioannis] connected the screen’s native driver board up to the $55 video receiver board. To boost performance he swapped out the less-than-ideal antenna for a circular polarized antenna designed to work well with the 5.8 GHz radio equipment.

It seems that everything works like a dream. This all came in under $100 which is half of what some other systems cost without a display. Has anyone figured out a way to connect a transmitter like this to your phone for use with Google Cardboard?

Repairing A Damaged RC Rx Due To Reverse Polarity Power Input

Rx Receiver Repair

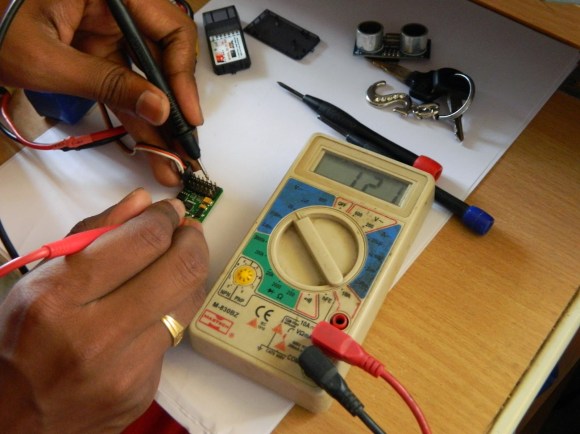
Once in a while all of us technocenti get a little complacent and do something that may be considered ‘dumb’ while working on a project…. like cutting the wrong side of a piece of wood or welding a bracket on in the wrong direction. [Santhosh] is human like everyone else and plugged in the power connector to his RC Receiver incorrectly, rendering the receiver useless. How will his Arduino-controlled Robot work without a functioning receiver?

[Santhosh] started by opening up the case to expose the circuit board and checking out the components inside. The first component in the power input path was a voltage regulator. Five volts DC was applied to the input side of the 3.3-volt regulator but only 1.21 came out the other end. Now that the problem was quickly identified the next step was to replace the faulty regulator. Purchasing an exact replacement would have been easy but cost both time and money. [Santhosh]’s parts bin contained a similar regulator, a little larger than the original but the pinout was the same.

Continue reading “Repairing A Damaged RC Rx Due To Reverse Polarity Power Input”

Hacking The R-390A Military Shortwave Radio Receiver To Transmit As Well

hacking-r390a-radio

After getting his hands on this relic [Gregory Charvat] manage to hack it, converting the receiver into a transceiver.

It may be old, but the R-390A is nothing to scoff at. It’s abilities include AM, code, and FSK operation from 500 kHz to 32 MHz. But it is a receiver with no way of transmitting on the same bands. This is where [Gregory’s] hack comes into play. He rerouted the variable-frequency oscillator feed inside of the R-390A in order to use his 20M single-sideband unit. Basically what this does is allow him to control everything from the 390, using the microphone from the SSB — along with some switching hardware — to transmit his own messages.

His demo video starts with him making a few contacts using the hacked equipment. He then spends some time at the whiteboard explaning the changes. This portion went over our heads, but it becomes more clear when he cracks open the case and shows the actual modifications.

Continue reading “Hacking The R-390A Military Shortwave Radio Receiver To Transmit As Well”

GoPro Hack Delivers Live Video Feed For Piloting Your Quadcopter

The GoPro line of HD cameras seem like they were specifically designed for use with quadcopters. We say that because the small, light-weight video devices present a payload which can be lifted without too much strain, but still have enough horse power to capture video of superb quality. Here’s a hack that uses the camera to provide a remote First Person View so that you may pilot the aircraft when it is out of your line of sight.

The camera in question is a GoPro Hero 3. It differs from its predecessors in that the composite video out port has been moved to a mini USB connector. But it’s still there and just a bit of cable splicing will yield a very clear signal. The image above shows the camera in the middle, connecting via the spliced cable to an FPV transmitter on the right. This will all be strapped to the quadcopter, with the signal picked up by the receiver on the left and piped to a goggle display worn by the pilot. You can see the cable being construction process in the clip after the break.

If you’re looking for other cool stuff to do with your GoPro camera check out the bullet-time work [Caleb] did with ours.

Continue reading “GoPro Hack Delivers Live Video Feed For Piloting Your Quadcopter”

27 MHz Transmitter/receiver Pair Made With 555 Timers

Get your feet wet with radio frequency transmitters and receivers by working your way through this pair of tutorials. [Chris] built the hardware around a couple of 555 timers so you don’t need to worry about any microcontroller programming. He started by building the transmitter and finished by constructing a receiver.

Apparently the 27 MHz band is okay to work with in most countries as long as your hardware stays below a certain power threshold. The carrier frequency is generated by the transmitter with the help of a 27.145 MHz crystal. The signal is picked up by the receiver which uses a hand-wrapped inductor made using an AL=25 Toroid Core. We’d say these are the parts that will be the hardest to find without putting in an order from a distributor. But the rest of the build just uses a couple 555 timer chips and passive components, all of which will be easy to find. The video after the break shows the project used to receive a Morse-code-style message entered with a push button. It would be fun to interface this with your microcontroller of choice and implement your own one-way error correction scheme.

Wireless Stereo Add-on Turns On Receiver And Pipes In Some Music

[PC486] wanted to add Bluetooth to a simple shelf stereo system. But if you’re going to go wireless, why not develop an all-in-one solution. His adapter turns on the stereo and feeds it audio all from a smart phone.

This is his roommate’s hardware so cracking it open and grabbing an iron wasn’t really an option. He needed a way to control the system without any permanent alterations. Since the unit has IR remote control capabilities that’s the most obvious way to go. But the original remote is long gone so he had to hit the Internet. Luckily the remote control codes are in the LIRC repository. He grabbed a small microcontroller, an ATtiny25, and wired up an IR led to send commands to the unit.

Next he examined the Bluetooth audio receiver board he planned to used in the project. It’s got an LED that lights up when connected to another Bluetooth device. The microcontroller knows when to turn the stereo on and when to shut it off again by monitoring that LED with a pin interrupt. Check out the final results in the clip after the break.

Continue reading “Wireless Stereo Add-on Turns On Receiver And Pipes In Some Music”

A Laser Audio Transmitter

Here’s a way of transmitting audio that makes it virtually impossible for someone else to listen in. Instead of sending radio waves bouncing all over creation, this uses the focused light of a laser to transmit audio. In the image above you can see the silver cylinder which houses the laser diode. It is focusing the beam on a light dependent resistor to the right which looks almost like a red LED due to the intensity of the light.

The simplicity of this circuit is fascinating. On the receiving end there is no more than the LDR, a 1.5V power source, and a headphone jack. The transmitter is not much more complicated than that. It includes an audio output transformer which boosts the resistance of the audio signal. This increase in resistance ensures that the laser diode modulates enough to affect the LDR on the receiving end. The transmitter uses a 3.3V supply. Check out the video after the break to hear the high quality of audio coming through the setup.

Once you’re done playing around with the transmitter you might try turning the laser into a remote control for your stereo.

Continue reading “A Laser Audio Transmitter”