Controlling A Block Camera With An RC Transmitter

The world of drones and FPV remote-controlled aircraft is rapidly expanding, airframes are getting bigger, and the demand for even cooler AV gear is higher than ever. [elad] got his hands on a Sony block camera that is able to zoom in on a scene – great if you want to get close to the action while still flying a safe distance away. Controlling the zoom on these cameras is usually done through RS232, but [elad] made it work with an RC transmitter.

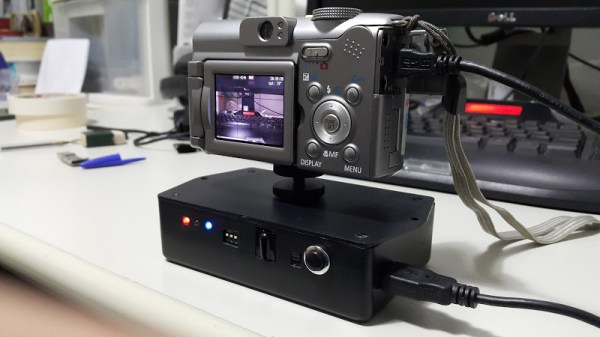
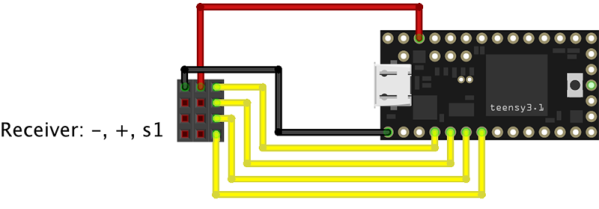
The camera [elad] is using is a Sony FCB-EX11D block camera with a standard SD resolution sensor. This camera has 10x optical zoom, making it a great solution to aerial surveillance, the only problem being the RS232 connection and the VISCA protocol. [elad] used an Arduino to listen in on the elevator channel from an RC receiver, translating that to something the camera will understand. The result is a controllable zoom on a camera that could easily take to the skies.

The entire camera package, with Arduino and electronics included, weighs in at about 100 grams. That’s about the same as a GoPro, and would fit perfectly on a camera gimbal. The only problem is getting a transmitter with enough channels or someone else to operate the camera while flying. Video below.

Continue reading “Controlling A Block Camera With An RC Transmitter”

Flying Bird RC

Mechanical Bird Actually Flies By Flapping Its Wings

Turns out you don’t have to be a multi-million dollar corporation like Festo to create a remote controlled, flapping bird robot. [Kazuhiko Kakuta] is a medical Doctor of Allergy, and in his free time he likes to build flying mechanical birds with his son.

It has just over a meter wingspan, weighs 193 grams, and it flies by flapping its wings. The majority of its components are 3D printed. If that’s not impressive enough for you as is, consider this. It it has no sensors, no gyroscopes or anything — it’s all manually controlled by [Kazuhiko].

And this isn’t even the only ornithopter he’s done. He’s also created something out of an anime film, Castle in the Sky. He even sells the designs for one of them, to be printed via Shapeways.

Continue reading “Mechanical Bird Actually Flies By Flapping Its Wings”

Mutant Kitchen TV Computer

In need of a kitchen entertainment system, [BoaSoft] headed to the parts bin and produced a project that can easily be called a mutant. That being said, we love the results!

Here’s the link to the original Russian language post. If your Russian is a bit rusty here’s a really awful machine translation. So let’s see if we can decipher this hack.

Sounds like [BoaSoft] had a broken Acer laptop on hand. Problem was the laptop can’t play over-the-air television (and similarly, a television can’t surf the net). The solution was to figure out how to utilized a TV tuner of unknown origin, combine that with the laptop and a computer monitor, then add back all the user interface you’d expect from an entertainment device.

The board shown in the first post of the thread is familiar to us. It seems to be based on the IgorPlug board which is a hack that goes waaaay back. This allows for the use of an IR media center remote and those input signals are easy to map to functions. The computer runs Windows Media Center which is already optimized for remote control but can use a wireless keyboard and mouse when more computer-centric functions are necessary.

With all on track the rest of the hack deals with hacking together a case. The laptop’s original body was ditched for some extended sides for the back of the monitor. [BoaSoft] did a great job of installing all the necessary ports in these extensions. Once in the kitchen everything is nice and neat and should stand the test of time.

[Thanks Dmitry]

Strobe Remote

Reverse Engineering A Wireless Studio Lighting Remote

If you want to take a photograph with a professional look, proper lighting is going to be critical. [Richard] has been using a commercial lighting solution in his studio. His Lencarta UltraPro 300 studio strobes provide adequate lighting and also have the ability to have various settings adjusted remotely. A single remote can control different lights setting each to its own parameters. [Richard] likes to automate as much as possible in his studio, so he thought that maybe he would be able to reverse engineer the remote control so he can more easily control his lighting.

[Richard] started by opening up the remote and taking a look at the radio circuitry. He discovered the circuit uses a nRF24L01+ chip. He had previously picked up a couple of these on eBay, so his first thought was to just promiscuously snoop on the communications over the air. Unfortunately the chips can only listen in on up to six addresses at a time, and with a 40-bit address, this approach may have taken a while.

Not one to give up easily, [Richard] chose a new method of attack. First, he knew that the radio chip communicates to a master microcontroller via SPI. Second, he knew that the radio chip had no built-in memory. Therefore, the microcontroller must save the address in its own memory and then send it to the radio chip via the SPI bus. [Richard] figured if he could snoop on the SPI bus, he could find the address of the remote. With that information, he would be able to build another radio circuit to listen in over the air.

Using an Open Logic Sniffer, [Richard] was able to capture some of the SPI communications. Then, using the datasheet as a reference, he was able to isolate the communications that stored information int the radio chip’s address register. This same technique was used to decipher the radio channel. There was a bit more trial and error involved, as [Richard] later discovered that there were a few other important registers. He also discovered that the remote changed the address when actually transmitting data, so he had to update his receiver code to reflect this.

The receiver was built using another nRF24L01+ chip and an Arduino. Once the address and other registers were configured properly, [Richard’s] custom radio was able to pick up the radio commands being sent from the lighting remote. All [Richard] had to do at this point was press each button and record the communications data which resulted. The Arduino code for the receiver is available on the project page.

[Richard] took it an extra step and wrote his own library to talk to the flashes. He has made his library available on github for anyone who is interested.

Multi Input IR Remote Control Repeater

[Peter]’s folks’ cable company is terrible – such a surprise for a cable TV provider – and the digital part of their cable subscription will only work with the company’s cable boxes. The cable company only rents the boxes with no option to buy them, and [Peter]’s folks would need five of them for all the TVs in the house, even though they would only ever use two at the same time. Not wanting to waste money, [Peter] used coax splitters can take care of sending the output of one cable box to multiple TVs, but what about the remotes? For that, he developed an IR remote control multidrop extender. With a few small boards, he can run a receiver to any room in the house and send that back to a cable box, giving every TV in the house digital cable while still only renting a single cable box.

The receiver module uses the same type of IR module found in the cable box to decode the signals from the remote. With a few MOSFETs, this signal is fed over a three-position screw terminal to the transmitter module stationed right next to the cable box. This module uses a PIC12F microcontroller to take the signal input and translate it back into infrared.

[Peter]’s system can be set up as a single receiver, and single transmitter, single receiver and multiple transmitter, many receivers to multiple transmitters, or just about any configuration you could imagine. The setup does require running a few wires through the walls of the house, but even that is much easier than whipping out the checkbook every month for the cable company.

Video below.

Continue reading “Multi Input IR Remote Control Repeater”

THP Entry: The Everything RC Transmitter

OSRC With few exceptions, most of The Hackaday Prize are things we really haven’t seen much of before: base-3 computers that have been relegated to the history books, extremely odd 3D printers, and fancy, new IoT devices are the norm. The OSRC is not a new project to us. (UPDATE: Looks like they deleted their project page. Here is a snapshot of it from the Internet Archive) We saw it once in 2011 and again a year later. What makes the OSRC an interesting project for The Hackaday Prize isn’t the fact that it’s the most advanced RC transmitter ever created. Creating that was evidently the easy part. The OSRC could use a big financial kick in the pants, and if [Demetris] wins, we’d guess he wouldn’t be taking that ride to space. Rather, he’d be taking the cash prize to get his ultimate transmitter into large-scale manufacturing and out into the wild.

While at first glance the base model OSRC seems expensive at about $6-700 USD, consider this: a six-channel transmitter from an excellent brand costs about $120 USD. Nine channels will run you about $400. The OSRC is a forty channel radio. The sticks are capable of force feedback, and of course the ‘pro’ model of the OSRC has that wonderful screen, capable of displaying video from an FPV camera, a GPS/map overlay, or an incredibly extensive telemetry display. There are multi-thousand dollar avionics for real airplanes out there that have a smaller feature set, and that’s not hyperbole.

A few months ago, [Demetris] was interviewed by the awesome people at Flite Test. That (highly suggested) video is embedded below.


SpaceWrencherThe project featured in this post is an entry in The Hackaday Prize. Build something awesome and win a trip to space or hundreds of other prizes.

Continue reading “THP Entry: The Everything RC Transmitter”

Hackaday Links: June 8, 2014

hackaday-links-chain

Yes, dogfighting with RC planes is cool. You know what’s even cooler? RC jousting. Considering these eight foot long planes are probably made of foam board or Depron, they’ll probably hold up for a fairly long time. The perfect application of RC FPV.

Home automation is the next big thing, apparently, but it’s been around for much longer than iPhones and Bluetooth controllable outlets and smart thermostats. Here’s a home automation system from 1985. Monochrome CRT display panel (with an awesome infrared touch screen setup), a rat’s nest of wiring, and a floor plan drawn in ASCII characters. It’s also Y2K compliant.

Here’s an idea for mobile component storage: bags. Instead of tackle and tool boxes for moving resistors and other components around, [Darcy] is using custom bags made from polyethylene sheets, folded and sealed with an impulse sealer. It’s not ESD safe, but accidentally zapping a LED with an ESD would be impressive.

Need a stepper motor test circuit? Easy, just grab one of those Polulu motor drivers, an ATtiny85, wire it up, and you’re done. Of course then you’re troubled with people on the Internet saying you could have done it with a 555 timer. This one is for them. It’s a 555, some wire, and some solder. Could have done it with discrete transistors, though.

Someone figured out Lego Minifigs can hold iDevice charge cables. +1 for the 1980s spaceman.

Remember that “electronic, color sensing, multicolor pen” idea that went around the Internet a year or so ago? It’s soon to be a Kickstarter, and man, is this thing full of fail. They’re putting an ARM 9 CPU in a pen. A pen with a diameter of 15mm. Does anyone know if an ARM 9 is made in that small of a package? We’ll have a full, “this is a totally unrealistic Kickstarter and you’re all sheep for backing it” post when it finally launches. Also, this.