What Does Your Necklace Say?

If we write about sound reproduction, there is a good chance we found a home-made amplifier or an upcycled speaker system. In this case, you don’t use your ears to appreciate the sound; you use your hands or eyes. [ElatisEagles] converted an amplitude sound graph into a wearable bead. Even without much background it should be immediately recognizable for what it is. Presumably, they converted a sound wave to vectors, then used the “Revolve” function in Rhino, their software of choice. Sometimes this is called a “lathe” function. Resin printers should be able to build these without supports and with incredible fidelity.

Some tattoos put a sound wave on the skin, and use an app to play it back, but if you want to wear a sound bite from your favorite show and not get branded as the “Pickle Rick” gal/guy at the office, maybe swap out the color and sound wave before it goes stale. We would wear a bead that says, “drop a link in our tip line,” but you can probably think of something more clever.

We have other high-tech ornamentation that leverages motion instead of sound, or how about a necklace that listens instead.

Continue reading “What Does Your Necklace Say?”

Antique Lighthouse Lens Via CNC

Before the invention of the high-powered LED, and even really before the widespread adoption of electric lights in general, lighthouses still had the obligation of warning ships of dangers while guiding them into various safe harbors. They did this with gas lights and impressive glass lenses known as Fresnel lenses which helped point all available light in the correct direction while reducing weight and material that would otherwise be used in a conventional lens.

Now, a company in Florida is using acrylic in reproductions of antique Fresnel lenses. At first glance, it seems like acrylic might not be the best substitute for glass, but the company is able to achieve extreme precision using a CNC machine and then polishing and baking the acrylic which makes it transparent and excellent for use in lighthouse lenses like this. The reproduction lenses are built out of brass, and the lens elements are glued in place with a special adhesive. It’s a convincing replication worthy of use in any lighthouse.

Be sure to check out the video below to see how these lenses are built, and although we’re not entirely sure what exactly is being sprayed on the lenses when they are being polished, perhaps someone in the comments section can illuminate that for us. Of course, there are other uses for Fresnel lenses than in lighthouses, and we’ve seen some great examples of them put to use for many different applications.

Continue reading “Antique Lighthouse Lens Via CNC”

Bantam-sized Jukebox Reproduction Tops The Fabrication Charts

Restoring a genuine vintage jukebox is a fun project, but finding suitable candidates can be a difficult proposition. Not only can a full-size machine take a huge bite out of your wallet, it can take up a lot of room, too. So a replica miniature jukebox might be just the thing.

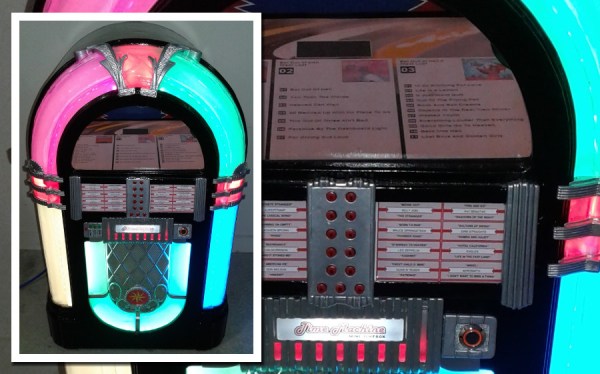
We have to admit, at first glance [Allan_D_Murray]’s project seemed like just another juke upgrade. It was only after diving into his very detailed build log that we realized this classic-looking juke is only about 30″ (80 cm) tall. It’s not exactly diminutive, but certainly more compact than the original Wurlitzer 1015 from which it draws its inspiration. But it sure looks like the real thing. Everything is custom made, from the round-top case to the 3D-printed trim pieces, which are painted to look like chrome-plated castings. The guts of the juke are pretty much what you’d expect these days — a PC playing MP3s. But an LCD monitor occupies the place where vinyl records would have lived in the original and displays playlists of the albums available. There’s an original-looking control panel on the front, and there are even bubblers in the lighted pilasters and arches.

Hats off to [Allan] for such a detailed and authentic tribute to a mid-century classic. But if a reproduction just won’t cut it for you, check out this full-size juke with the original electronics.

Continue reading “Bantam-sized Jukebox Reproduction Tops The Fabrication Charts”

Reproducing A DSKY

This is a project that is about a year and a half in the making, but [Fran] is finally digging into the most iconic part of the Apollo Guidance Computer and building the most accurate reproduction DSKY ever.

The Apollo Guidance Computer was a masterpiece of engineering and is frequently cited as the beginning of the computer revolution, but it didn’t really look that interesting – it looks like a vastly overbuilt server blade, really. When everyone thinks about the Apollo Guidance Computer, they think about the DSKY, the glowey keypad interface seen in the blockbuster hit Apollo 13 and the oddly accurate disappointment of Apollo 18. It’s the part of the Apollo Guidance Computer the Apollo astronauts actually interacted with, and has become the icon of the strange, early digital computers developed for NASA in the 60s.

There are a few modern DSKY replicas, but all of them are exceedingly anachronistic; all of these reproductions use seven-segment LEDs, something that didn’t exist in the 1960s. A true reproduction DSKY would use custom electroluminescent displays. These EL segments are powered by AC, and transistors back then were terrible, leading to another design choice – those EL segments were turned on and off by relays. It’s all completely crazy, and aerospace equipment to boot.

Because of the custom design and engineering choices that seem insane to the modern eye, there isn’t much in the way of documentation when it comes to making a reproduction DSKY. This is where [Fran] tapped a few of the contacts her historical deconstruction cred earned when she reverse engineered a Saturn V Launch Vehicle Digital Computer to call upon anyone who would have access to a real Apollo-era DSKY.

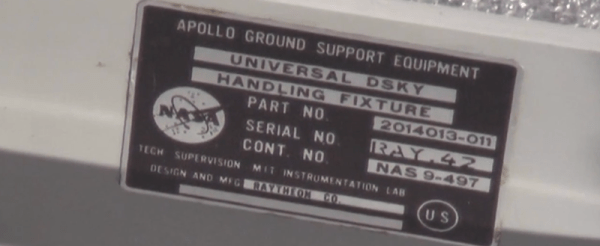
The first contact was the Kansas Cosmosphere who was kind enough to send extremely detailed photographs of the DSKYs in their archives. It would have been extremely nice to have old documentation made when the DSKYs were rolling off the assembly line, but that information is locked away in a file cabinet owned by Raytheon.

[Fran] got a break when she was contacted by curators at the National Air and Space Museum’s Garber facility who invited her down to DC. She was given the grand tour, including the most elusive aircraft in the museum’s collection, the Ho 229, the dual-turbojet Nazi flying wing. At the Garber facility, [Fran] received permission to take apart two DSKYs.

The main focus of [Fran]’s expedition to the Air and Space Museum was to figure out how the EL displays were constructed. The EL displays that exist today are completely transparent when turned off because of the development of transparent conductors.

The EL displays in the DSKY were based on earlier night lights manufactured by Sylvania. After looking at a few interesting items that included Gemini hardware and early DSKYs, this sort of construction was confirmed.

With a lot of pictures, a lot of measurements, a lot of CAD work, and some extremely tedious work, [Fran] was able to create the definitive reference for DSKY display elements. There are 154 separate switchable element in the display, all controlled by relays. These elements are not multiplexed; every element can be turned on and off individually.

Figuring out how the elements were put together was only one part of [Fran]’s research. Another goal was to figure out the electrical connections between the display and the rest of the DSKY. There, [Fran] found 160 gold pins in a custom socket. It’s bizarre, and more like a PGA socket than like the backplane connector [Fran] found in the Saturn V computer.

Even though [Fran]’s research was mostly on the EL panel inside the display, she did get a few more insights with her time with the DSKYs. The buttons are fantastic, and the best keys she’d ever used. This is just part one of what will be an incredibly involved project, and we’re looking forward to what [Fran] looks into next.

Cold War Clock Is All Tubes

A clock built from tubes


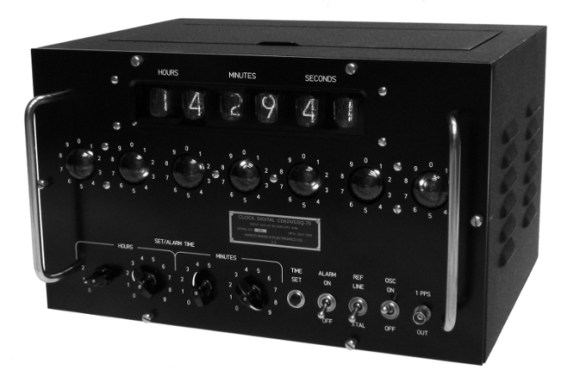
Clocks are great projects to build. They serve a real purpose, and there’s a wide variety of ways to implement a unique timepiece. [Hank]’s Cold War Clock only uses parts and technologies that were available in 1959. It contains no semiconductors, but has an audible alarm and reasonable time accuracy.

Looking through the hand drafted schematics, you’ll find a number of Dekatron tubes. These vintage components are used as registers to store and count the time. [Hank] found some cheap Soviet Dekatrons, but had to machine his own sockets to connect them. These tubes do the counting, but the actual display consists of nixies.

A cost estimate puts this clock at $2130 in 1959, which equates to $17040 today. Clearly this would be outside the price range of most hobbyists. The actual build cost [Hank] around $1600.

There’s some intricate details in this build. The front panel has an authentic look to it, and the manual has instructions for “demolition of clock to prevent enemy use.” [Hank] calls it a “creative anachronism.” In a sense, it’s a reproduction of a product that never actually existed.

A video of this clock in action, including the Cold War era alarm, is after the break.

Continue reading “Cold War Clock Is All Tubes”

BAMF2010: Look Sir, Droids!

Ask any engineer what originally sparked their interest in technology, and almost universally the response will be a Hollywood film or TV robot — Star Wars’ R2-D2, the B9 robot from Lost in Space, or Short Circuit’s Johnny 5, to name a few. Engineers need a creative outlet too, and some pay homage to their inspirations by building elaborate reproductions. At this year’s Maker Faire, droid-builders had their own corner in the center hall, their work ranging from humble craft materials to ’bots surpassing their film counterparts in detail and workmanship.

Continue reading “BAMF2010: Look Sir, Droids!”