Putting Your Time In

I was absolutely struck by a hack this week — [Adam Bäckström]’s amazing robot arm built with modified hobby servos. Basically, he’s taken apart and re-built some affordable off-the-shelf servo motors, and like the 6-Million-Dollar Man, he’s rebuilt them better, stronger, faster. OK, and smoother. We have the technology.

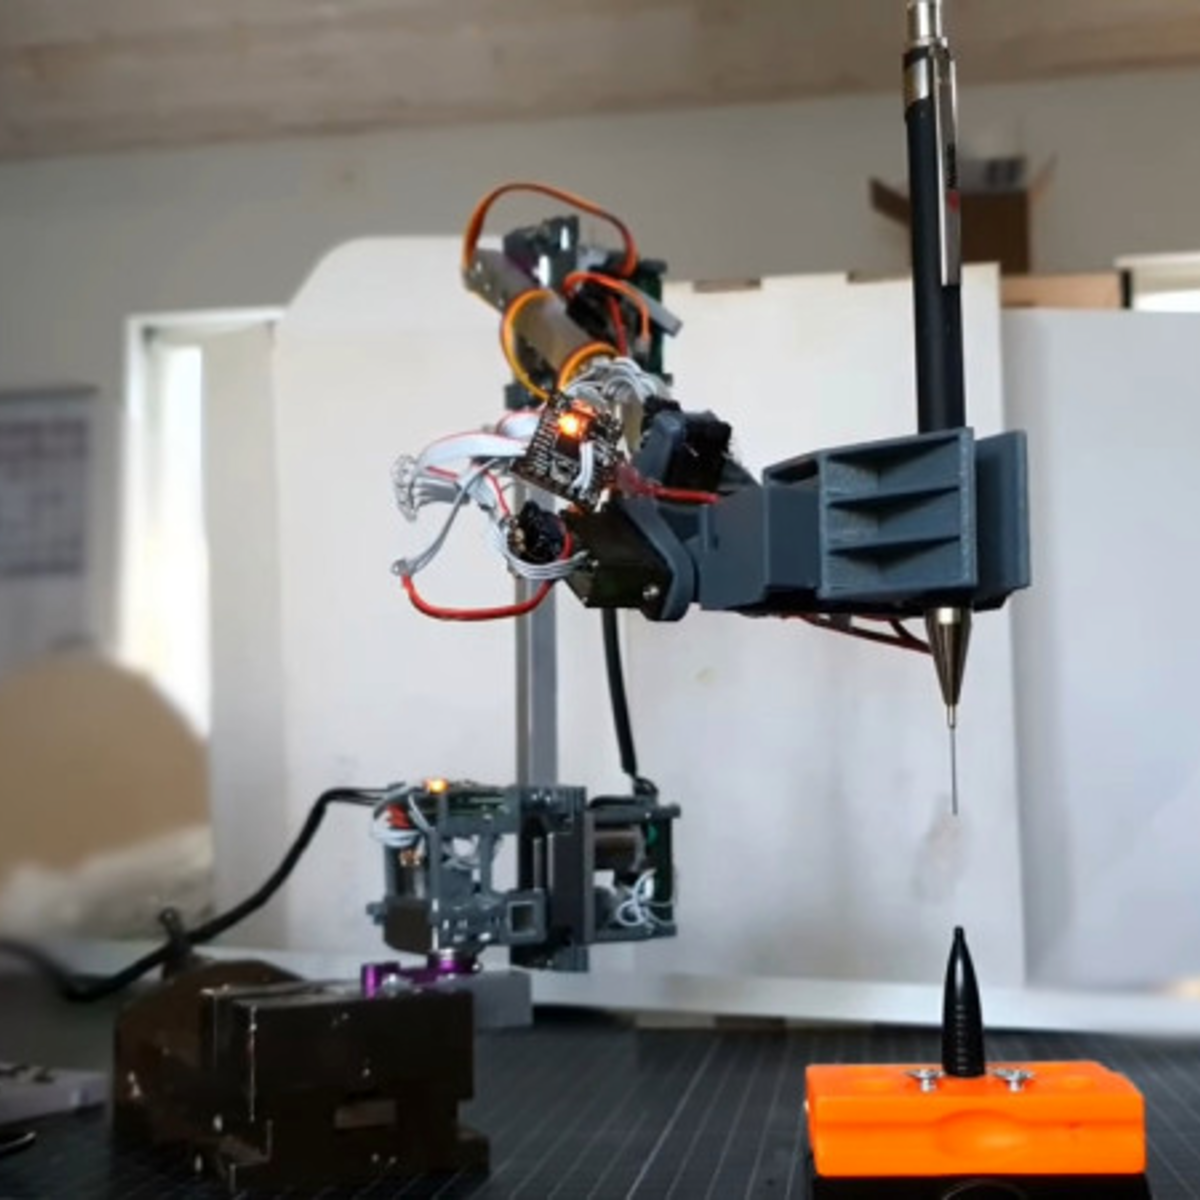
The results are undeniably fantastic, and enable the experienced hacker to get champagne robot motion control on a grape-juice budget by employing some heavy control theory, and redundant sensors to overcome geartrain backlash, which is the devil of cheap servos. But this didn’t come out of nowhere. In his writeup, [Adam] starts off with “You could say this project started when I ordered six endless servos in middle school, more than 15 years ago.” And it shows.

Go check out this video of his first version of the modified servos, from a six-axis arm he built in 2009(!). He’s built in analog position sensors in the motors, which lets him control the speed and makes it work better than any other hobby servo arm you’ve ever seen, but there’s still visible backlash in the gears. A mere twelve years later, he’s got magnetic encoders on the output and a fast inner loop compensates for the backlash. The result is that the current arm moves faster and smoother, while retaining accuracy.

Twelve years. I assume that [Adam] has had some other projects on his plate as well, but that’s a long term project by any account. I’m stoked to see his work, not the least because it should help a lot of others who are ready to step up their desktop servo-arm projects. But the real take-home lesson here is that if you’ve got a tough problem that you’re hacking on, you don’t have to get it done this weekend. You don’t have to get it done next weekend either. Keep hammering on it as long as you need, but keep on hammering. When you get it done, the results will be all the better for the long, slow, brewing time. What’s the longest project that you’ve ever worked on?

Skid Steer Robot Chassis Takes A Beating

[Engineering After Hours] wanted a highly maneuverable robot chassis with a tight turning radius. Skid steering seemed to be the perfect solution, but the available commercial options didn’t take his fancy. Thus, a custom build was the answer – with impressive results.

The build packs two large RC motors, one for each side, with each driving two wheels through a belt drive. This reduces the electronics required to the bare minimum for skid steering. It’s all assembled within a plasma-cut metal chassis which is more than tough enough to take some hard knocks.

One of the primary goals on the build was to eliminate the risk of vibrations and shock damaging the motors and gearboxes. Many off-the-shelf designs couple the wheels directly to gearbox output shafts, potentially damaging the expensive components over time. In this design, a separate bearing assembly is used to take the load from the wheels instead.

It’s a great example of how an engineering-first approach can build a sturdy ‘bot with a minimum of fuss. Outfitted with some fat off-road tyres the performance is impressive, with the ‘bot having no trouble tearing it up in mud, snow, and water.

We’ve seen other great builds from [Engineering After Hours] before, like the active aero RC build. Video after the break.

Continue reading “Skid Steer Robot Chassis Takes A Beating”

DIY B-Movie Robot Is A-OK

While we certainly agree that “Devil Girl From Mars” is an attractive movie title, we have yet to see this apparent British B-movie delight for ourselves. If [Cory Collins]’ fantastic build of Chani, the lumbering, terrifying robot that accompanies the vinyl-clad and caped Devil Girl in question is any indication, we bet it’s delightfully bad.

[Cory] was able to faithfully reproduce Chani — lights, lumbering and all — for less than $50. This price tag does not include the vacuum former required to make the domed head, but hey, it’s an investment into future projects.

[Cory] started by dissecting an R/C stunt car from Harbor Freight and stringing the innards up to a 3D-printed walking mechanism that’s been modified to use gear-reduced motors so it walks more slowly. While Chani is stomping around on TPU treads, the LEDs from the R/C car’s headlights shine inside of its dome. Chani’s boxy body is a big paper sculpture that looks spot-on to us when compared to the movie’s trailer.

We love the way that Chani walks — it sort of dips and glides along in a forward-facing Moonwalk fashion. As you can see in the video below, [Cory] totally nailed the robot’s gait, and it’s hilarious to watch Chani’s little coolant hose-looking arms dangle and shake as he makes his slow and menacing way across the table. Stick around for some scary nighttime footage of Chani against a thunderstorm.

Want your robots to move more like movie robots? All you gotta do is use the right tools.

Continue reading “DIY B-Movie Robot Is A-OK”

Your Plants Can Take Care Of Themselves Now

One of [Sasa]’s life goals is to be able to sit back in his home and watch as robots perform all of his work for him. In order to work towards this goal, he has decided to start with some home automation which will take care of all of his house plants for him. This project is built from the ground up, too, and is the first part of a series of videos which will outline the construction of a complete, open-source plant care machine.

The first video starts with the sensors for the plants. [Sasa] decided to go with a completely custom module based on the STM32 microcontroller since commercial offerings had poor communications designs and other flaws. The small board is designed to be placed in the soil, and has sensors for soil moisture as well as other sensors for amount of light available and the ambient temperature. The improvements over the commercial modules include communication over I2C, allowing a large number of modules to communicate over a minimum of wires and be arranged in any way needed.

For this build everything is open-source and available on [Sasa]’s GitHub page, including PCB layouts and code for the microcontrollers. We’re looking forward to the rest of the videos where he plans to lay out the central unit for handling all of these sensors, and a custom dashboard for controlling them as well. Perhaps there will also be an option for adding a way to physically listen to the plants communicate their needs as well.

Continue reading “Your Plants Can Take Care Of Themselves Now”

Print Chess Pieces, Then Defeat The Chess-Playing Printer

Chess is undoubtedly a game of the mind. Sadly, some of the nuances are lost when you play on a computer screen. When a game is tactile, it carries a different gravity. Look at a poker player shuffling chips, and you’ll see that when a physical object is on the line, you play for keeps. [Matou], who is no stranger to 3D printing, wanted that tactility, but he didn’t stop at 3D printed pieces. He made parts to transform his Creality Ender 3 Pro into a chess-playing robot.

To convert his printer, [Matou] designed a kit that fits over the print head to turn a hotend into a cool gripper. The extruder motor now pulls a string to close the claw, which is a darn clever way to repurpose the mechanism. A webcam watches the action, while machine vision determines what the player is doing, then queries a chess AI, and sends the next move to OctoPrint on a connected RasPi. If two people had similar setups, it should be no trouble to play tactile chess from opposite ends of the globe.

Physical chess pieces and computers have mixed for a while and probably claimed equal time for design and gameplay. There are a couple of approaches to automating movement from lifting like [Matou], or you can keep them in contact with the board and move them from below.

Continue reading “Print Chess Pieces, Then Defeat The Chess-Playing Printer”

OnShape To Robot Models Made Easier

We live in a time where our phones have computing power that would have been the envy of NASA a few decades ago. So, in theory, we should be able to simulate just about anything. Thanks to [rhoban], robots you design in OnShape — a popular CAD tool — are now easier to simulate using several common simulation tools.

Electronic circuits are pretty easy to simulate, because we typically draw schematics and circuit simulators can capture those schematics readily. But simulating physics for robotic designs is a bit trickier. Gazebo and Pybullet both can use SDF files or URDF. However, building those files is often a separate process from actual physical design even though you probably did the design using a CAD tool. Even if you don’t use OnShape, you can probably import your preferred format and then bridge to the simulation file format without having to manually recreate your design. You can see the author walk through the process in the video below.

Continue reading “OnShape To Robot Models Made Easier”

These Micro Mice Have Macro Control

Few things fascinate a simple Hackaday writer as much as a tiny robot. We’ve been watching [Keri]’s utterly beguiling micromouse builds for a while now, but the fifth version of the KERISE series (machine translation) of ‘bots takes the design to new heights.

A family of mice v1 (largest) to v5 (smallest)

For context, micromouse is a competition where robots complete to solve mazes of varying pattern but standardized size by driving through them with no guidance or compute offboard of the robot itself. Historically the mazes were 3 meter squares composed of a 16 x 16 grid of cells, each 180mm on a side and 50mm tall, which puts bounds on the size of the robots involved.

What are the hallmarks of a [Keri] micromouse design? Well this is micromouse, so everything is pretty small. But [Keri]’s attention to detail in forming miniaturized mechanisms and 3D structures out of PCBs really stands out. They’ve been building micromouse robots since 2016, testing new design features with each iteration. Versions three and four had a wild suction fan to improve traction for faster maneuvering, but the KERISE v5 removes this to emphasize light weight and small size. The resulting vehicle is a shocking 30mm x 32mm! We’re following along through a translation to English, but we gather that [Keri] feels that there is still plenty of space on the main PCBA now that the fan is gone.

The KERISE v5 front end

The processor is a now familiar ESP32-PICO-D4, though the wireless radios are unused so far. As far as environmental sensing is concerned the v5 has an impressive compliment given its micro size. For position sensing there are custom magnetic encoders and a 3 DOF IMU. And for sensing the maze there are four side-looking IR emitter/receiver pairs and one forward-looking VL6180X laser rangefinder for measurements out to 100 or 150mm. Most of these sensors are mounted on little PCB ‘blades’ which are double sided (check out how the PCB shields the IR emitter from it’s receiver!) and soldered into slots perpendicular to the PCBA that makes up the main chassis. It goes without saying that the rest of the frame is built up of custom 3D printed parts and gearboxes.

If you’d like to build a KERISE yourself, [Keri] has what looks to be complete mechanical, electrical, and firmware sources for v1, v2, and v3 on their Github. To see the KERISE v5 dance on a spinning sheet of paper, check out the video after the break. You don’t want to miss it!

Continue reading “These Micro Mice Have Macro Control”