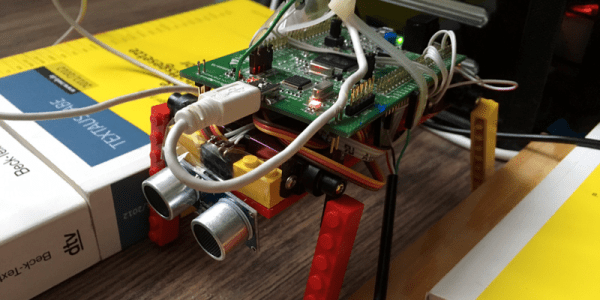
[Basti] was playing around with Artificial Neural Networks (ANNs), and decided that a lot of the “hello world” type programs just weren’t zingy enough to instill his love for the networks in others. So he juiced it up a little bit by applying a reasonably simple ANN to teach a four-legged robot to walk (in German, translated here).
While we think it’s awesome that postal systems the world over have been machine sorting mail based on similar algorithms for years now, watching a squirming quartet of servos come to forward-moving consensus is more viscerally inspiring. Job well done! Check out the video embedded below.
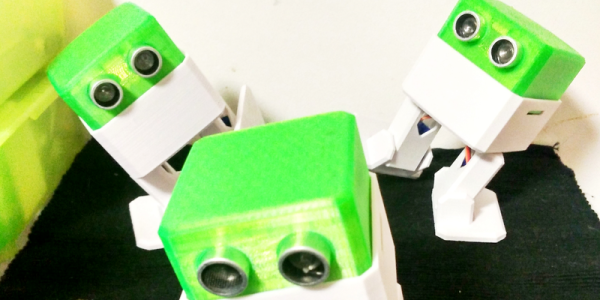
The Otto DIY robot has just taken first place in the coveted role as “best robot to 3D print for your (inner) child”. It’s cute, it dances, it doesn’t cost too much, it’s completely open source, and it’s not impossible to write code for. It’s probably the most refined Bob design that we’ve seen yet. Watch it move in the video below.
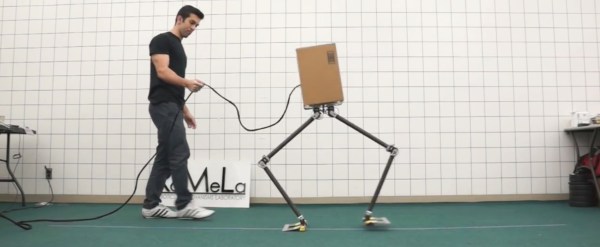
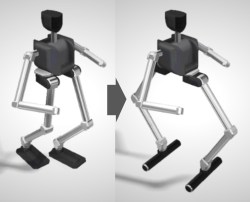
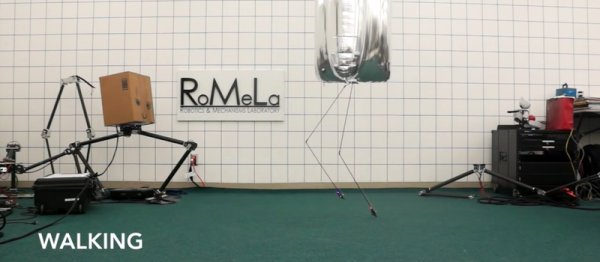
We humans walk funny. Pivoting one leg forward at the hip creates an offset that puts us off-balance sideways. We have to compensate for this with each step we take. Many robots handle this by instead taking small, calculated steps. Enter NABiRoS, the Non Anthropomorphic Bipedal Robot System (link to the video below). The ‘Non Anthropomorphic’ means that it doesn’t walk like a human, and yet the ‘Bipedal’ means it still walks on two legs. The difference is that it walks sideways.
Here’s how the folks from RoMeLa (Robotics & Mechanisms Laboratory) at UCLA did it. Imagine you rotated both your legs 90 degrees such that they were facing in opposite directions. Then you rotate your upper body 90 degrees to face one of your legs. You can now move your legs to walk in the direction you’re facing and there’ll be no more tilting sideways each time you take a step. The joints are also simpler as only a single degree of freedom is needed in each of the knee and hip joints. The ankles and feet are done with a compliant, or an elastic, joint much as you see with a lot of prosthetic legs. As you can see in the video below, in addition to walking, they can do some surprisingly active things such as hopping up and down and what we can only call skipping. In fact, the result is sometimes very human.
There are many kits available to today’s hobbyists who wish to try their hand at producing simple computer-controlled robots. Small concoctions of servos and laser-cut acrylic, to which boards such as the Arduino, Raspberry Pi, or Beaglebone can easily be fitted.
In the 1980s though this was a market that was yet to be adequately served. The sheer size of the many 8-bit machines of the day meant they could not be incorporated in your robot, and interfacing to them was a bit more challenging than the easy-to-use GPIOs of their modern counterparts. Then the mechanical hardware of a small robot was something that had not been easily and cheaply packaged for the constructor, making building a physical robotic platform a significant task in itself.
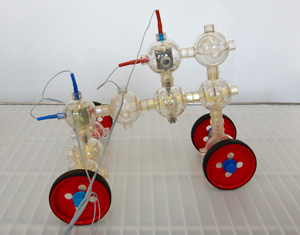
[Charlie] is a robot based on the Capsela construction system, a toy consisting of interlocking plastic spheres containing different functions of shafts, gears, and motors. There was a Robotic Workshop kit for Capsella that featured a Commodore 64 interface, and it is through this means that [Charlie]’s three motors are controlled. It includes a ROM that extends Commodore BASIC with extra commands, which allow the robot to be easily controlled.
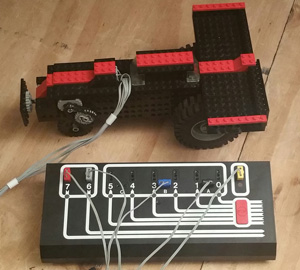
Artie the robot, with Dacta box in foreground
Meanwhile [Artie] is a Lego robot, using the Dacta TC Logo, a kit sold for the educational market and available at the time with interfaces for the PC and the Apple II. They had a Dacta control box but not the Apple II card to go with it, so had to make do with a functional replica built on a prototyping card. As the name suggests, this was programmed using Logo, and came with the appropriate interpreter software.
Both robots are reported to have been a success in terms of working in the first place, then demonstrating the 1980s technology and providing entertainment and engagement with the faire’s visitors.
We have covered numerous Lego robots over the years, as a search of our site will confirm. But this is only the second time we’ve featured a Capsela project, the first being this Arduino rover from 2011. [Mike] mused why we don’t see Capsela more often, and the same sentiment is true today. Do you have a Capsela set gathering dust somewhere that could make a robotic project?
It’s no secret that we love bizarre robot locomotion, so we are naturally suckers for BALLU (YouTube link, also embedded below) the Bouyancy-Assisted Lightweight Legged Unit. The project started with a simple observation — walking robots are constrained by having to hold themselves up — and removing that constraint make success much easier. Instead of walking, BALLU almost floats and uses what little net weight it does have to push against the ground.
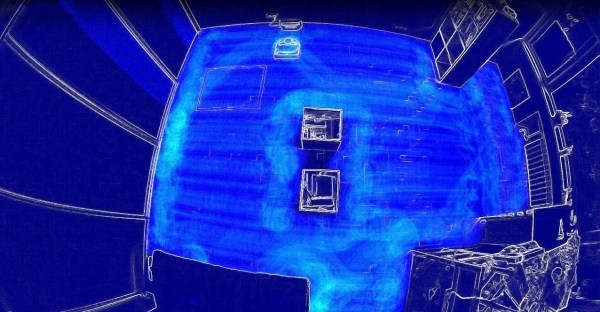
What’s going through the mind of those your autonomous vacuum cleaning robots as they traverse a room? There are different ways to find out such as covering the floor with dirt and seeing what remains afterwards (a less desirable approach) or mounting an LED to the top and taking a long exposure photo. [Saulius] decided to do it by videoing his robot with a fisheye lens from near the ceiling and then making a heatmap of the result. Not being satisfied with just a finished photo, he made a video showing the path taken as the room is being traversed, giving us a glimpse of the algorithm itself.
Looking down on the room and robot
The robot he used was the Vorwerk VR200 which he’d borrowed for testing. In preparation he cleared the room and strategically placed a few obstacles, some of which he knew the robot wouldn’t get between. He started the camera and let the robot do its thing. The resulting video file was then loaded into some quickly written Python code that uses the OpenCV library to do background subtraction, normalizing, grayscaling, and then heatmapping. The individual frames were then rendered into an animated gif and the video which you can see below.
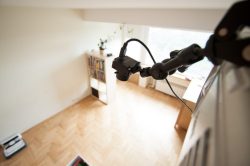
Building a simple robot arm is a lot more straightforward than it used to be. If you have a laser cutter, or a bit of cash and don’t mind waiting for postage, there are inexpensive kits like the MeArm. If you have a 3D printer, there are any number of 3D-printed designs for you to tackle. What if you need to satisfy your urge to build a robot arm really quickly, and you don’t have a laser cutter or 3D printer? You’ve got a pile of servos from that remote-control project, how can you make the rest?
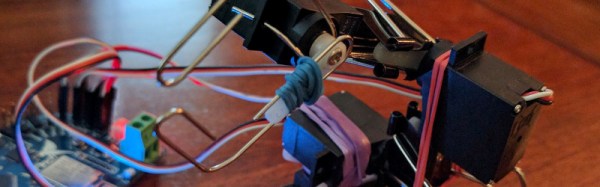
If you are [roboteurs], you raid the stationery cupboard, and create an arm using rubber bands, paper clips, and binder clips. The binder clips grip the servo arms and hold the whole thing together, the rubber bands provide extra attachment , and the paper clips are bent to form the jaws. It’s not the prettiest or perhaps the most capable of arms, but it undeniably is an arm, and we’d doubt it could be done any more cheaply.
In this particular case, the arm serves as a demonstration piece for [roboteurs]’ Printabots Maker Kit for people without a 3D printer. It uses their controller board, but there is no reason why it could not be used with any other board capable of driving servos.
We’ve covered innumerable robot arms over the years, This one may be the cheapest, but another contender might be this cardboard arm. None of them, however, are as cool as this steam-powered Armatron toy.