UAV Flight Controller Saves Weight

When building autonomous airborne vehicles like drones or UAVs, saving a little bit of weight goes a long way, literally. Every gram saved means less energy needed to keep the aircraft aloft and ultimately more time in the air, but unmanned vehicles often need to compromise some on weight in order to carry increased computing abilities. Thankfully this one carries a dizzying quantity of computer power for an absolute minimum of weight, and has some clever design considerations to improve its performance as well.

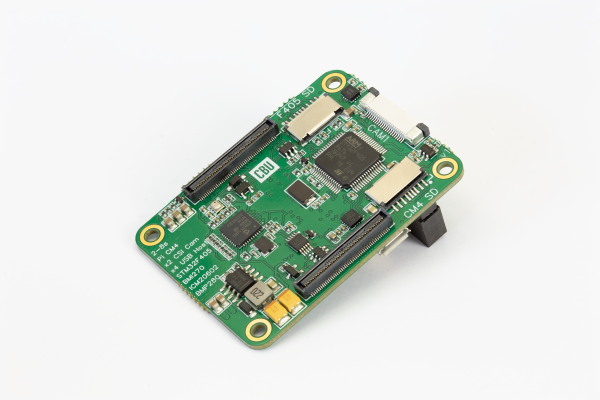
The advantage of this board compared to other similar offerings is that it is built to host a Raspberry Pi Compute Module 4, while the rest of the flight controllers are separated out onto a single circuit board. This means that the Pi is completely sandboxed from the flight control code, freeing up computing power on the Pi and allowing it to run a UAV-specific OS like OpenHD or RubyFPV. These have a number of valuable tools available for unmanned flight, such as setting up a long range telemetry and camera links. The system itself supports dual HD camera input as well as additional support for other USB devices, and also includes an electronic speed controller mezzanine which has support for quadcopters and fixed wing crafts.

Separating non-critical tasks like cameras and telemetry from the more important flight controls has a number of benefits as well, including improved reliability and simpler software and program design. And with a weight of only 30 grams, it won’t take too much cargo space on most UAVs. While the flight computer is fairly capable of controlling various autonomous aircraft, whether it’s a multi-rotor like a quadcopter or a fixed wing device, you might need a little more computing power if you want to build something more complicated.

A Sandbox For DIY Pinball Design

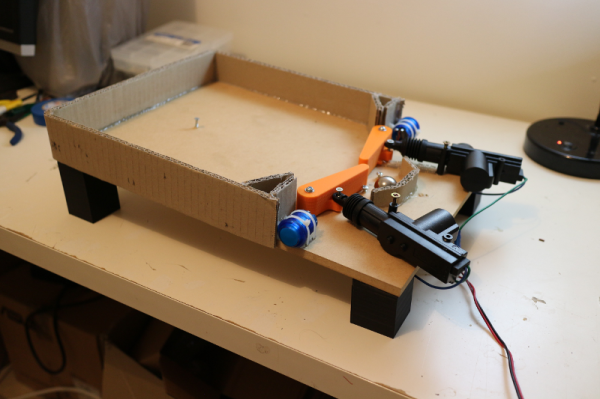
If you’ve always wanted to build your own pinball machine but have no idea where to start, this is the project for you. [Chris] is in the process of building a 3/4 size pinball table and is currently in the waiting-for-parts stage. As they arrive, he is testing them in a sandbox he built in an afternoon. Let [Chris]’s proving ground be your quick-start guide to all the ways you could approach the two most important parts of any pin: the flippers and targets.

The field of play is a sturdy piece of particle board, and the cardboard walls are attached with hot glue. [Chris] designed and printed a pair of flippers that are driven by some cheap remote door lock motors he found at a popular online auction house. You can see how snappy are in the test video after the break.

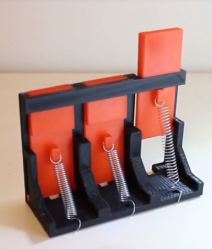
We love the crisp action and elegant simplicity of the spring-loaded drop targets [Chris] designed. Right now he resets them manually, but soon they will be reset by a solenoid or maybe a motor. We can’t wait to see how the table turns out. In the meantime, we’ll have to go back to drooling over this amazing life-size 3D-printed pinball machine.

Continue reading “A Sandbox For DIY Pinball Design”

Sandclock

These Sands Of Time Literally Keep Time

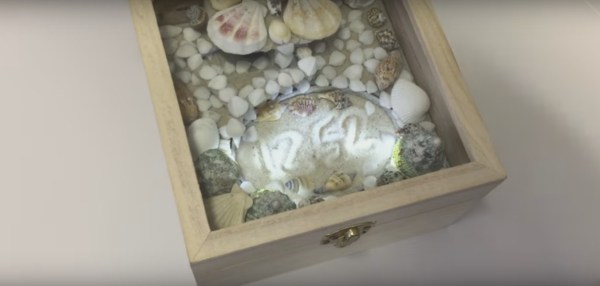
Hour glasses have long been a way to indicate time with sand, but the one-hour resolution isn’t the best. [Erich] decided he would be do better and made a clock that actually wrote the time in the sand. We’ve seen this before with writing time on a dry erase board with an arm that first erases the previous time and then uses a dry erase marker to write the next time. [Erich]’s also uses an arm to write the time, using the tip of a sea shell, but he erases the time by vibrating the sandbox, something that took much experimentation to get right.

To do the actual vibrating he used a Seeed Studio vibration motor which has a permanent magnet coreless DC motor. Interestingly he first tried with a rectangular sandbox but that resulted in hills and valleys, so he switched to a round one instead. Different frequencies shifted the sand around in different ways, some moving it to the sides and even out of the sandbox, but trial and error uncovered the right frequency, duration, and granular medium. He experimented with different sands, including litter for small animals, and found that a powder sand with small, round grains works best.

Four white LEDs not only add to the nice ambience but make the writing more visible by creating shadows. The shells also cleverly serve double duty, both for appearance and for hiding things. Shells cause the arms to be practically invisible until they move (well worth viewing the video below), but the power switch and two hooks for lifting the clock out of the box are also covered by shells. And best of all, the tip that writes in the sand is a shell. There’s plenty more to admire about the cleverness and workmanship of this one.

Continue reading “These Sands Of Time Literally Keep Time”

Excel Password

Breaking Dridex Malware With Excel Macro Password Exploit

[Ronnie] recently posted a new chapter in his adventures in malware deconstruction. This time the culprit was an infected Excel spreadsheet file. The .xls file was attached to a phishing email claiming to be related to a tax rebate. With tax season in full swing, this type of phishing message would be likely to be opened by an inexperienced user.

[Ronnie] saved the file to a virtual machine to prevent his real workstation from getting infected. He then opened it up in Excel and noticed that it immediately attempted to run macros. A macro is essentially visual basic scripting that runs inside of the spreadsheet file. You can use it for simple automation, cell formatting, or do even more complicated tasks like reach out to external websites and pull information. This malware focused on the latter.

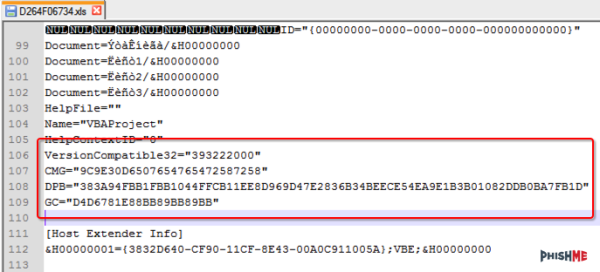
[Ronnie] used the alt + F11 shortcut to view the macros. Unfortunately the attackers had password protected them. [Ronnie] wouldn’t be able to view the macro code without knowing the password. Luckily, he learned of a surprisingly simple trick to completely bypass the macro password. He opened up the .xls file in Notepad++ and located three keys; CMG, DPB, and G. [Ronnie] then created and saved a new blank .xls document and password protected the macros with his own password. He opened up this new file in Notepad++ as well, and located those same three keys. He copied the keys from the new file into the old one, and saved the old file. This effectively changed the password of the malware file to the new one he had set for his new file. This is a nifty trick that apparently only works on the older .xls formats, not the newer .xlsx format.

After loading the macros, [Ronnie] quickly noticed that most of the code was obfuscated to make it difficult to analyze. There were, however, three named modules that reference possible sandbox evasion techniques. The malware first invokes these functions to detect the presence of a virtual machine or other type of sandbox. If it detects nothing, then the rest of the malware program is decoded and executed. [Ronnie] removed these checks and then executed the macro to verify that his change had worked.

The next step was to try to view the decoded instructions. The decoded gibberish was saved to a variable. The simplest way for [Ronnie] to view the contents of the variable was to have the program create a pop-up box that displayed the contents of that variable. After making this change and running the program again, he was able to see exactly what the malware was doing. The code actually invoked Powershell, downloaded a file from the Internet, and then extracted and executed that file. In the full write-up, [Ronnie] goes even further by downloading and analyzing the executable.

Sandbox Topographical Play Gets A Big Resolution Boost

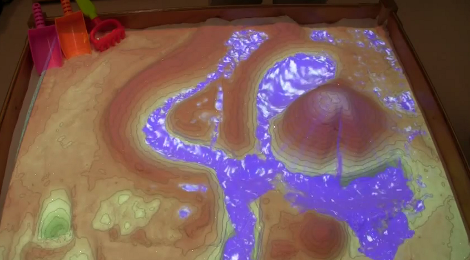
Here’s another virtual sandbox meets real sandbox project. A team at UC Davis is behind this depth-mapped and digitally projected sandbox environment. The physical sandbox uses fine-grained sand which serves nicely as a projection surface as well as a building medium. It includes a Kinect depth camera over head, and an offset digital projector to add the virtual layer. As you dig or build elevation in parts of the box, the depth camera changes the projected view to match in real-time. As you can see after the break, this starts with topographical data, but can also include enhancements like the water feature seen above.

It’s a big step forward in resolution compared to the project from which the team took inspiration. We have already seen this concept used as an interactive game. But we wonder about the potential of using this to quickly generate natural environments for digital gameplay. Just build up your topography in sand, jump into the video game and make sure it’s got the attributes you want, then start adding in trees and structures.

Don’t miss the video demo embedded after the break.

Continue reading “Sandbox Topographical Play Gets A Big Resolution Boost”