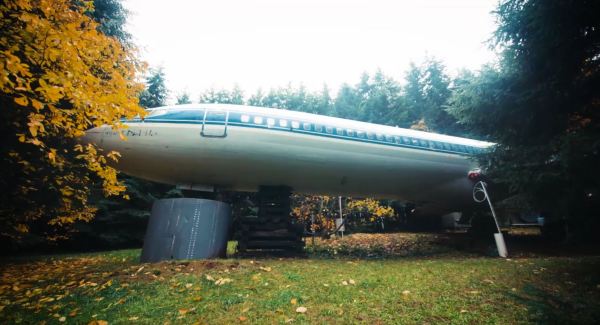
Hacklet 35 – BeagleBone Projects

The Raspberry Pi 2 is just barely a month old, and now that vintage console emulation on this new hardware has been nailed down, it’s just about time for everyone to do real work. You know, recompiling stuff to take advantage of the new CPU, figuring out how to get Android working on the Pi, and all that good stuff that makes the Pi useful.

It will come as no surprise to our regular readers that there’s another board out there that’s just as good in most cases, and in some ways better than the Pi 2. It’s the BeagleBone Black, and for this edition of the Hacklet, we’re focusing on all the cool BeagleBone projects on Hackaday.io.

lcdSo you have a credit card sized Linux computer and a small, old LCD panel. If it doesn’t have HDMI, VGA or composite input, there’s probably no way of getting this display working, right? Nope. Not when you can make an LCD cape for $10.

[Dennis] had an old digital picture frame from a while back, and decided his BeagleBone needed a display. A few bits of wire and some FPC connectors, and [Dennis] has a custom display for his ‘Bone. It’s better than waiting for that DSI display…

bed[THX1082] is making a bed for his son. This isn’t your usual race car bed, or even a very cool locomotive bed. No, this is a spaceship bed. Is your bed a space ship? No, I didn’t think so.

Most of the work with plywood, MDF, paint, and glue is done, which means the best feature of this bed – a BeagleBone Black with an LCD, buttons, a TV, and some 3D printed parts – is what [THX] is working on right now. He’s even forking a multiplayer networked starship simulator to run in the bed. Is your bed a starship simulator?

beer

Beer. [Deric] has been working on a multi-step fermentation controller using the BeagleBone Black. For good beer you need to control temperatures and time, lest you end up with some terrible swill that I’d probably still drink.

This project controls every aspect of fermentation, from encouraging yeast growth, metabolization of sugars, and flocculation. The plan is to use two circuits – one for heating and one for cooling – and a pair of temperature sensors to ensure the beer is fermenting correctly.


If you’re looking for more BeagleBone Projects, there’s an entire list of them over on Hackaday.io with GLaDOs Glasses, Flight Computers, and Computer Vision.

Using RC Transmitters With Flight Simulators

It’s winter, and that means terrible weather and very few days where flying RC planes and helicopters is tolerable. [sjtrny] has been spending the season with RC flight simulators for some practice time. He had been using an old Xbox 360 controller, but that was really unsuitable for proper RC simulation – a much better solution would be to use his normal RC transmitter as a computer peripheral.

The usual way of using an RC transmitter with a computer is to buy a USB simulator adapter that emulates a USB game pad through a port on the transmitter. Buying one of these adapters would mean a week of waiting for shipping, so [sjtrny] did the logical thing and made his own.

Normally, a USB simulator adapter plugs in to a 3.5mm jack on the transmitter used for a ‘buddy box’, but [sjtrny] had an extra receiver sitting around. Since a receiver simply outputs signals to servos, this provides a vastly simpler interface for an Arduino to listen in on. After connecting the rudder, elevator, aileron, and throttle signals on the receiver to an Arduino, a simple bit of code and the UnoJoy library allows any Arduino and RC receiver to become a USB joystick.

[sjtrny] went through a second iteration of hardware for this project with a Teensy 3.1. This version has higher resolution on the joystick axes, and the layout of the code isn’t slightly terrible. It’s a great project for all the RC pilots out there that can’t get a break in the weather, and is also a great use for a spare receiver you might have sitting around.

“Superfan” Gaming Peripheral Lets You Feel Your Speed

Virtual reality has come a long way but some senses are still neglected. Until Smell-O-Vision happens, the next step might be feeling the wind in your hair. Perhaps dad racing a sportbike or kids giggling on a rollercoaster. Not as hard to build as you might think, you probably have the parts already.

HAD - Superfan4Off-the-shelf devices serve up the seeing and hearing part of your imaginary environment, but they stop there. [Jared] wanted to take the immersion farther by being able to feel the speed, which meant building his own high power wind generator and tying it into the VR system. The failed crowdfunding effort of the “Petal” meant that something new would have to be constructed. Obviously, to move air without actually going on a rollercoaster requires a motor controller and some fans. Powerful fans.

A proponent of going big or going home, [Jared] picked up a pair of fans and modified them so heavily that they will launch themselves off of the table if not anchored down. Who overdrives fans so hard they need custom heatsinks for the motors? He does. He admits he went overboard and sensibly way overbudget for most people but he built it for himself and does not care.

Continue reading ““Superfan” Gaming Peripheral Lets You Feel Your Speed”

Open-Source Laser Shooting Simulator

Looking to practice your marksmanship skills at home? Check out the homeLESS (Home LasEr Shooting Simulator), an open-source tool for marksmanship practice. [Laabicz] developed this system as a cheaper alternative to commercial laser shooting simulators, which are just as simple but very expensive.

[Laabicz]’s simulator primarily uses modified airsoft pistols that are fitted with batteries (installed in the magazine) and a laser in the chamber. Any gun can be used with the system as long as you can figure out how to attach a laser and trigger switch. To power the laser, a small capacitor is charged from batteries when the trigger switch is off. Once the trigger is pressed, the capacitor discharges through the laser and makes a short pulse of light.

The simulator is written in Processing and requires a projector and a webcam. The Processing sketch projects configurable moving targets on a screen or wall, and the webcam detects when a laser is triggered over any of the targets. The software supports multiple target types (including moving targets) and is quite configurable. Check out the video after the break to see the system in use.

Continue reading “Open-Source Laser Shooting Simulator”

[Tom Sachs] Builds His Own Space Program

sachslunarcapsuleinterior

Born in the mid 60’s, [Tom Sachs] has always been fascinated with space, especially the Apollo program. Just like every kid of his generation, [Tom] imagined himself in Neil Armstrong’s and Buzz Aldrin’s boots, gazing over the lunar surface. He never gave up that dream, and years later as a successful modern artist, he built his own space program.

[Tom Sachs] is a master of bricolage . Taken from the French word for tinkering, Wikipedia defines bricolage as “… the construction or creation of a work from a diverse range of things that happen to be available, or a work created by such a process.”  The term could also describe the junkbox procurement methods we use on many of our own projects.

sachs-lunar-landerBoth [Tom’s] 2007 lunar program and his 2012 Mars program featured his astonishing lunar lander. Built from plywood, found items, and junk, the lander literally made us do a double take the first time we saw it. The attention to detail is incredible. At first glance one could mistake this for a simulator built by NASA themselves. After a few seconds the custom touches start to jump out, such as a “Thank You” garbage door from a fast food restaurant, or a bar stocked with tequila and vodka. The lander’s tools are not just for show either, as the gallery opens with a simulated space mission, which could best be described as a mix of art, improv, and an epic game of make-believe for adults.

[Tom’s] installations also include mission control, which in his Mars piece consisted of a dizzying array of screens, controls and an 80’s boombox. Dressed in the white shirt, thin tie, and horn rimmed glasses we’ve come to associate with NASA engineers of the 60’s, this is where [Tom] works. He truly is the engineer of this mission.

Editor’s Note [Tom] and the entire hacker community at large have a chance to go to space by entering The Hackaday Prize!

Continue reading “[Tom Sachs] Builds His Own Space Program”

Building A Cessna 172 Simulator

plane

As anyone who has downloaded Microsoft Flight Simulator X or X-Plane knows, piloting an aircraft using a keyboard and mouse just doesn’t work. If you’re going to get in to the world of flight simulators, it’s best to go all-in. [Stevenarango] knows this and built a great Cessna 172 cockpit for his personal use.

All the gauges, instrument panels, and controls are from Saitek, one of the best manufacturers of home/hobbyist flight controls. The instruments were mounted on a 5mm piece of PVC, which is mounted on a C172 cockpit-sized wooden frame. All the instruments, from the throttle, pedals, yoke, trim wheel, individual LCD steam gauges, and multi panel are driven by USB.

As for the actual simulation, [Steven] is using a fairly powerful computer running Flight Simulator X with dual monitors – one for the glass cockpit and another for the windscreen. It’s not quite the same scale as building a 737 in your garage, but it’s more than sufficient for an awesome flight simulator experience at home.

Remote Control FPV Cockpit

cockpit

FPV flying, for how awesome it actually is, still consists of fiddling around with a remote control transmitter and either wearing video goggles or squinting into a screen. Awesome, yes, but not as cool as [Brett Hays]’s enclosed cockpit ground station. It’s a trailerable flight sim that allows you to have the same experience of flying an aircraft over your local terrain without actually leaving the ground.

The centerpiece for this build is a 42 inch flat screen TV that was picked up for $160. This was placed at the front of a large plywood and 2×2 box along with a computer joystick, throttle, and rudder controls.

The pots inside the controls needed to be switched out to match the resistance of the ones inside an old Futaba transmitter. From there, completing the the cockpit was just a matter of fabricating a few panels for a video switcher, gear retract lever, flaps. and RC radio settings.

It’s a truly amazing build and when placed on a trailer towed by [Brett]’s jeep, has the potential to be the closest thing to flying a manned aircraft you can get without a pilot’s license.

Videos of the cockpit in action below.

Continue reading “Remote Control FPV Cockpit”