SNES Controllers Are (Almost) SPI-Compatible

Considering that the Serial Peripheral Interface bus semi-standard has been around since the early 1980s, it’s perhaps not that shocking that the controllers of the Super Nintendo Entertainment System (SNES) would take at least some strong design hints for the used protocol. This does however raise the question of exactly how compatible a SNES controller is when connected to the SPI master peripheral of any random MCU. Recently [James Sharman] set out to answer this question decisively.

The impetus for answering this question came after [James] designed a separate SNES controller board for his homebrew computer system, which led to many comments on that video saying that he could just have hooked the controller up to the SPI board in said homebrew system.

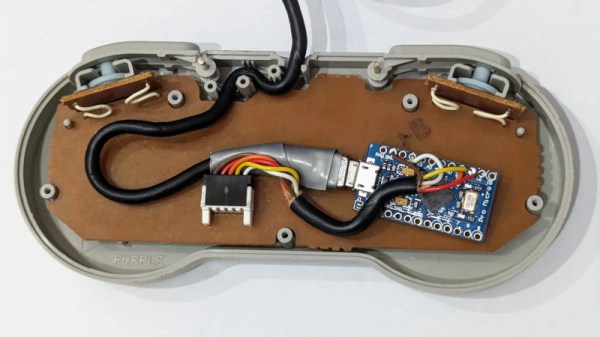
Here the short answer is that the SNES controller protocol is very close to SPI Mode-1, with a similar arrangement of clock/data/chip select (latch) lines and clocking. If you think of the SNES controller as an SPI device with just a MISO line, you’re basically there already. The only niggle that popped up was that the ‘MISO’ line does not get pulled into a high-impedance state when the active-low latch connection is pulled high.

This was fixable by introducing a 74HC125 tri-state buffer IC, after which both the original SD card and twin SNES controllers could be used simultaneously.

Continue reading “SNES Controllers Are (Almost) SPI-Compatible”

Fixing The Damage Of A Botched SNES SuperCIC Mod

Not what you want to see when testing that 'repaired' SNES. (Credit: Skawo, YouTube)
Not what you want to see when testing that ‘repaired’ SNES. (Credit: Skawo, YouTube)

The good part about older game consoles like the Super Nintendo is that they have rather rudimentary region locks, but unfortunately this also gives some people the idea that installing something like the SuperCIC mod chip to make a SNES region-free is easy. The patient that arrived on [Skawo]’s surgery table was one such victim, with the patient requiring immediate surgery to remove the botched installation before assessing the damage.

Here the good news was that the patient features the revision B CPU, making it a good console to rescue. The bad news was that the pads of the old CIC chip had been ripped up, there was a solder bridge on S-PPU1 between two pins and both the installed wiring and soldering were atrocious, requiring plenty of touch-ups.

With the CIC pads already a loss, finishing the SuperCIC mod seemed like a good plan, also since this would make for a nice region-free console. This mod involves a PIC16F630 with special firmware that works with the corresponding CIC IC in each cartridge, while also switching between 50/60 Hz mode to fit the cartridge’s region. After an initial test with PAL and NTSC cartridges everything seemed all right. Then [Skawo] ran the SuperNES Burn-In test from its cartridge, which gave dire news.

Continue reading “Fixing The Damage Of A Botched SNES SuperCIC Mod”

A SNES CPU Replacement Via FPGA

Let’s say you had a SNES with a busted CPU. What would you do? Your SNES would be through! That is, unless, you had a replacement based on an FPGA. [leonllr] has been developing just such a thing.

The project was spawned out of necessity. [leonllr] had purchased a SNES which was struck down with a dead CPU—in particular, a defective S-CPU revision A. A search for replacements only found expensive examples, and ones that were most likely stripped from working machines. A better solution was necessary.

Hence, a project to build a replacement version of the chip using the ICE40HX8K FPGA. Available for less than $20 USD, it’s affordable, available, and has enough logic cells to do the job. It’s not just a theoretical or paper build, either. [leonllr] has developed a practical installation method to hook the ICE40HX8K up to real hardware, which uses two flex PCBs to go from the FPGA mainboard to the SNES motherboard itself. As for the IP on the FPGA, the core of the CPU itself sprung from the SNESTANG project, which previously recreated the Super Nintendo on Sipeed Tang FPGA boards. As it stands, boards are routed, and production is the next step.

It’s nice to see classic hardware resurrected by any means necessary. Even if you can’t get a whole bare metal SNES, you might be able to use half of one with a little help from an FPGA. We’ve seen similar work on other platforms, too. Meanwhile, if you’re working to recreate Nintendo 64 graphics chips in your own basement, or something equally weird, don’t hesitate to let us know!

The SNES Seems To Be Getting Faster Over Time

Every Super Nintendo console should run at the same speed. They were all built in factories with the same components so they should all operate at the steady clip mandated by Nintendo all those years ago. Except, apparently, the SNES is speeding up as it gets older.

The matter was brought to the public’s attention by the [TASBot] team, a group within the speedrunning community. If anyone was going to notice vintage consoles suddenly running a hair faster, you could bet it would be the speedrunners. Soon enough, a call was put out to crowdsource some data. Submitters were asked to run a set piece of code to test the DSP sample rate on consoles when cold and warm, to get the best idea of what was going on.

As reported by Ars Technica, the group seems to have pinned down the problem to the SNES’s Audio Processing Unit. It’s supposed to run at 24.576 MHz, with a sample rate of 32,000 Hz. However, over the years, emulator developers and speedrunners had noticed that 32,040 Hz seemed to be a more realistic figure for what real consoles were actually running the DSP sample rate at. Developers found that building emulators to run the DSP at this rate was important to run commercial games as expected, suggesting the hardware might have always been a little faster than expected.

However, more recently, it seems that the average speed of the DSP sample rate has increased further. The average result collected by [TASBot] from modern consoles is 32,076 Hz. What’s more interesting is the range of submitted figures—from 31,976 Hz to 32,349 Hz. It seems that the DSP’s ceramic resonator—used instead of a quartz crystal—might degrade over time, causing the speedup. [TASBot] team members also tested temperature changes, but only found a 32 Hz variation from a frozen SNES to one at room temperature.

The fact that console components degrade over time isn’t exactly news; we’ve featured plenty of articles on leaky batteries and corroded traces. Still, for speedrunners, the idea that the hardware standard itself can shift over time? It’s like feeling quicksand under your feet. What even is reality anymore?

[Thanks to s7726 for the tip!]

Are CRT TVs Important For Retro Gaming?

We always thought the older console games looked way better back in the day on old CRTs than now on a modern digital display. [Stephen Walters] thinks so too, and goes into extensive detail in a lengthy YouTube video about the pros and cons of CRT vs digital, which was totally worth an hour of our time. But are CRTs necessary for retro gaming?

The story starts with [Stephen] trying to score a decent CRT from the usual avenue and failing to find anything worth looking at. The first taste of a CRT display came for free. Left looking lonely at the roadside, [Stephen] spotted it whilst driving home. This was a tiny 13″ Sanyo DS13320, which, when tested, looked disappointing, with a blurry image and missing edges. Later, they acquired a few more displays: a Pansonic PV-C2060, an Emerson EWF2004A and a splendid-looking Sony KV24FS120. Some were inadequate in various ways, lacking stereo sound and component input options.

A poor analog cable coupled with rendering inaccuracy gives a nice filtering effect

A large video section discusses the reasons for the early TV standards. US displays (and many others using NTSC) were designed for 525 scan lines, of which 480 were generally visible. These displays were interlaced, drawing alternating fields of odd and even line numbers, and early TV programs and NTSC DVDs were formatted in this fashion. Early gaming consoles such as the NES and SNES, however, were intended for 240p (‘p’ for progressive) content, which means they do not interlace and send out a blank line every other scan line.  [Stephen] goes into extensive detail about how 240p content was never intended to be viewed on a modern, sharp display but was intended to be filtered by the analogue nature of the CRT, or at least its less-than-ideal connectivity. Specific titles even used dithering to create the illusion of smooth gradients, which honestly look terrible on a pixel-sharp digital display. We know the differences in signal bandwidth and distortion of the various analog connection standards affect the visuals. Though RGB and component video may be the top two standards for quality, games were likely intended to be viewed via the cheaper and more common composite cable route.

Continue reading “Are CRT TVs Important For Retro Gaming?”

A Look Inside The Super Nintendo Cartridges And Video System

Despite being effectively sold as a toy in the 1990s, the Super Nintendo Entertainment System (SNES) was pretty bleeding-edge as far its computing chops were concerned. This was especially apparent with its cartridges, such as in this excellent summary article by [Fabien Sanglard].

In addition to the mask ROM that stored the game data and (optionally) battery-backed SRAM to store save data, a wide range of enhancement processors existed that upgraded the base SNES system with additional processors for more CPU performance, enhanced graphics and so on. Imagine sticking a game cartridge in a PlayStation 4 today that boosted CPU speed by 5x and gave it a much better GPU, this was the world of SNES games.

On the other side of the video game cartridges was the video output system, which seems easy enough in today’s world of digital HDMI and DisplayPort output. In the 90s video output did however mean NTSC and SECAM/PAL, which means playing nice with frequencies, different resolutions (lines) and squeezing as much as possible into a single frame in a way that works with the game console’s rendering pipeline. As a result of this the PAL version of Super Mario World has a larger vertical resolution than the NTSC version (240 vs 224 lines), even if it’s still squashed into the same 4:3 format. For the physical video output side, European gamers were spoiled with an AV connector to (RGB) SCART output, while the rest of the world dealt with some variety of RF composite or S-video.

Although the SNES’s successor in the form of the N64 would not take cartridges to the same extremes, it was this flexible architecture that gave the SNES such an amazing game library.

Arduino Provides No Fuss SNES-To-USB Conversion

Even for those of us who are fans of retrocomputing, it’s fair to say that not everyone plays their old-school games on real old-school hardware. The originals are now fragile and expensive, and emulators are good enough that if the gaming experience is all you’re after there’s little point in spending all that cash.

There’s one place in which the originals sometimes have the edge though, the classic controllers are the personal interface with the game. So when [Dome] found a SNES controller in an Akibahara shop, of course he picked it up. How to make it talk to a PC? Tuck an Arduino Pro Micro inside it, of course!

What we like about this project is that instead of ripping out the original electronics it instead hooks the Arduino board onto the original serial interface. We might have made a Nintendo socket to USB box to keep the original cable, but either way, the SNES (technically Super Famicom, because it’s a Japanese market unit) original stays true to its roots. The Arduino polls the clock line at the speed of the console, reads the result, and translates it to a USB interface for the computer. There’s a full run-down of the code and how it was made, should you wish to try.

Of course, if you don’t always have a PC handy, you could also put the whole computer in the controller.