A DIY Mobile Soldering Iron

Cordless soldering irons are, as a rule, terrible. A few months ago, you could pick up a cordless soldering iron from Radio Shack that was powered by AAA batteries. You can guess how well those worked. There are butane-fueled soldering irons out there that will heat up, but then you’re left without the requisite degree of temperature control.

[Xavier] didn’t want to compromise on a mobile soldering iron, so he made a desktop version portable. His mobile temperature controlled soldering iron uses the same electronics that are found in inexpensive Hakko clones, and is powered by a LiPo battery.

The soldering station controller comes directly from eBay, and a DC/DC boost converter accepts just about any DC power supply – including an XT60 connector for LiPo cells. A standard Hakko 907 iron plugs into the front, and a laser cut MDF enclosure makes everything look great. There were a few modifications to the soldering station controller that involved moving the buttons and temperature display, but this build really is as simple as wiring a few modules together.

With an off-the-shelf LiPo battery, the iron heats up fast, and it doesn’t have a long extension cord to trip over. With the right adapter, [Xavier] can use this soldering station directly from a car’s cigarette power port, a great feature that will be welcomed by anyone who has ever worked on the wiring in a car.

Continue reading “A DIY Mobile Soldering Iron”

Creating New Nintendo 3DS Hardware

For the last five years or so, Nintendo has been selling the 3DS, the latest in a long line of handheld consoles. Around two years ago, Nintendo announced the New Nintendo 3DS, with a faster processor and a few other refinements. The new 3DS comes in two sizes: normal and XL. You can buy the XL version anywhere in the world, but Nintendo fans in North America cannot buy the normal version.

[Stephen] didn’t want the jumbo-sized New 3DS XL, both because it’s too large for his pockets, and because there are no fancy cases for the XL. His solution? Creating a US non-XL 3DS with god-like soldering skills.

In manufacturing the XL and non-XL versions of the 3DS, Nintendo didn’t change much on the PCBs. Sure, the enclosure is different, but electronically there are really only two changes: the eMMC storage and the Nintendo processor. 3DS are region-locked, so simply swapping out the boards from a normal 3DS to an XL 3DS wouldn’t work; [Stephen] would also like to play US games on his modded console. That leaves only one option: desoldering two chips from a US XL and placing them on the board from a Japanese 3DS.

With a board preheater and heat gun, [Stephen] was able to desolder the eMMC chip off both boards. Of course this meant the BGA balls were completely destroyed in the process, which means reballing the package with solder bits only 0.3mm in diameter. With the US eMMC transplanted to the Japanese board, [Stephen] ended up with an error message that suggested the processor was reading the memory. Progress, at least.

[Stephen] then moved on to the processor. This was a nightmare of a 512 pin BGA package, with 512 pins that needed a tiny dot of solder placed on them. Here, sanity gave way and [Stephen] called up a local board and assembly house. They agreed to solder the chip onto the board and do an x-ray inspection. With the professional rework done, [Stephen] assembled his new US non-XL 3DS, and everything worked. It’s the only one in the world, and given the effort required to make these mods, we’re expecting it to remain the only one for a very long time.

More GPIOs For The ESP8266

The ESP8266 is an incredible piece of hardware; it’s a WiFi module controllable over a serial port, it’s five freaking dollars, and if that’s not enough, there’s a microcontroller on board. Until there’s a new radio standard, this is the Internet Of Things module.

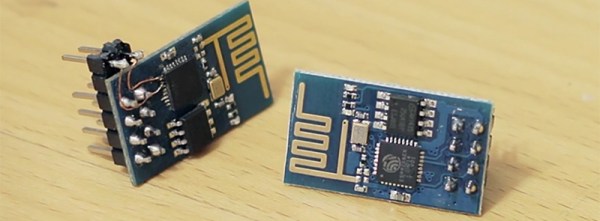
The most common version of the ESP, the -01 version, only has a 2×4 row of pins for serial, power, configuration, and two lines of GPIO. It’s a shame that module only has two GPIOs, but if you’re good enough with a soldering iron you can get a few more. It took a lot of careful soldering, but [Hugatry] managed to break out two more GPIOs on this tiny module.

According to [Hugatry] a lot of patience to solder those wires onto those tiny pads, but after finishing this little proof of concept he discovered a Russian hacker managed to tap into four extra GPIOs on the ESP8266-01 module (Google Translatrix).

As a proof of concept, it’s great, but there’s more than one ESP module out there. If you’re looking for a cheap WiFi module, check out the ESP-03, -04, or -07; they have nice castellated pins that are exceptionally easy to solder to.

Video below.
Continue reading “More GPIOs For The ESP8266”

$50k In Play: 20 Bulbdial Clock Kits

For this week we’re veering away from our habit of giving away things to help with your build and giving away something fun. 20 Hackaday Prize entries will receive a Bulbdial Clock kit. Getting into the running is easy, start your project on Hackaday.io and make sure you officially submit it to the Hackaday Prize. Get it in by next Wednesday to be considered for this week’s prizes, and you’ll also be in the running each week after that as we work our way through $50,000 in prizes this summer before giving away the big stuff like a Trip into Space and $100,000 in cash.

The Bulbdial Clock has been a favorite of ours for years. Developed by Hackaday Prize Judges [Windell] and [Lenore] at Evil Mad Scientist Labs, it uses three rings of colored LEDs to cast shadows as clock hands. It’s a fun solder kit that will take time to assemble. In keeping with that ideal, your best bet at scoring one this week is to post a new project log showing off the solder work you’ve done on your prototype. If you don’t have one soldered yet, that’s okay too. Just post a new project log that talks about the component assembly you’ll be working on. This would be a great time to finally draw up a basic schematic, right?

Last Week’s 40 Winners of $50 Shapeways Gift Cards

50k-in-play-shapeways-blogview

Congratulations to these 40 projects who were selected as winners from last week. You will receive a $50 gift card from Shapeways so that you can get your custom parts 3D printed. We were on the lookout for projects that we thought would benefit most from custom parts. Some of these are far along in their development, some have just started, but all of them are awesome so browse the list and make sure to skull and follow the ones you like!

Each project creator will find info on redeeming their prize as a message on Hackaday.io.


The 2015 Hackaday Prize is sponsored by:

Open Source, DIY Soldering Robot

After [Brian] starting selling his own Raspberry Pi expansion boards, he found himself with a need for a robot that could solder 40-pin headers for him. He first did what most people might do by looking up pre-built solutions. Unfortunately everything he found was either too slow, too big, or cost as much as a new car. That’s when he decided to just build his own soldering robot.

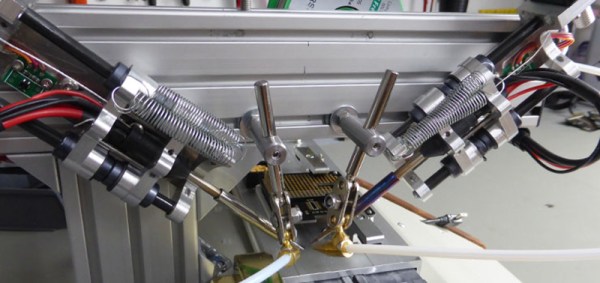
The robot looks similar to many 3D printer designs we’ve seen in the past, with several adjustments. The PCBs get mounted to a flat piece of aluminum dubbed the “PCB caddy”. The PCBs are mounted with custom-made pins that thread into the caddy. Once the PCBs are in place, they are clamped down with another small piece of aluminum. A computer slowly moves the caddy in one direction, moving the header’s pins along the path of the soldering irons one row at a time.

The machine has two soldering irons attached, allowing for two pins to be soldered simultaneously. The irons are retracted as the PCB caddy slides into place. They irons are then lowered onto the pins to apply heat. Two extruders then push the perfect amount of solder onto each pin. The solder melts upon contact with the hot pins, just as it would when soldered by hand.

The system was originally designed to be run on a Windows 8.1 tablet computer, but [Brian] found that the system’s internal battery would not charge while also acting like a USB host. Instead, they are running the Windows WPF application on full PC. All of the software and CAD files can be found on [Brian’s] github page. Also be sure to check out the demo video below. Continue reading “Open Source, DIY Soldering Robot”

A New Handle For An Old Soldering Station

About 20 years ago, [Simon] spent a few week’s pay on a soldering station, a Micron W/2172. It served him well for the past few decades, but lately he hasn’t been able to find a supply of new tips for it. The Micron went into a cupboard and he upgraded to a newer Hakko soldering station.

The old Micron was still sitting in the cupboard when [Simon] realized both stations use a 24V supply for the heater, and you can buy replacement Hakko handle for a few bucks. Having two soldering stations would be handy, so [Simon] set out to convert the old Micron station to accept Hakko handles.

The only technical challenge for this modification was to figure out how the old circuit board in the Micron would read the thermistor  in the new handle. The original circuit used a dual op-amp, with one side used to amplify the thermocouple and the other to compare it to the temperature set point. After measuring the set point and a bit of Excel, [Simon] had a small circuit board that would replace the old op-amp. After that it was only a matter of wiring the new handle into the old station, calibrating the temperature settings, and enjoying the utility of two soldering stations.

Extreme Repair Of An All-in-One PC

While browsing a local auction site, [Viktor] found himself bidding on a beat up Lenovo A600 all-in-one PC. He bid around $50 and won. Then came the hard part – actually making the thing work. The front glass was cracked, but the LCD was thankfully unharmed. The heat pipes looked like they had been attacked with monkey wrenches. The superIO chip’s pins were mangled, and worst of all, the MXM video card was dead.

The first order of business was to fix the superIO chip’s pins and a few nearby discrete components which had been knocked off their pads. Once that was done, [Viktor] was actually able to get the computer to boot into Linux from a USB flash drive. The next step was bringing up the display. [Viktor] only needed a coding station, so in addition to being dead, the video accelerator on the MXM wasn’t very useful to him. The Lenovo’s motherboard was designed to support video on an MXM card or internal video. Switching over meant changing some driver settings and moving a few components, including a rather large LVDS connector for the display itself. A difficult task, compounded by the fact that [Viktor’s] soldering tools were a pair of soldering guns that would be better suited to fixing the bodywork on a ’57 Chevy. He was able to fashion a hot wire setup of sorts, and moved the connector over. When he was done, only one tiny solder bridge remained!

The end result is a new coding battle station for [Viktor] and a computer which was a basket case is saved from the landfill. If you like this hack, check out [Viktor’s] low power PSU, or his 1 wire network!