Tiny Pipe Organ Needs Tiny Church

There are a lot of unusual listings on eBay. If you’re wondering why someone would have a need for shredded cash, or a switchblade comb, or some “unicorn meat” (whatever that is), we’re honestly wondering the same thing. Sometimes, though, a listing that most people would consider bizarre finds its way to the workbench of someone with a little imagination. That was the case when [tinkartank] found three pipe organ pipes on eBay, bought them, and then built his own drivers.

The pipes have pitches of C, D, and F# (which make, as far we can tell, a C add9 flat5 no3 chord). [tinkartank] started by firing up the CNC machine and creating an enclosure to mount the pipes to. He added a church-like embellishment to the front window, and then started working on the controls for the pipes. Each pipe has its own fan, each salvaged from a hot air gun. The three are controlled with an Arduino. [tinkartank] notes that the fan noise is audible over the pipes, but there does seem to be an adequate amount of air going to each pipe.

This project is a good start towards a fully functional organ, provided [tinkartank] gets lucky enough to find the rest of the pipes from the organ. He’s already dreaming about building a full-sized organ of sorts, but in the meantime it might be interesting to use his existing pipes to build something from Myst.

A Tech That Didn’t Make It: Sound On Stainless Steel Wire

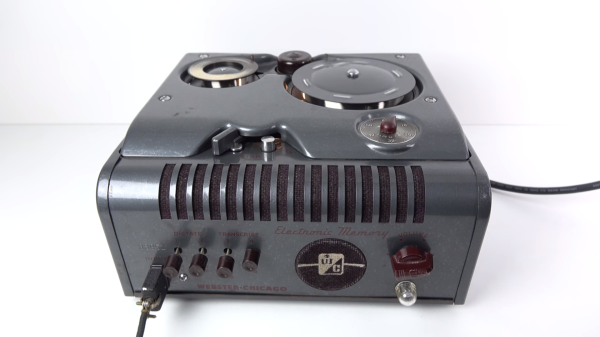
For a brief period in the 1940’s it might have been possible for a young enamored soul to hand his hopeful a romantic mix-spool of wire. This was right before the magnetic tape recorder and its derivatives came into full swing and dominated the industry thoroughly until the advent of the compact disk and under a hundred kilogram hard disk drives. [Techmoan] tells us all about it in this video.

The device works as one would expect, but it still sounds a little crazy. Take a ridiculously long spool of steel wire the size of a human hair(a 1 hour spool was 2.2km of wire), wind that through a recording head at high speed, magnetize the wire, and spool it onto a receiving spool.

If you’re really lucky the wire won’t dramatically break causing an irreversible tangle of wire. At that point you can reverse the process and hear the recorded sound. As [Techmoan] shows, the sound can best be described as… almost okay. Considering that its chief competition at the time was sound carved into expensive aluminum acetate plates, this wasn’t the worst.

The wire recorder lived on for a few more years in niche applications such as airplane black boxes. It finally died, but it does sound like a really fun couple-of-weekends project to try and build one. Make sure and take good pictures and send it in if any of you do.

Continue reading “A Tech That Didn’t Make It: Sound On Stainless Steel Wire”

3D Printer Enclosure Is Pleasant On The Eyes And Ears

There’s a lot going on in the 3D printing world. Huge printing beds, unique materials like concrete, and more accessible, inexpensive printers for us regular folk. The only thing that’s often overlooked with these smaller printers is the ruckus that they can make. The sounds of all those motors can get tiresome after a while, which was likely the inspiration for [Fabien]’s home 3D printer workstation. (Google Translate from French)
After acquiring a new printer, [Fabien] needed a place to put it and created his own piece of furniture for it. The stand is made out of spruce and is lined with insulation. He uses a combination of cork, foam, and recycled rubber tile to help with heat, sound, and vibration respectively. Don’t worry, though, he did install a ventilation system for the fumes! After the printer housing is squared away, he place a webcam inside so that the user can monitor the print without disturbing it. Everything, including the current print, is managed with a computer on the top of the cabinet.
Having a good workspace is just as important as having a quality tool, and [Fabien] has certainly accomplished that for his new 3D printer. There have been a lot of good workspace builds over the years, too, including electronics labs in a portable box and this masterpiece workbench. If you’ve ever experienced the frustration of working in an area that wasn’t designed for the task at hand, you’ll easily be able to appreciate any of these custom solutions.

3D Printer Prints Sound

People like music, but they are also visual creatures. Perhaps that’s why music visualization is such a common project. Usually, you think of music visualization as using LEDs or a computer screen. However, [Gieeel] did his music visualization using a 3D printer.

Sure, the visualization is a little static compared to LEDs, but it does make an interesting conversation piece. The actual process isn’t very difficult, once you have the idea. [Gieeel] captured the waveform in Audacity, did a screen capture, and then converts the image to an SVG file using Inkscape.

From there, you can use many different CAD tools to convert the image into a 3D object. [Gieeel] used Autodesk Fusion 360 and had the resulting object professionally 3D printed.

We’ve seen other kinds of sound sculptures before. Of course, we’ve also seen a lot of traditional visualizations, as well.

Color-Changing LED Makes Techno Music

As much as we like addressable LEDs for their obedience, why do we always have to control everything? At least participants of the MusicMaker Hacklab, which was part of the Artefact Festival in February this year, have learned, that sometimes we should just sit down with our electronics and listen.

With the end of the Artefact Festival approaching, they still had this leftover color-changing LED from an otherwise scavenged toy reverb microphone. When powered by a 9 V battery, the LED would start a tiny light show, flashing, fading and mixing the very best out of its three primary colors. Acoustically, however, it spent most of its time in silent dignity.

singing_led_led_anatomy

As you may know, this kind of LED contains a tiny integrated circuit. This IC pulse-width-modulates the current through the light-emitting junctions in preprogrammed patterns, thus creating the colorful light effects.

To give the LED a voice, the participants added a 1 kΩ series resistor to the LED’s “anode”, which effectively translates variations in the current passing through the LED into measurable variations of voltage. This signal could then be fed into a small speaker or a mixing console. The LED expressed its gratitude for the life-changing modification by chanting its very own disco song.

singing_led_hook_up_schematic

This particular IC seems to operate at a switching frequency of about 1.1 kHz and the resulting square wave signal noticeably dominates the mix. However, not everything we hear there may be explained solely by the PWM. There are those rhythmic “thump” noises, shifts in pitch and amplitude of the sound and more to analyze and learn from. Not wanting to spoil your fun of making sense of the beeps and cracks (feel free to spoil as much as you want in the comments!), we just say enjoy the video and thanks to the people of the STUK Belgium for sharing their findings.

Hacklet 91: Ultrasonic Projects

Ultrasound refers to any audio signal above the range of human hearing. Generally that’s accepted as 20 kHz and up. Unlike electromagnetic signals, ultrasonics are still operating in a medium – generally the air around us. Plenty of animals take advantage of ultrasonics every day. So do hackers, makers, and engineers who have built thousands of projects based upon these high frequency signals. This weeks Hacklet is all about the best ultrasonic projects on Hackaday.io!

spambakeWe start with [spambake] and World’s Smallest Bat Detector. [Spambake] is interested in bats. These amazing creatures have poor eyesight, but that doesn’t slow them down. Bats use echolocation to determine their surroundings. Ultrasonic chirps bounce off obstacles. The bat listens to the echos and changes its flight path accordingly. While we can’t hear most of the sounds bats make, electronics can. [Spambake] cooked this circuit up starting with a MEMs microphone. These microphones pick up human sounds, but unlike our ears, they can hear plenty above the 20 kHz range. The audio signal is passed through an amplifier which boosts the it up around 10,000 times. The signal is filtered and then used to trigger LEDs that indicate a bat is present. The final circuit works quite well! Check out [spambake’s] video to see the bat detector in action!

movvaNext up is [Neil Movva] with Pathfinder – Haptic Navigation. Pathfinder uses ultrasonic transducers to perform echolocation similar to bats. The received data is then passed on to a human wearer. [Neil’s] idea is to use Pathfinder to help the visually disabled and blind navigate the world around them. Pathfinder was a 2015 Hackaday Prize finalist. The ultrasonic portion of Pathfinder uses the ubiquitous HC-SR04 distance sensor, which can be found for as little as $2 USD on eBay and Alibaba. These sensors send out a 60 kHz signal and listen for the echos. A microcontroller can then measure the time delay and determine the distance from the sensor to an obstacle. Finally the data is passed on to the user by a vibrating pager motor. [Neal] was kind enough to give a talk about Pathfinder at the 2015 Hackaday SuperCon.

levitate[HoboMunching] likes his ultrasonic devices ultra powerful, and that’s just what he’s got with Ultrasonic Levitation Rig. Inspired by a similar project from Mike, [HoboMunching] had to build his own levitation setup. Ultrasonic levitation used to be a phenomenon studied only in the laboratory. Cheap transducers designed for the industrial world have made this experiment practical for the home hackers. [HoboMunching] was able to use his rig to levitate up to 8 tiny balls on the nulls between the 28.5 kHz sound waves produced by his transducer. The speed of sound can be verified by measuring the distance between the balls. Purists will be happy to hear that [HoboMunching]’s circuit was all based upon the classic 555 timer.

speaker-arrayFinally we have [Alan Green] with Ultrasonic Directional Speaker V1. Most audio signals are not very directional, due to wavelength and practical limitations on speaker size. Ultrasonics don’t have this limitation. Couple this with the fact that ultrasonic signals can be made to demodulate in air, and you have the basis for a highly directional speaker setup. “Sound lasers” based on this system have been around for years, used in everything from targeted advertising to defensive weapons. [Alan] is just getting started on this project. Much of his research is based upon [Joe Pompei’s] work at the MIT media lab. [Alan] plans to use an array of ultrasonic transducers to produce a directional signal which will then demodulate and be heard by a human. This project has a hard deadline though:  [Alan] plans to help his son [Mitchell] with a musical performance that is scheduled for May, 2016. The pair hope to have a prototype in place by March.

If you want to see more ultrasonic projects, check out our new ultrasonic projects list! If I missed your project, don’t be shy! Just drop me a message on Hackaday.io. That’s it for this week’s Hacklet. As always, see you next week. Same hack time, same hack channel, bringing you the best of Hackaday.io!

Update: Battlezone On Vector Display Step-by-Step

When we ran the story of Battlezone played on tube displays earlier this week there were immediately questions about recreating the hack. At the time the software wasn’t available, and there is also a bit of hardware hacking necessary to get the audio working. You asked and [Eric] from Tubetime delivered. He’s posted a pair of articles that show how to get an STM32F4 Discovery board to play the classic game, along with instructions to build the firmware.

The hardware hack in this case is untangling the pinout used on the discovery board. It seems that one of the lines needed to get sound working for this hack is tied to one of the two DACs. If you read the original coverage you’ll remember that both of the DACs are used to drive X and Y on the vector display. The image above shows a cut trace on the bottom of the board. You’ll then need to route that signal to an alternate pin by soldering a jumper wire from the chip to a resistor on the board.

This (as well as one other alteration that bridges two of the chip pins) is a great example of work you should be unafraid to do on your own dev boards. We’ve had to do it with the Launchpad boards to get at the functionality we needed. We’d like to hear your own epic stories of abusing dev boards to do your bidding. Let us know in the comments.