We’ll just come out and say it, [reboots] has friends with nice garbage. Sure, some of us have friends who are desperately trying to, “gift,” us a CRT monitor, hope dropping like a rock into their stomach when they realize they can’t escape the recycling fee. [reboots] has friends who buy other people’s poorly thought out CNC projects and then gift him with the parts.
After dismantling the contraption he found himself with nice US and Japanese made linear motion components. However, he needed a CNC controller to drive it all. So he helped another friend clean out their garage and came away with a FlashCut CNC controller.
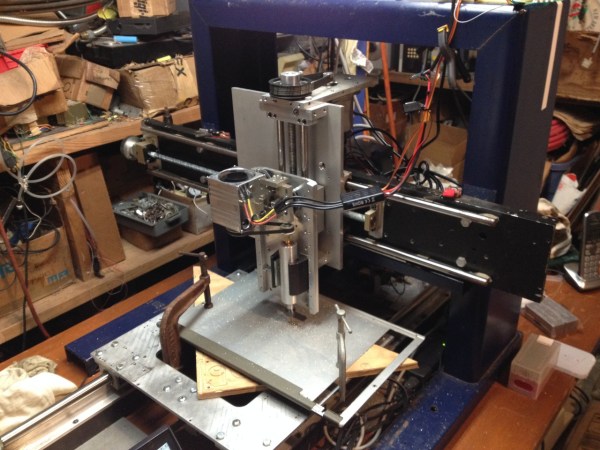
Now that he had a controller and the motion components whirring nicely, he really needed a frame to put it all in. We like to imagine that he was at a friend’s barbeque having a beer. In one corner of the yard was an entire Boeing 747. A mouldering scanning electron microscope with a tattered and faded blue tarp barely covering its delicate instrumentation sat in another corner. Countless tech treasures were scattered about in various states. It was then that he spotted a rusting gamma ray spectrometer in the corner that just happened to have the perfect, rigid, gantry frame for his CNC machine.
Of course, his friend obliged and gladly gave up the spectrometer. Now it was time to put all together. The gantry was set on a scavenged institutional door. The linear motion frames were bolted in place. Quite a few components had to be made, naturally, of scrap materials.
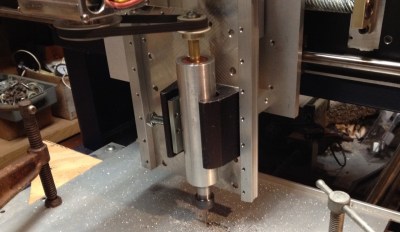 Most people will start by using a handheld router for the spindle. The benefits are obvious: they’re inexpensive, easy to procure, and generally come with mounts. But, there are some definite downsides, one of the most glaring of which is the lack of true speed control.
Even routers that allow you to adjust the speed (a fairly common feature on new models) generally don’t actually regulate that speed. So, you end up with a handful of speed settings which aren’t even predictable under load. Furthermore, they usually rely on high RPMs to do their work. For those reasons, handheld woodworking routers aren’t the best choice for a mill that you intend to cut metal with.
[reboots] noticed this problem while building this machine and came up with an inexpensive way to build a speed-controlled spindle. His design uses a brushless DC motor, controlled through a hobby ESC (electronic speed control), which uses a belt to drive the spindle. The spindle itself is mounted using skateboard bearings, and ends in an E11 collet (suitable for light machining in aluminum).
With the ESC providing control of the brushless motor, he’s able to directly control the spindle speed via software. This means that spindle speeds can be changed with G-code, allowing for optimized feeds and speeds for different operations. The belt-drive increases torque while separating the motor from the spindle, which should keep things cool, and reduce rotating mass on the spindle itself. Now all [reboots] needs to do is add a DIY tool changer!
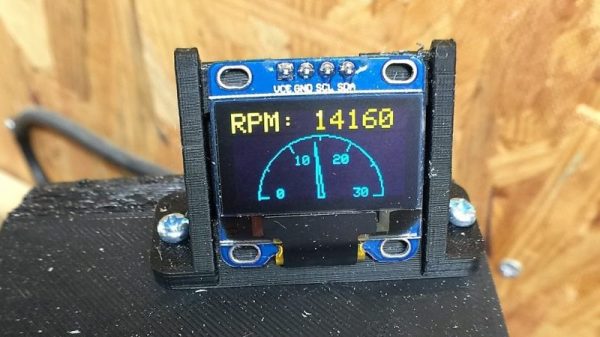
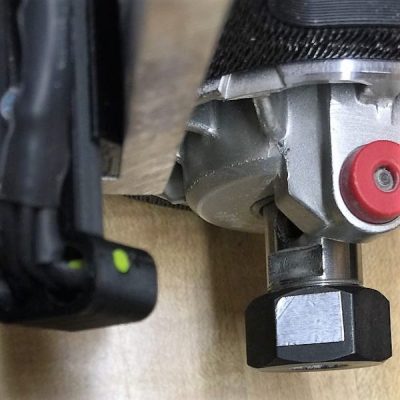 The CNC router in question is the popular Sienci, and the 3D-printed brackets for the photodiode and LED are somewhat specific for that machine. But [tmbarbour] has included STL files in his exhaustively detailed write-up, so modifying them to fit another machine should be easy. The sensor hangs down just far enough to watch a reflector on one of the flats of the collet nut; we’d worry about the reflector surviving tool changes, but it’s just a piece of shiny tape that’s easily replaced. The sensor feeds into a DIO pin on a Nano, and a small OLED display shows a digital readout along with an analog gauge. The display update speed is decent — not too laggy. Impressive build overall, and we like the idea of using a piece of PLA filament as a rivet to hold the diodes into the sensor arm.


 Most people will start by using a handheld router for the spindle. The benefits are obvious: they’re inexpensive, easy to procure, and generally come with mounts. But, there are some definite downsides, one of the most glaring of which is the lack of true speed control.


