Hackaday Links Column Banner

Hackaday Links: August 31, 2025

Back in March, we covered the story of Davis Lu, a disgruntled coder who programmed a logic bomb into his employers’ systems. His code was malicious in the extreme, designed as it was to regularly search for his Active Directory entry and fire off a series of crippling commands should it appear he had been fired. His 2019 sacking and subsequent deletion of his AD profile triggered the job, wreaking havoc on servers and causing general mayhem. Whatever satisfaction Lu drew from that must have been fleeting, because he was quickly arrested, brought to trial in federal court, and found guilty of causing intentional damage to protected computer systems.

Lu faced a decade in federal prison for the stunt, but at his sentencing last week, he got four years behind bars followed by three years of supervised release. That’s still a pretty stiff sentence, and depending on where he serves it, things might not go well for him. Uber-geek Chris Boden has some experience in the federal prison system as a result of some cryptocurrency malfeasance; his video on his time in lockup is probably something Mr. Lu should watch while he can. Honestly, we feel bad for him in a way because we’ve been there; we certainly toyed with the logic bomb idea when we were coding for a living, without actually ever doing it. Maybe he thought it would just get treated as a prank, but that was probably never in the cards; as we’re fond of telling our kids, the world just doesn’t have a sense of humor anymore.

Continue reading “Hackaday Links: August 31, 2025”

Kali Cyberdeck Looks The Business

Even though we somewhat uncharacteristically don’t have a cyberdeck contest currently underway, there’s never a bad time to get your [Gibson] on. That’s especially true when fate hands you an enclosure as perfect as the one that inspired this very compact Kali Linux cyberdeck.

Now, that’s not to say that we don’t love larger cyberdecks, of course. The ones built into Pelican-style shipping containers are particularly attractive, and it’s hard to argue against their practicality. But when [Hans Jørgen Grimstad], who somehow just sounds like a person who should be building cyberdecks, found a new-old-stock stash of US Army Signal Corps spare parts kits from the 1950s, designation CY-684/GR, he just had to spring into action. After carefully gutting the metal case of the dividers that once protected tubes and other parts, he had some PCB panels made up for the top and bottom. The bottom had enough room for a compact USB keypad, with room left over on the panel for a cooling fan and various connectors. A 7″ HDMI display was added to the panel on the top lid, while a Raspberry Pi 5 with a 500-GB NVMe SSD went below the lower panel. The insides are properly decorated with cyberpunk-esque regalia including a “Self Destruct” button. Sadly, this appears to be unimplemented in the current version, at least for the stated purpose; there’s always hope for version two.

While we love the look and feel of this build and the subtle nods to the cyberpunk aesthetic, it sure seems like you could get some serious work done with a deck like this. Hats off to [Hans] for the build, and here’s hoping he left some of those cool cases for the rest of us.

Continue reading “Kali Cyberdeck Looks The Business”

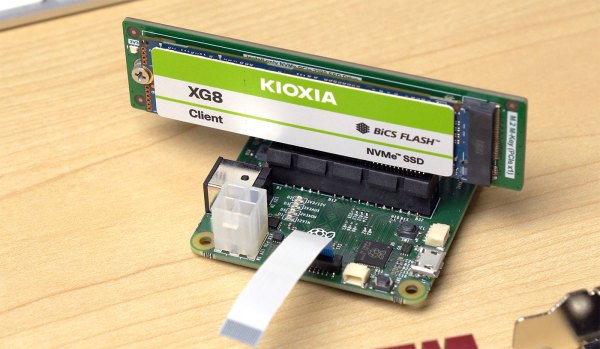
Pi with the PiFEX shield on the right, the SSD under test on the left with testpoints held by a jumper clip, jumper wires connecting the two together

JTAG Hacking An SSD With A Pi: A Primer

[Matthew “wrongbaud” Alt] is well known around these parts for his hardware hacking and reverse-engineering lessons, and today he’s bringing us a JTAG hacking primer that demoes some cool new hardware — the PiFEX (Pi Interface Explorer). Ever wondered about those testpoint arrays on mSATA and M.2 SSDs? This write-up lays bare the secrets of such an SSD, using a Pi 4, PiFEX, OpenOCD and a good few open-source tools for JTAG probing that you can easily use yourself.

The PiFEX hat gives you level-shifted bidirectional GPIO connectors for UART, SPI, I2C, JTAG, SWD and potentially way more, an OLED screen to show any debugging information you might need, and even a logic analyzer header so that you can check up on your reverse-engineering progress.

Continue reading “JTAG Hacking An SSD With A Pi: A Primer”

Squeeze Another Drive Into A Full-Up NAS

A network-attached storage (NAS) device is a frequent peripheral in home and office networks alike, yet so often these devices come pre-installed with a proprietary OS which does not lend itself to customization. [Codedbearder] had just such a NAS, a Terramaster F2-221, which while it could be persuaded to run a different OS, couldn’t do so without an external USB hard drive. Their solution was elegant, to create a new backplane PCB which took the same space as the original but managed to shoehorn in a small PCI-E solid-state drive.

The backplane rests in a motherboard connector which resembles a PCI-E one but which carries a pair of SATA interfaces. Some investigation reveals it also had a pair of PCI-E lanes though, so after some detective work to identify the pinout there was the chance of using those. A new PCB was designed, cleverly fitting an M.2 SSD exactly in the space between two pieces of chassis, allowing the boot drive to be incorporated without annoying USB drives. The final version of the board looks for all the world as though it was meant to be there from the start, a truly well-done piece of work.

Of course, if off-the-shelf is too easy for you, you can always build your own NAS.

Booting The Raspberry Pi 5 With An NVMe SSD

The Raspberry Pi has come a long way since its humble origins, adding faster processors and better interfaces with each new generation. Now, the Raspberry Pi 5 has a lovely new PCIe port right on board, and [Jeff Geerling] has gone right ahead and slammed in an NVMe SSD as a boot drive.

[Jeff] explains that to use an NVMe to boot, you first have to modify /boot/config.txt to enable PCIe and modify the Raspberry Pi’s boot order. Once the bootloader is appropriately configured, you can boot straight off an SSD with Raspberry Pi OS installed. To get the operating system on to an NVMe drive, he recommends cloning an existing boot volume from a microSD install.

One of the primary reasons you might want to do this is speed. NVMe drives are generally a significant cut above even the best microSD cards, both in speed and reliability. [Jeff] also notes that you can use an NVMe SSD through a PCIe switch on the Pi 5 if you so desire, but you can’t currently boot with this configuration.

It’s a great feature to have on the Pi 5, and it follows on from the earlier implementation on the Raspberry Pi Compute Module 4. Video after the break.

Continue reading “Booting The Raspberry Pi 5 With An NVMe SSD”

ADATA SSD Gets Liquid Cooling, But Not Everyone’s Convinced

Solid-state drives (SSDs) were a step change in performance when it came to computer storage. They offered incredibly fast seek times by virtue of dispensing with solid rust for silicon instead. Now, some companies have started pushing the limits to the extent that their drives supposedly need liquid cooling, as reported by The Register.

The device in question is the ADATA Project NeonStorm, which pairs a PCIe 5.0 SSD with RGB LEDs, a liquid cooling reservoir and radiator, and a cooling fan. The company is light on details, but it’s clearly excited about its storage products becoming the latest piece of high-end gamer jewelry.

Notably though, not everyone’s jumping on the bandwagon. Speaking to The Register, Jon Tanguy from Crucial indicated that while the company has noted modern SSDs running hotter, it doesn’t yet see a need for active cooling. In their case, heatsinks have proven enough. He notes that NAND flash used in SSDs actually operates best at 60 to 70 C. However, going beyond 80 C risks damage and most drives will shutdown or throttle access at this point.

Realistically, you probably don’t need to liquid cool your SSDs, even if you’ve got the latest and greatest models. However, if you want the most tricked out gaming machine on Twitch, there’s plenty of products out there that will happily separate you from your money.

That Old ThinkPad Needs An Open Source 2.5″ IDE SSD

So you fancy yourself a FOSS devotee, do you? Running GNU/Linux on your old ThinkPad, avoiding devices that need binary blobs? Got LibreBoot installed too? Not bad, not bad. But what about the hard drive? Can you be sure you aren’t leaking some freedoms out of that spinning rust?

Well, worry no more. Thanks to the work of [dosdude1], we now have an open source solid state drive that’s designed to work with any device which originally used a 2.5 inch IDE hard drive. The choice of releasing it under the GPL v3 versus an open hardware license might seem an odd choice at first, but turns out that’s actually what the GNU project recommends currently for circuit designs.

Fair warning: all the chips on the board are BGA.

Which is precisely what we’re talking about here — just a circuit design done up in KiCad. There’s no firmware required, and the PCB features very little beyond the four BGA152/BGA132 NAND flash chips and the SM2236 controller IC. You’ve just got to get the board fabricated, obtain (or salvage) the chips, and suddenly your retro laptop is sporting the latest in mass storage technology.

So how does it work? The SM2236 is actually a CompactFlash (CF) controller, and since IDE and CF interfaces are so similar, the PCB doesn’t have to do much to adapt from one to the other. Sprinkle in a few NANDs, and you’ve got yourself a native SSD suitable for old school machines. [dosdude1] says the board can slot four 64 GB chips, which should be more than enough given the age of the systems this gadget will likely be installed in. There are a few catches though: the NAND chips need to be supported by the SM2236, and they all have to match.

If you need something even smaller, [dosdude1] produced a 1.8 inch SSD using the same techniques back in October of last year.

Continue reading “That Old ThinkPad Needs An Open Source 2.5″ IDE SSD”