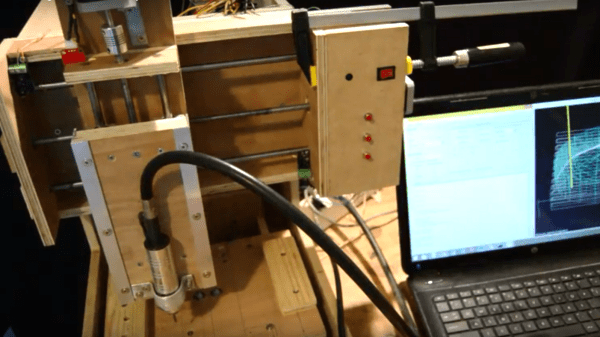
Hackaday Links Column Banner

Hackaday Links: November 27, 2016

[Prusa]’s business is doing great. This year, he released the Prusa i3 Mk. 2, a four color upgrade to the printer, and sales are through the roof. There’s just one problem: Paypal just locked his funds. Prusa is turning away from Paypal and given Paypal’s history, this will eventually be worked out. Be warned, though: don’t use Paypal for your hardware business. We’ve seen this same story played out too many times before.

Those millennials are always on their phones. How do you get rid of that distraction? Airplane mode? No, that’s stupid. Put those phones in a metal box. It’s the exact same thing as airplane mode – which is free – but this extra special metal box costs $45 and ships in March. Is this metal box different from any other metal box, like a cookie tin, perhaps? Probably not.

Nothing to see here, folks.

The holidays are here, and it’s time for Cards Against Humanity to do something stupid with other people’s money. This year, they’re throwing money into a hole. No, really. People are contributing money to dig a gigantic hole. There’s a livestream of the digging. Five dollars lets the dig continue for another few seconds. Join in on the holiday spirit: throw your money into a hole.

You don’t want to throw your money into a hole? Buy some stuff on Tindie! There’s robots, CNC controllers, servo drivers, MIDI arpeggiators, USB testers, power supplies, blinky glowy things, and retro gaming stuff. Go plug your Raspberry Pi into some of these gizmos.

The Mechaduino is a board that clips onto a ubiquitous NEMA stepper motor to turn it into a servo motor.  It won 5th place in the Hackaday Prize last month, and we can’t wait to see it integrated into a closed-loop 3D printer. [Chris] came up with an Ethernet-enabled servo-stepper conversion, and now it’s a project on Kickstarter. Of course, you can buy a Mechaduino right now, making the future of stepper motor-controlled desktop CNC very interesting.

Individually addressable RGB LEDs exist, and we’re waiting for Clark Griswold to electrify his house in red, green, and blue. Until then, [Michel built a holiday ornament loaded up with 16 WS2812b LEDs. The star features caps and diodes to make everything work as it should and requires only three wires per star.

Rotating Frame Will Change Your View Of Vertical Images

[Tim] was tired of compromising his portrait-oriented digital photos by shoehorning them into landscape-only frames. Unable to find a commercial solution, he built his own rotating digital photo frame from a 27″ LCD TV.

It uses a Raspi 3 to find [Tim]’s pictures on a giant SD card. He originally wanted to have the Pi pull pictures from Google Photos and display them randomly, but the API doesn’t work in that direction. Instead, a Python script looks at the pictures on the SD card and determines whether each is landscape or portrait-oriented. If a picture was taken in portrait-mode, the display will rotate 90 degrees. Rotation is handled with an Arduino, a stepper motor, and some 3D-printed herringbone gears. The first version was a bit noisy, so [Tim] re-printed the motor mount and the pinion gear out of flexible filament.

[Tim] designed the mount and frame himself and laser-cut the pieces out of birch plywood. We like that he accounted for the front-heaviness and that he covered the high voltage circuitry with acrylic to mitigate the risk of shock. All the code and design files are available on his project page. Make the jump to see a brief demonstration followed by a walk-through and stay for the six-minute slide show.

Continue reading “Rotating Frame Will Change Your View Of Vertical Images”

The Evolution Of A DIY Circuit Board Plotter

In this three part video series we watch [Dirk Herrendoerfer] go from scraps to a nice 3D printed assembly as he iterates through the design of a pen plotter for making circuit boards.

[dana] mentioned [Dirk]’s work in the comments of this post which describes a different process. Many permanent markers stick to copper well enough to last through the chemical etching process. While hand drawing definitely produces some cool, organic-looking boards, for sharp lines and SMDs it gets a bit harder; to the point where it becomes advisable to just let a robot do it.

Of course, [Dirk] was aware of this fact of life. He just didn’t have a robot on hand. He did have some electronic detritus, fishing line, an Arduino, scrap wood, brass tubes, and determination.  The first version‘s frame consisted of wooden blocks set on their ends with holes drilled to accept brass rods. The carriage was protoboard and hot glue. Slightly larger brass tubing served as bushings and guide. As primitive as it was the plotter performed admirably, albeit slowly.

The second version was a mechanical improvement over the first, but largely the same. The software got a nice improvement. It worked better and had some speed to it.

The latest version has some fancy software upgrades; such as acceleration. The frame has gone from random bits of shop trash to a nicely refined 3D printed assembly. Even the steppers have been changed to the popular 28BYJ-48 series. All the files, software and hardware, are available on GitHub. The three videos are viewable after the break. It’s a great example of what a good hacker can put together for practically no money.

Continue reading “The Evolution Of A DIY Circuit Board Plotter”

Star Track: A Lesson In Positional Astronomy With Lasers

[gocivici] threatened us with a tutorial on positional astronomy when we started reading his tutorial on a Arduino Powered Star Pointer and he delivered. We’d pick him to help us take the One Ring to Mordor; we’d never get lost and his threat-delivery-rate makes him less likely to pull a Boromir.

As we mentioned he starts off with a really succinct and well written tutorial on celestial coordinates that antiquity would have killed to have. If we were writing a bit of code to do our own positional astronomy system, this is the tab we’d have open. Incidentally, that’s exactly what he encourages those who have followed the tutorial to do.

The star pointer itself is a high powered green laser pointer (battery powered), 3D printed parts, and an amalgam of fourteen dollars of Chinese tech cruft. The project uses two Arduino clones to process serial commands and manage two 28byj-48 stepper motors. The 2nd Arduino clone was purely to supplement the digital pins of the first; we paused a bit at that, but then we realized that import arduinos have gotten so cheap they probably are more affordable than an I2C breakout board or stepper driver these days. The body was designed with a mixture of Tinkercad and something we’d not heard of, OpenJsCAD.

Once it’s all assembled and tested the only thing left to do is go outside with your contraption. After making sure that you’ve followed all the local regulations for not pointing lasers at airplanes, point the laser at the north star. After that you can plug in any star coordinate and the laser will swing towards it and track its location in the sky. Pretty cool.

Continue reading “Star Track: A Lesson In Positional Astronomy With Lasers”

Keytar Made Out Of A Scanner To Make Even The 80s Jealous

Do any of you stay awake at night agonizing over how the keytar could get even cooler? The 80s are over, so we know none of us do. Yet here we are, [James Cochrane] has gone out and turned a HP ScanJet Keytar for no apparent reason other than he thought it’d be cool. Don’t bring the 80’s back [James], the world is still recovering from the last time.

Kidding aside (except for the part of not bringing the 80s back), the keytar build is simple, but pretty cool. [James] took an Arduino, a MIDI interface, and a stepper motor driver and integrated it into some of the scanner’s original features. The travel that used to run the optics back and forth now produce the sound; the case of the scanner provides the resonance. He uses a sensor to detect when he’s at the end of the scanner’s travel and it instantly reverses to avoid collision.

A off-the-shelf MIDI keyboard acts as the input for the instrument. As you can hear in the video after the break; it’s not the worst sounding instrument in this age of digital music. As a bonus, he has an additional tutorial on making any stepper motor a MIDI device at the end of the video.

If you don’t have an HP ScanJet lying around, but you are up to your ears in surplus Commodore 64s, we’ve got another build you should check out.

Hackaday Prize Entry: Linear Stepper Motors

Today, your average desktop 3D printer is a mess of belts, leadscrews, and pulleys. For his Hackaday Prize entry, [DeepSOIC] is eliminating them entirely. How’s he doing this? With a linear stepper motor.

Search Google for ‘linear stepper motor’ and you’ll find a bunch of NEMA-bodied motors with leadscrews down the middle. This is not a linear stepper motor. This is a stepper motor with a leadscrew down the middle. The motor [DeepSOIC] has in mind is more like a mashup of a rack gear and a maglev train. The ‘linear’ part of this motor is a track of magnets perpendicular to the axis of the motor, with alternating polarities. The ‘motor’ part of this motor is a carriage with two field windings. It’s an unrolled stepper motor, basically, and could run a 3D printer much faster without as much slop and backlash.

Right now [DeepSOIC] is in the experimental phase, and he had a plan to print the axis of his linear stepper in ferromagnetic filament. This did not work well. The steel found in electric motors has a magnetic permeability of about 4000, while the magnetic permeability of his brand of ferromagnetic filament is about 2. Even if the idea of printing part of a motor was a complete failure, it was a great success at characterizing the properties of a magnetic 3D printing filament. That makes it a great entry for the Hackaday Prize, and a perfect example of what we’re looking for in the Citizen Science portion of the Prize.

Mechaduino- Closed Loop Stepper Servos For Everyone

Is it something in the water, or have there been a lot of really cool servo projects lately? Mechaduino is a board that sits on a regular stepper motor and turns it into a servo with a closed loop control of 0.1degree.

Whenever we post something about using cheap brushless motors for precision control, someone comments that a stepper is just a brushless motor with a lot of poles, why not just control it like one. That’s exactly what the Mechaduino does. They also hint at doing something very clever with a magnetic encoder on the board which allows them, after a calibration routine, to get the accuracy they’ve promised.

T Continue reading “Mechaduino- Closed Loop Stepper Servos For Everyone”