The modern touchpads are incredible feats of engineering, with everything from complex signal processing for noise and tremendous economies of scale driving prices low. So [Kevin] decided to see if he could make his own touchpad. Partially out of curiosity of what makes one touchpad better than another, but also because he was curious if he could. Using an STM32 and a custom PCB, he was off to the races in an incredibly cost-effective way.
After writing some quick firmware in Rust, he was reporting the values read by the PWM channels. Using python, he could get a good idea of the raw values that were being written over USB and visualized. So rather than implement filtering in hardware or firmware, he elected to do the filtering and processing on the host computer side in Python. We suspect this gave him much shorter iteration cycles.
If you like the idea of making your own touchpad but perhaps are dreaming a little bigger, why not make a tablecloth-sized touchpad?
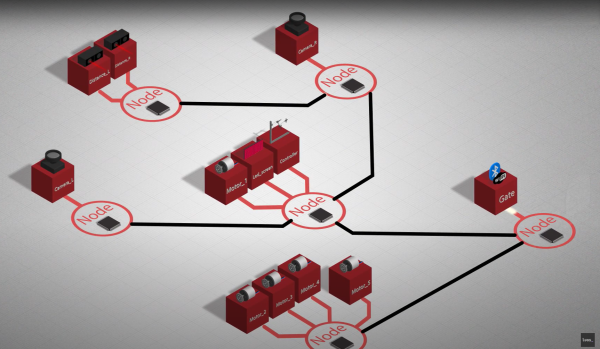
Those of us tasked with developing firmware for embedded systems have a quite a few hurdles to jump through compared to those writing for the desktop or mobile platforms. Solved problems such as code reuse or portability are simply harder. It was with considerable interest that we learnt of another approach to hardware abstraction, called Luos, which describes itself as micro-services for embedded systems.
This open source project enables deployment of distributed architectures composed of collaborating micro-services. By containerizing applications and hardware drivers, interfaces to the various components are hidden behind a consistent API. It doesn’t even matter where a resource is located, multiple services may be running on the same microcontroller, or separate ones, yet they can communicate in the same way.
By following hardware and software design rules, it’s possible to create an architecture of cooperating computing units, that’s completely agnostic of the actual hardware. Microcontrollers talk at the hardware level with a pair of bidirectional signals, so the hardware cost is very low. It even integrates with ROS, so making robots is even easier.
Luos architecture
By integrating a special block referred to as a Gate, it is possible to connect to the architecture in real-time from a host computer via USB, WiFi, or serial port, and stream data out, feed data in, or deploy new software. The host software stack is based around Python, running under Jupyter Notebook, which we absolutely love.
Current compatibility is with many STM32 and ATSAM21 micros, so chances are good you can use it with whatever you have lying around, but more platforms are promised for the future.
Now yes, we’re aware of CMSIS, and the idea of Hardware Abstraction Layers (HALs) used as part of the platform-specific software kits, this is nothing new. But, different platforms work quite differently, and porting code from one to another, just because you can no longer get your preferred microcontroller any more, is a real drag we could all do without, so why not go clone the GitHub and have a look for yourselves?
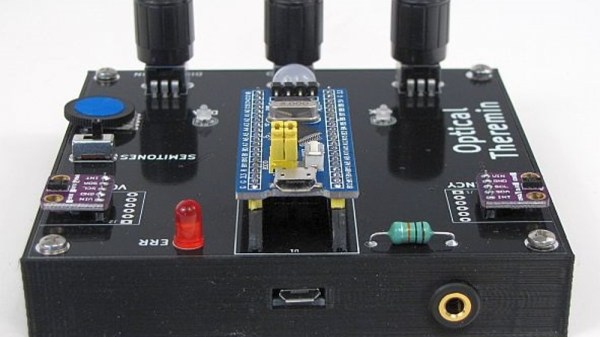
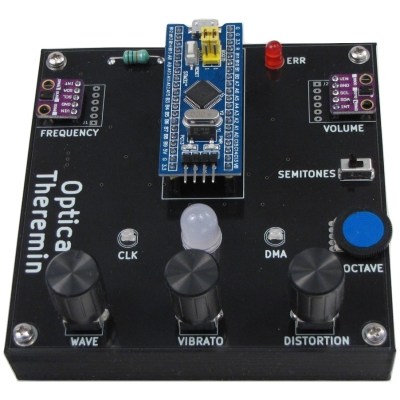
[Fearless Night]’s optical theremin project takes advantage of the kind of highly-integrated parts that are available to the modern hacker and hobbyist in all the right ways. The result is a compact instrument with software that can be modified using the Arduino IDE to take it places the original Theremin design could never go.
The design is based on a ‘Blue Pill’ STM32 MCU development board and two Avago APDS-9960 gesture sensor breakout boards, along with a few other supporting components. Where the original Theremin sensed hand proximity using two antenna-like capacitive sensors to control note frequency and volume, this design relies on two optical sensors to do the same job.
[Fearless Night] provides downloads for the schematic, code, parts list, and even 3D models for the enclosure. PCB files are also included for a convenient assembly, but since the component count is fairly low, a patient hacker should be able to get away with soldering it up by hand without much trouble.
This series of monthly teardowns was started in early 2018 as an experiment, and since you fine folks keep reading them, I keep making them. But in truth, finding a new and interesting gadget every month can sometimes be a chore. Which is why I’m always so thankful when a reader actually sends something in that they’d like to see taken apart, as it absolves me from having to make the decision myself. Of course it also means I can’t be blamed if you don’t like it, so keep that in mind as well.
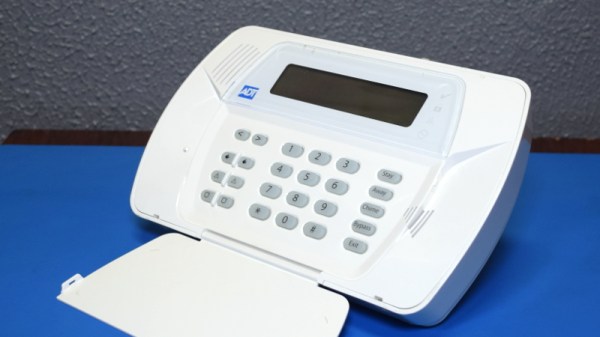
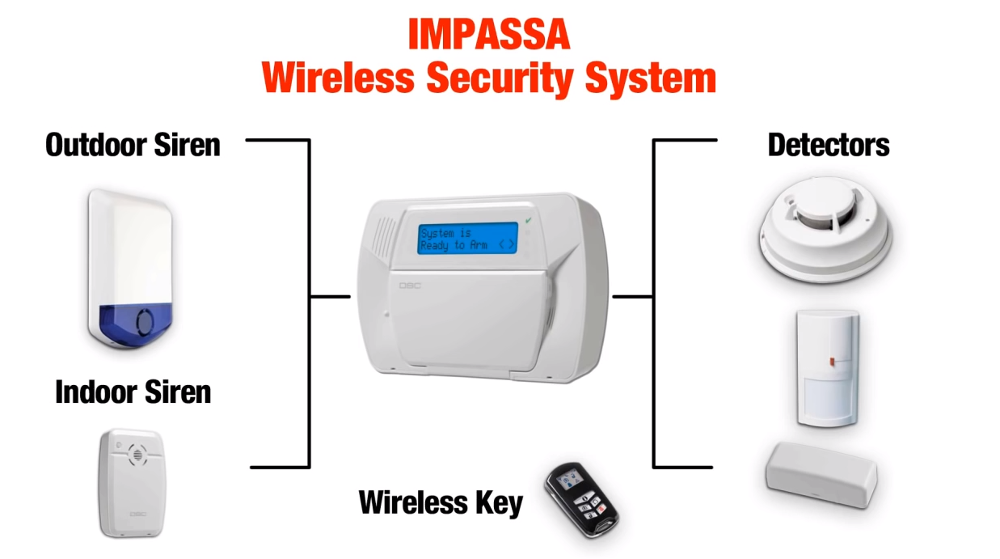
Coming our way from the tropical paradise of Eastern Pennsylvania, this month’s subject is an ADT branded Impassa SCW9057G-433 alarm system that was apparently pulled off the wall when our kind patron was moving house. As you might have guessed from the model number, this unit uses 433 MHz to communicate with various sensors and devices throughout the home, and also includes a 3G cellular connection that allows it to contact the alarm monitoring service even if the phone line has been cut.
The alarm can connect to a wide array of 433 MHz devices.
From how many of these are on eBay, and the research I’ve done on some home alarm system forums, it appears that you can actually pick one of these up on the second-hand market and spin your own whole-house alarm system without going through a monitoring company like ADT. The extensive documentation from Impassa covers how to wire and configure the device, and as long as the system isn’t locked when you get it, it seems like wiping the configuration and starting from scratch isn’t a problem.
If it’s possible to put together your own homebrew alarm system with one of these units at the core, then it seems the least we can do is take it apart and see what kind of potentially modifiable goodies are waiting under that shiny plastic exterior.
Back in 2018 we covered a project that would break a video down into its individual frames and slowly cycle through them on an e-paper screen. With a new image pushed out every three minutes or so, it would take thousands of hours to “watch” a feature length film. Of course, that was never the point. The idea was to turn your favorite movie into an artistic conversation piece; a constantly evolving portrait you could hang on the wall.
[Manuel Tosone] was recently inspired to build his own version of this concept, and now thanks to several years of e-paper development, he was even able to do it in color. Ever the perfectionist, he decided to drive the seven-color 5.65 inch Waveshare panel with a custom STM32 board that he estimates can wring nearly 300 days of runtime out of six standard AA batteries, and wrap everything up in a very professional looking 3D printed enclosure. The end result is a one-of-a-kind Video Frame that any hacker would be proud to display on their mantle.
The Hackaday.IO page for this project contains a meticulously curated collection of information, covering everything from the ffmpeg commands used to process the video file into a directory full of cropped and enhanced images, to flash memory lifetime estimates and energy consumption analyses. If you’ve ever considered setting up an e-paper display that needs to run for long stretches of time, regardless of what’s actually being shown on the screen, there’s an excellent chance that you’ll find some useful nuggets in the fantastic documentation [Manuel] has provided.
We always love to hear about people being inspired by a project they saw on Hackaday, especially when we get to bring things full circle and feature their own take on the idea. Who knows, perhaps the next version of the e-paper video frame to grace these pages will be your own.
Tamagotchi’s relatively simple technical complexity pales in comparison to its huge cultural impact, with over 76 million sold. It has spawned comics, stories, numerous toys, and offshoots such as an anime and two films. [JC] was looking through some of his old stuff and came across a Tamagotchi P1 (the original Tamagotchi) and decided to create a portable emulator for it. The ROM for the P1 has long been dumped and can be run within a MAME emulator. After all, it’s just an E0C6S46 Epson MCU, 32×16 LCD with 8 additional icons, three buttons, and a piezo. The manual for the MCU is even available on Epson’s website. Here at Hackaday, we’ve seen Tamagotchis many times before, such as the infinite matrix of the Tamagotchi Singularity and a ROM dump of the latest generation of Tamagotchi based on a 6502 core.
So what’s different about what [JC] is trying to accomplish? For starters, the tooling. It is divided into two parts: TamaLIB and TamaTool. The first is a hardware-agnostic P1 emulation library that relies on a HAL layer to communicate with the hardware. The second is a frontend for the first, allowing debugging, RAM editing, and modifications to the ROM. In particular, it supports easy modification of images within the ROM and allows for custom eggs and Tamagotchis. The homage to the Jolly Wrencher is nice.
Given that the emulation is platform-agnostic and access to a low-resolution timer is not guaranteed, cycle counts become tricky. The rather clever solution [JC] stumbled upon was synchronizing against input polling, screen updates, and sound output. TamaLIb keeps track of how many CPU cycles have passed and regularly checks if the emulation is going too fast or too slow. Slowing down or speeding up the simulation allows it to seem to run in real-time.
The last goal [JC] had was to run it on embedded hardware. Using an STM32F072 board and a cheap OLED screen had a portable emulated Tamagotchi known as MCUGotchi. The code is available on GitHub and should work on most STM32 MCUs with a few small tweaks. Now that someone has gone through the effort to make it easy to run a Tamagotchi literally anywhere, it might not be long until we see a coffee maker or a smart light acting as a Tamagotchi. Perhaps the new joke will be, can it run Tamagotchi?
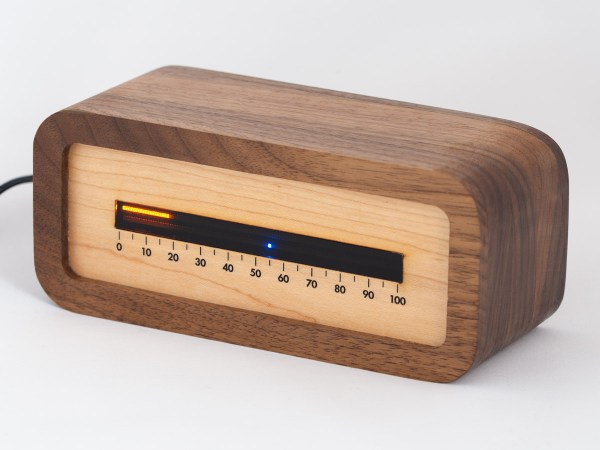
The notion of segmenting and quantizing the day into discrete segments of time is perhaps one of the most human things we do. Heralding back to a simpler era when a day was just a progression of sunrise to sunset, [James Wilson] created a beautiful linear clock that shows time as progress throughout the day.
For previous projects, [James] had used nixie tubes but the headache of the inverters, high voltages, and tight spaces led him to instead use mini-LED’s. Two PCBs were manufactured, one as the display and one to hold the GNSS module as it works best when mounted horizontally to point at the sky. Two rows of 112 tightly packed LEDs make a great stand-in for bar graph style tubes and are are controlled by TLC5926 shift registers. The venerable STM32G0 was chosen as the microcontroller to power the clock. With the help of some approximating functions and the location provided by the GNSS module [James] had the position of the sun which he then could turn into a % of progress through the sky.
The enclosure was modeled after the mid-century modern look and made of several pieces of wood CNC’d and then glued together. Machining it out of a solid piece of wood would have been difficult as finding long enough end mills that could carve out the interior is tricky. We think the resulting clock looks wonderful and the walnut accents the maple nicely.
The writeup is highly detailed and we love the honest explanations of what choices were made and why. The code is available on GitHub. Or if perhaps you’d rather eschew the LED’s and go for something more physical there’s always this ratcheting linear clock to draw inspiration from.


 The design is based on a ‘