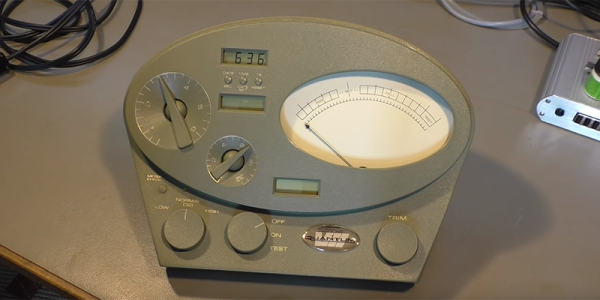
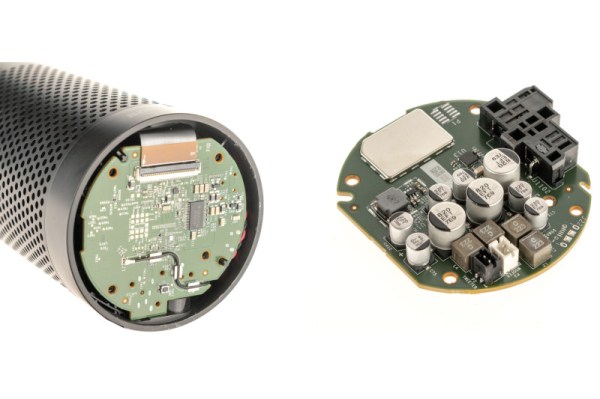
Dive Inside This Old Quartz Watch

In an age of smartwatches, an analog watch might seem a little old-fashioned. Whether it’s powered by springs or a battery, though, the machinery that spins those little hands is pretty fascinating. Trouble is, taking one apart usually doesn’t reveal too much about their tiny workings, unless you get up close and personal like with this microscopic tour of an analog watch.

This one might seem like a bit of a departure from [electronupdate]’s usual explorations of the dies within various chips, but fear not, for this watch has an electronic movement. The gross anatomy is simple: a battery, a coil for a tiny stepper motor, and the gears needed to rotate the hands. But the driver chip is where the action is. With some beautiful die shots, [electronupdate] walks us through the various areas of the chip – the oscillator, the 15-stage divider cascade that changes the 32.768 kHz signal to a 1 Hz pulse, and a remarkably tiny H-bridge for running the stepper. We found that last section particularly lovely, and always enjoy seeing the structures traced out. There are even some great tips about using GIMP for image processing. Check out the video after the break.

[electronupdate] knows his way around a die, and he’s a great silicon tour guide, whether it’s the guts of an SMT inductor or a Neopixel close-up. He’s also looking to improve his teardowns with a lapping machine, but there are a few problems with that one so far.

Continue reading “Dive Inside This Old Quartz Watch”

An Electromagnet Brings Harmony To This Waving Cat

We’ve noticed waving cats in restaurants and stores for years, but even the happy bobbing of their arm didn’t really catch our attention. Maybe [Josh] had seen a couple more than we have when it occurred to him to take one apart to see how they work. They are designed to run indoors from unreliable light sources and seem to bob along forever. How do the ubiquitous maneki-neko get endless mechanical motion from one tiny solar cell?

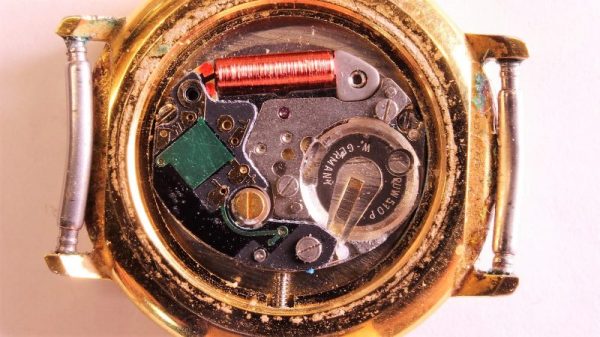
Perhaps unsurprisingly given the prevalence and cost of these devices, the answer is quite simple. The key interaction is between a permanent magnet mounted to the end of the waving arm/pendulum and a many-turn wire coil attached to the body. As the magnet swings over the coil, its movement induces a voltage. A small blob of analog circuitry reacts by running current through the coil. The end effect is that it “senses” the magnet passing by and gives it a little push to keep things moving. As long as there is light the circuit can keep pushing and the pendulum swings forever. If it happens to stop a jolt from the coil starts the pendulum swinging and the rest of the circuit takes over again. [Josh] points to a similar circuit with a very nice write up in an issue of Nuts and Volts for more detail.

We’ve covered [Josh]’s toy teardowns before and always find this category of device particularly interesting. Toys and gadgets like the maneki-neko are often governed by razor-thin profit margins and as such must satisfy an extremely challenging intersection of product constraints, combining simple design and fabrication with just enough reliability to not be a complete disappointment.

For more, watch [Josh] describe his method in person after the break, or try flashing his code to an Arduino and make a waving cat of your own.

Continue reading “An Electromagnet Brings Harmony To This Waving Cat”

Teardown: LED Bulb Yields Tiny UPS

Occasionally you run across a product that you just know is simply too good to be true. You might not know why, but you’ve got a hunch that what the bombastic phrasing on the package is telling you just doesn’t quite align with reality. That’s the feeling I got recently when I spotted the “LED intellibulb Battery Backup” bulb by Feit Electric. For around $12 USD at Home Depot, the box promises the purchaser will “Never be in the dark again”, and that the bulb will continue to work normally for up to 3.5 hours when the power is out. If I could repurpose that to make a tiny UPS for a microcontroller project of my own, it could be even more useful.

Now an LED light bulb with a battery in the base isn’t exactly rocket science, we can understand the product conceptually at a glance. But as they say, the devil is in the details. The box claims the bulb consumes 8.5 watts, but a battery with enough capacity to run such a load for 3.5 hours would be far too large to fit inside of a light bulb. Obviously there’s more to the story.

On the side of the box, in the smallest font used on the whole package, we get our clue. The bulb drops down to 200 lumens when in battery backup mode, or roughly as bright as a cheap LED flashlight. Now things are starting to come together. Without even opening the device, we can be fairly sure it will contain two separate arrays of LEDs: one low set for battery, and a brighter set to run when the bulb has AC power.

Still, I tend to be of the opinion that anything less than $20 or so is worth cracking open to see what makes it tick. Even if the product itself is underwhelming, there’s a chance the internal components could be useful or interesting. With that in mind, let’s see what’s inside a battery backup light bulb, and what we might be able to do with it.

Continue reading “Teardown: LED Bulb Yields Tiny UPS”

Polaroid Gets Thermal Printer And Raspberry Pi

Despite what you may have read in the comments, we here at Hackaday are not unaware that there’s something of a “Pi Fatigue” brewing. Similar to how “Arduino” was once a dirty word around these parts, projects that are built around the world’s most popular Linux SBC are occasionally getting dismissed as lazy. Hacker crams Raspberry Pi into an old electronic device, applies hot glue liberally, posts a gallery on Imgur, and boom! Lather, rinse, repeat.

We only mention this because the following project, despite featuring the Raspberry Pi Zero grafted into a vintage Polaroid camera, is anything but lazy. In the impeccably detailed and photographed write-up, [mitxela] explains how the Pi Zero and a thermal camera recreated the classic Polaroid experience of going from shutter button to physical picture in seconds. The workmanship and attention to detail on this build is simply phenomenal, and should quell any doubts our Dear Readers may have about Raspberry Pi projects. For now, anyway.

The video after the break will show you the modded camera in operation and goes over a few highlights of the build, but for this one you really should take the time to read the entire process start to finish. [mitxela] starts off by disassembling the Polaroid camera, complete with plenty of fantastic pictures that show how this legendary piece of consumer electronics was put together. If you’ve never seen the inside of one of these cameras, you might be surprised to see what kind of interesting hardware is lurking underneath that rather unassuming exterior. From the screw-less construction to the circuits with paper substrate, a lot of fascinating engineering went into getting this camera to a mass-market price. Frankly, the teardown alone is worth checking out.

But once the camera has been stripped down to the bare frame, the real fun begins. At the conceptual level, [mitxela] replaces the camera optics with a cheap webcam, the “brains” with a Raspberry Pi Zero, and the film mechanism with the type of thermal printer used for receipts. But how he got it all connected is why this project is so impressive. Nearly every decision made during the design and construction of this camera was for the purposes of reducing boot-time. Nobody wants a camera that takes 30, 15, or even 10 seconds to boot. It has to be available as soon as you need it.

Getting this Linux-powered camera boot up in as little as 2 seconds took a lot of clever software hacks that you’ll absolutely want to check out if you’ve ever considered building an embedded Linux device. You can’t just throw a stock Raspbian image on an SD card and hope for the best. [mitxela] used buildroot to craft a custom Linux image containing only what was needed for the camera to operate, plus a bunch of esoteric tweaks that the Junior Penguin Wrangler would likely never consider. Like shaving a full second off of the boot time by disabling dumping kernel messages to the serial port during startup.

[mitxela] brought his camera to show off at the recent Hackaday London meetup, but it was far from the first time we’ve come across his handiwork. From his servo-powered music box earlier this year to his penchant for tiny MIDI devices, he’s consistently impressed our cold robot hearts.

Continue reading “Polaroid Gets Thermal Printer And Raspberry Pi”

What’s Inside A Neonode Laser Sensor?

Every once in a while, you get your hands on a cool piece of hardware, and of course, it’s your first instinct to open it up and see how it works, right? Maybe see if it can be coaxed into doing just a little bit more than it says on the box? And so it was last Wednesday, when I was at the Embedded World trade fair, and stumbled on a cool touch display floating apparently in mid-air.

The display itself was a sort of focused Pepper’s Ghost illusion, reflected off of an expensive mirror made by Aska3D. I don’t know much more — I didn’t get to bring home one of the fancy glass plates — but it looked pretty good. But this display was interactive: you could touch the floating 2D projection as if it were actually there, and the software would respond. What was doing the touch response in mid-air? I’m a sucker for sensors, so I started asking questions and left with a small box of prototype Neonode zForce AIR sensor sticks to take apart.

The zForce sensors are essentially an array of IR lasers and photodiodes with some lenses that limit their field of view. The IR light hits your finger and bounces back to the photodiodes on the bar. Because the photodiodes have a limited angle over which they respond, they can be used to triangulate the distance of the finger above the display. Scanning quickly among the IR lasers and noting which photodiodes receive a reflection can locate a few fingertips in a 2D space, which explained the interactive part of the floating display. With one of these sensors, you can add a 2D touch surface to anything. It’s like an invisible laser harp that can also sense distance.

The intended purpose is fingertip detection, and that’s what the firmware is good at, but it must also be the case that it could detect the shape of arbitrary (concave) objects within its range, and that was going to be my hack. I got 90% of the way there in one night, thanks to affordable tools and free software that every hardware hacker should have in their toolbox. So read on for the unfortunate destruction of nice hardware, a tour through some useful command-line hardware-hacking tools, and gratuitous creation of animations from sniffed SPI-like data pulled off of some test points.

Continue reading “What’s Inside A Neonode Laser Sensor?”

One Man’s Quest For A Desktop Spherical Display

[Nirav Patel] is a man on a mission. Since 2011 he has been obsessed with owning a spherical display, the kind of thing you see in museums and science centers, but on a desktop scale. Unfortunately for him, there hasn’t been much commercial interest in this sort of thing as of yet. Up to this point, he’s been forced to hack up his own versions of his dream display.

That is until he heard about the Gakken Worldeye from Japan. This device promised to be exactly what he’s been looking for all these years, and he quickly snapped up two of them: one to use, and one to tear apart. We like this guy’s style. But as is often the case with cheap overseas imports, the device didn’t quite live up to his expectations. Undaunted by the out of the box performance of the Worldeye, [Nirav] has started documenting his attempts to improve on the product.

These displays work by projecting an image on the inside of a frosted glass or plastic sphere, and [Nirav] notes that the projection sphere on the Worldeye is actually pretty decent. The problem is the electronics, namely the anemic VGA resolution projector that’s further cropped down to a 480 pixel circle by the optics. Combined with the low-quality downsampling that squashes down the HDMI input, the final image on the Worldeye is underwhelming to say the least.

[Nirav] decided to rip the original projector out of the Worldeye and replace it with a Sony MP-CL1 model capable of a much more respectable 1280×720. He came up with a 3D printed bracket to hold the MP-CL1 in place, and has put the files up on Thingiverse for anyone who might want to play along at home. The results are better, but unfortunately still not great. [Nirav] thinks the sphere is physically too small to support the higher resolution of the MP-CL1, plus the optics aren’t exactly of the highest quality to begin with. But he’s just glad he didn’t have to build this one from scratch.

Going back to our first coverage of his DIY spherical display in 2012, we have to say his earliest attempts are still very impressive. It looks like this is a case of the commercial market struggling to keep up with the work of independent hackers.

Customising A $30 IP Camera For Fun

WiFi cameras like many other devices these days come equipped with some sort of Linux subsystem. This makes the life of a tinkerer easier and you know what that means. [Tomas C] saw an opportunity to mod his Xiaomi Dafang IP camera which comes configured to work only with proprietary apps and cloud.

The hack involves voiding the warranty by taking the unit apart and installing custom firmware onto it. Photos posted by [Tomas C] show the mainboard powered by an Ingenic T20 which is a popular IP Camera processor featuring some image and video processing sub-cores. Upon successful flashing of the firmware, the IP camera is now capable of a multitude of things such as remote recording and playback which can be configured using the web UI as documented by [Tomas C]

We did a little more digging on the custom firmware and discovered that the original author of the custom firmware, [EliasKotlyar] has done a lot of work on this project. There are loads of images of the teardown of a camera and an excellent set of documentation of how he made the hack. Everything from adding serial headers, getting root access, dumping the firmware and even toolchain links are given on the page. This is extremely handy for a newbie looking to get into the game.

And IP Cameras are not of the only hackable hardware out in the wild. There are other devices that are running Linux based firmware such as the Wifi SD Cards that run OpenWRT. Check out the essential guide to compiling OpenWRT from source if you are looking to get started with your next IP Camera hack.

Thanks for the tip [Orlin82]