Heads-Up Display Turns Car Into Fighter Jet

While most of us will never set foot in a fighter jet, some of us can still try to get as close as possible. One of the most eye-catching features of a fighter jet (at least from the pilot’s point-of-view) is the heads-up display, so that’s exactly what [Frank] decided to build into his car to give it that touch of fighter jet style.

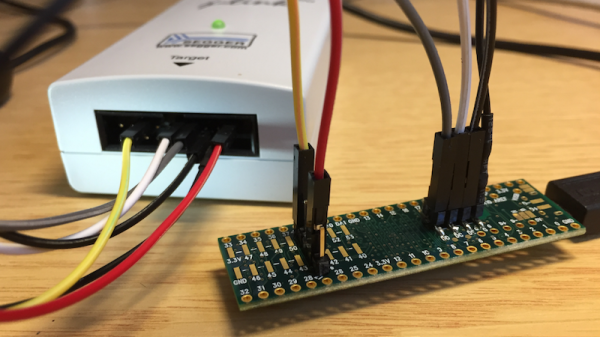
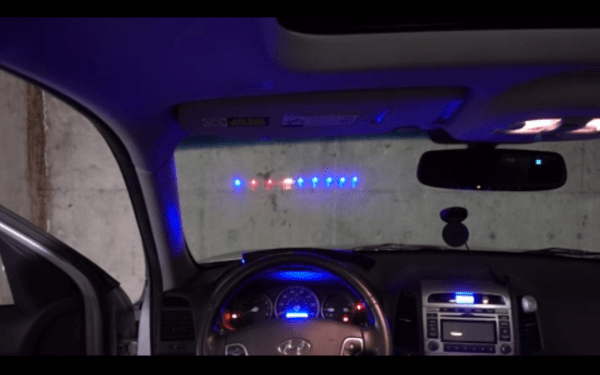
Heads-up displays use the small reflectivity of a transparent surface to work. In this case, [Frank] uses an LED strip placed on the dashboard to shine up into the windshield. A small amount of light is reflected back to the driver which is able to communicate vehicle statues without obscuring view of the road. [Frank]’s system is able to display information reported over the CAN bus, including voltage, engine RPM, and speed.

This display seems to account for all the issues we could think up. It automatically cycles through modes depending on driving style (revving the engine at a stoplight switches it to engine RPM mode, for example), the LEDs automatically dim at night to avoid blinding the driver, and it interfaces with the CAN bus which means the ability to display any other information in the future should be relatively straightforward. [Frank] does note some rough edges, though, namely with the power supply and the fact that there’s a large amount of data on the CAN bus that the Teensy microcontroller has a hard time sorting out.

That being said, the build is well polished and definitely adds a fighter jet quality to the car. And if [Frank] ever wants even more aviation cred for his ground transportation, he should be able to make use of a 747 controller for something on the dashboard, too.

How To MIDI Interface Your Toys

There’s a great number toys in the world, many of which make all manner of pleasant or annoying noises for the entertainment of children. If you’re a musician, these toys may be of interest due to their unique or interesting sounds. However, due to their design being aimed at play rather than performance, it may be difficult to actually use the toy as a musical instrument. One way around this is to record the sounds of the toy into a sampler, but it’s not the only way. [little-scale] is here to demonstrate how to MIDI interface your toys. 

[little-scale] starts out by discussing the many ways in which one can interface with a toy. The article discusses how a simple button can be replaced with a relay, or a multiplexer, and be interfaced to all manner of other devices to control the toy. This is demonstrated by using a mobile phone toy which makes sounds when buttons are pressed.

A Teensy 3.6 is used to run the show, acting as a USB-MIDI interface so the toy can be controlled by music software like Abelton. It’s connected to the toy’s buttons through a multiplexer. The toy’s speaker is cut off and used as an audio output instead, allowing the toy to be easily connected to other audio hardware for performance or recording. It’s also fed through a digital pot so MIDI commands can control the volume. A resistor is used to control pitch in the toy, so this too was replaced with a digital pot as well, to allow sample pitch to be controlled.

The project is incredibly well documented, with [little-scale] first tearing down the toy and highlighting the points of interest, before stepping through each stage of interfacing the toy to the digital world. We’ve seen some of [little-scale]’s work before, too – namely, this MIDI DAC for controlling vintage synthesizers. Video after the break. Continue reading “How To MIDI Interface Your Toys”

Graduation Cap Shows Us What It’s Got!

A high school graduation ceremony is well due the pomp and circumstance for making it through one of life’s many milestones. To commemorate the event with their own flair, redditor [PM_(cough)_FOR_KITTENS] hid a 32 x 32 GIF-playing LED matrix in their graduation cap!

The board is controlled by a Teensy hosting a SmartMatrix shield. With the shield’s assistance, the matrix enables scrolling text and GIFs to play across the LEDs, as well as an SD card slot to load up your favourites. Currently, it’s set to a 50-50 chance of playing a gif — one of sixty — or one of the twenty scrolling text lines loaded onto the SD card. [PM_(ahem)_FOR_KITTENS] co-opted his friend’s expertise to write the code — available here — while he designed the circuit and handled the assembly.

Carefully unwrapping his cap, [PM_(yep)_FOR_KITTENS] reinforced it with thinner and stronger cardboard, cutting slots into it, allowing the boards and wires to — barely — fit inside. A hole in the side of the cap is enough for a barely noticeable USB cable to run down his neck to a 2000 mAh battery which can power the cap for over five hours at 5V and 2A. Check out a demo video after the break!

Continue reading “Graduation Cap Shows Us What It’s Got!”

Everything’s A Touch Surface With Electrick

Touch screens are great, but big touchscreens are expensive and irregular touchscreens are not easy to make at all. Electrik is a method developed by several researchers at Carnegie Mellon University that makes almost any solid object into a touch surface using tomography. The catch is that a conductive coating — in the form of conductive sheets, 3D plastic, or paint — is necessary. You can see a demonstration and many unique applications in the video below. They’ve even made a touch-sensitive brain out of Jell-O and a touchable snowman out of Play-Doh.

The concept is simple. Multiple electrodes surround the surface. The system injects a current using a pair of electrodes and then senses the output at the other terminals. A finger touch will change the output of several of the electrodes. Upon detection, the system will change the injection electrodes and repeat the sensing. By using multiple electrode pairs and tomography techniques, the system can determine the location of touch and even do rough motion tracking like a low-resolution touch pad mouse.

Continue reading “Everything’s A Touch Surface With Electrick”

Adding A Debugger To A Teensy 3.5/3.6

The Teensy is a powerful ARM-based development board with loads of features that can do fun stuff with USB as well. Like many dev boards, it uses a less powerful processor as an interface. Teensy designer [Paul Stoffregen] added a debug header to allow direct SWD JTAG access to the main chip, but the interface microcontroller has to be silenced for that to work, and the code to do so is still in progress.

Impatient, [Erich Styger] documents the changes he made to add support for the J-Link SWD protocol by removing the offending NXP Kinetis KL02Z that serves as the as the onboard interface and bootloader that helps the Arduino IDE talk to the K64F which is the main chip. After the KL02Z was removed, [Erich] populated the debug headers and then wired up the Segger J-Link to the board and tested it out with Eclipse, GDB, and standard SWD debug tools.

The end result is a Cortex M4F board that can work with standard tools at a third of the price of the Kinetis’ development board. [Paul Stoffregen] confirms that the debugging functionality will be added to the bootloader code soon but until then, a hardware hack is a working, if brutal, approach to debugging on the platform.

More information on the JTAG interface is available for the interested. And if Teensy isn’t your thing, you might consider an STM32-based development board.

Teensy And 3D Printer Make Beautiful Music Together

[Otermrelik] wanted to experiment with the Teensy audio library and adapter. That, combined with his 3D printer, led to a very cool looking build of the teensypolysynth. The device looks like a little mini soundboard with sliders and 3D printed knobs. You can see (and hear) it in the video below.

The Teensy audio library supports several output devices including several built-in options and external boards like the audio adapter used here. The library does CD-quality sound, supports polyphonic playback, recording, synthesis, mixing, and more.

Continue reading “Teensy And 3D Printer Make Beautiful Music Together”

Heavy Metal Detectors

Helsinki has a strong underground Heavy Metal scene, so what better way to show it off than to have listeners literally unearth the local sounds themselves with converted metal detectors that play, naturally, Metal? [Steve Maher] built these modified detectors and handed them to a bunch of participants who went on exploratory walks around the city. The tracks from local bands changed as the user moved from one concealed metallic object to the other to create the experience of discovering the hidden soundscape of the land.  Continue reading “Heavy Metal Detectors”