Zero Parts-Count Temperature Sensor

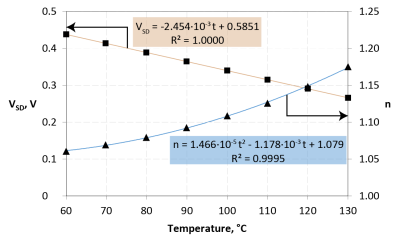
Quick: What’s the forward voltage drop on a conducting diode? If you answered something like 0.6 to 0.7 V, you get a passing grade, but you’re going to have to read on. If you answered V_F = \frac{T-T_0}{k} where T0 and k are device-specific constants to be determined experimentally, you get a gold Jolly Wrencher.

vsd%2C+n-01[Jakub] earned his Wrencher, and then some. Because not only did he use the above equation to make a temperature sensor, he did so with a diode that you might have even forgotten that you have on hand — the one inside the silicon of a MOSFET — the intrinsic body diode.

[Jakub]’s main project is an Arduino-controlled electronic load that he calls the MightWatt, and a beefy power MOSFET is used as the variable resistance element. When it’s pulling 20 or 30 A, it gets hot. How hot exactly is hard to measure without a temperature sensor, and the best possible temperature sensor would be one that was built into the MOSFET’s die itself.

There’s a bunch of detail in his write-up about how he switches the load in and out to measure the forward drop, and how he calibrates the whole thing. It’s technical, but give it a read, it’s good stuff. This is a great trick to have up your sleeve.

And if you’re in the mood for more stupid diode tricks, we recommend using them as solar cells or just stringing a bunch of them together to make a thermal camera.

Build Your Own Sensor Skin

Scientific research, especially in the area of robotics, often leverages cutting-edge technology. Labs filled with the latest measurement and fabrication gear are unleashed on the really tough problems, like how to simulate the exquisite sensing abilities of human skin. One lab doing work in this area has taken a different approach, though, by building multi-functional sensors arrays from paper.

A group from the King Abdullah University of Science and Technology in Saudi Arabia, led by [Muhammad M. Hussain], has published a fascinating paper that’s a tour de force of getting a lot done with nothing. Common household items, like Post-It notes, kitchen sponges, tissue paper, and tin foil, are used to form the basis of what they call “paper skin”. Fabrication techniques – scissors and tape – are ridiculously simple and accessible to anyone who made it through kindergarten.

They do turn to a Circuit Scribe pen for some of their sensors, but even this nod to high technology is well within their stated goal of making it possible for anyone to fabricate sensors at home. The paper goes into great detail about how the sensors are made, how they interact, and how they are interfaced. It’s worth a read to see what you can accomplish with scraps.

For another low-tech paper-based sensor, check out this capacitive touch sensor keyboard.

Thanks for the tip, [Mattias]

Warm Up Your Small Talk With A Thermometer Scarf

Just how cold is it out there? This giant thermometer scarf is a fantastic entry-level wearables project. It’s sure to strike up conversations that move past the topic of weather.

The scarf is built around a FLORA, a Neopixel ring that represents the bulb, and a short length of Neopixels to show the temperature in Fahrenheit and Celsius. Temperature sensing is done with a poorly documented DHT11 that gave [caitlinsdad] the fits until he found Adafruit’s library for them.To make the scarf, [caitlinsdad] used a nice cozy micro-fleece. He built a pocket for the electronics and padded it with polyester fiber fill to diffuse the LEDs. This makes the lights blur and run together, resembling a mercury thermometer.

Once it was up and running, [caitlinsdad] figured out the temperature scale based on the DHT11 readings and marked it out on the scarf with a permanent marker. [caitlinsdad] has a few mods in mind for this project. For instance, it would be easy to add haptic feedback to keep you from being exposed for too long. Another wearable in the same spirit is this hat that has a sunblock reminder system.

Continue reading “Warm Up Your Small Talk With A Thermometer Scarf”

Bluetooth Thermometer Minds Your Meats

The summer may have come to a close here in the USA, but any time of the year is a good time for grilling. In the colder weather, it’s a drag to have to stay near the hot grill to keep an eye on your burgers and franks. [Eric Ely] thought it would be smarter to have a meat thermometer that sent his phone the current reading via Bluetooth.

Instead of starting from scratch, [Eric] took an off the shelf electronic thermometer and removed its temperature probe (which was a thermistor). The hardware used an off the shelf Bluetooth board with a companion battery board and prototype board. If you can’t bear to cut up a good thermometer, you can get replacement probes that ought to work just as well.

In addition to the boards and the scavenged thermistor, [Eric] used a couple of resistors. One resistor is in parallel with the thermistor to improve the linearity of the device’s response curve. The second resistor forms a voltage divider that the Bluetooth board reads.

The software (using Node.js and C) is available on Github. The C program reads the temperature and pushes it out using JSON. Node.js provides a server that [Eric] can hit with his phone’s Web browser.

Sure, you can buy wireless thermometers, but what self-respecting hacker wants to carry around a store-bought box just to display meat temperature? Viewing it on your phone has much more street cred.  Of course, a real hacker isn’t going to cook on a conventional grill, either.

Continue reading “Bluetooth Thermometer Minds Your Meats”

A Thermometer Probe For A Hotplate, Plugging Stuff Into Random Holes

[NurdRage], YouTube’s most famous chemist with a pitch-shifted voice, is back with one of our favorite pastimes: buying cheap equipment and tools, reading poorly translated manuals, and figuring out how to do something with no instructions at all.

[NurdRage] recently picked up a magnetic stirrer and hotplate. It’s been working great so far, but it lacks a thermometer probe. [NurdRage] thought he was getting one with the hotplate when he ordered it, he just never received one. Contacting the seller didn’t elicit a response, and reading the terribly translated manual didn’t even reveal who the manufacturer was. Figuring this was a knock-off, a bit more research revealed this hotplate was a copy of a SCILOGEX hotplate. The SCILOGEX temperature probe would cost $161 USD. That’s not cool.

The temperature probe was listed in the manual as a PT1000 sensor; a platinum-based RTD with a resistance of 1000Ω at 0°C. If this assumption was correct, the pinout for the temperature probe connector can be determined by sticking a 1kΩ resistor in the connector. When the hotplate reads 0ºC, that’s the wires the temperature probe connects to.

With the proper pin connectors found, [NurdRage] picked up a PT1000 on eBay for a few dollars, grabbed a DIN-5 connector from a 20 year old keyboard, and connected everything together. The sensor was encased in a pipette, and the bundle of wires snaked down piece of vinyl tube.

For $20 in parts, [NurdRage] managed to avoid paying $161 for the real thing. It works just as good as the stock, commercial unit, and it makes for a great video. Check that out below.

Thanks [CyberDjay] for the tip.

Continue reading “A Thermometer Probe For A Hotplate, Plugging Stuff Into Random Holes”

Temperature Logger

Logging Engine Temperature For RC Models

[Rui] enjoys his remote-controlled helicopter hobby and he was looking for a way to better track the temperature of the helicopter’s engine. According to [Rui], engine temperature can affect the performance of the craft, as well as the longevity and durability of the engine. He ended up building his own temperature logger from scratch.

The data logger runs from a PIC 16F88 microcontroller mounted to a circuit board. The PIC reads temperature data from a LM35 temperature sensor. This device can detect temperatures up to 140 degrees Celsius. The temperature sensor is mounted to the engine using Arctic Alumina Silver paste. The paste acts as a glue, holding the sensor in place. The circuit also contains a Microchip 24LC512 EEPROM separated into four blocks. This allows [Rui] to easily make four separate data recordings. His data logger can record up to 15 minutes of data per memory block at two samples per second.

Three buttons on the circuit allow for control over the memory. One button selects which of the four memory banks are being accessed. A second button changes modes between reading, writing, and erasing. The third button actually starts or stops the reading or writing action. The board contains an RS232 port to read the data onto a computer. The circuit is powered via two AA batteries. Combined, these batteries don’t put out the full 5V required for the circuit. [Rui] included a DC-DC converter in order to boost the voltage up high enough.

A Very, Very Small IMU

The reason we’re playing with quadcopters, flight controllers, motion controlled toys, and hundreds of other doodads is the MEMS revolution. A lot is possible with tiny accelerometers and gyroscopes, and this is looking like the smallest IMU yet. It’s an 18mm diameter IMU, with RF networking, C/C++ libraries, and a 48MHz ARM microcontroller – perfect for the smallest, most capable quadcopter we’ve ever seen.

The build started off as an extension of the IMUduino, an extremely small rectangular board that’s based on the ATMega32u4. While the IMUduino would be great for tracking position and orientation over Bluetooth, it’s still 4cm small. The Femtoduino cuts this down to an 18mm circle, just about the right size to stuff in a model rocket or plane.

Right now, femtoIO is running a very reasonable Kickstarter for the beta editions of these boards with a $500 goal. The boards themselves are a little pricey, but that’s what you get with 9-DOF IMUs and altimeter/temperature sensors.