A purple 3D-printed case with an LCD screen on the front and Pikachu on top

Avoid Repetitive Strain Injury With Machine Learning – And Pikachu

The humble mouse has been an essential part of the desktop computing experience ever since the original Apple Macintosh popularized it in 1984. While mice enabled user-friendly GUIs, thus making computers accessible to more people than ever, they also caused a significant increase in repetitive strain injuries (RSI). Mainly caused by poor posture and stress, RSI can lead to pain, numbness and tingling sensations in the hand and arm, which the user might only notice when it’s too late.

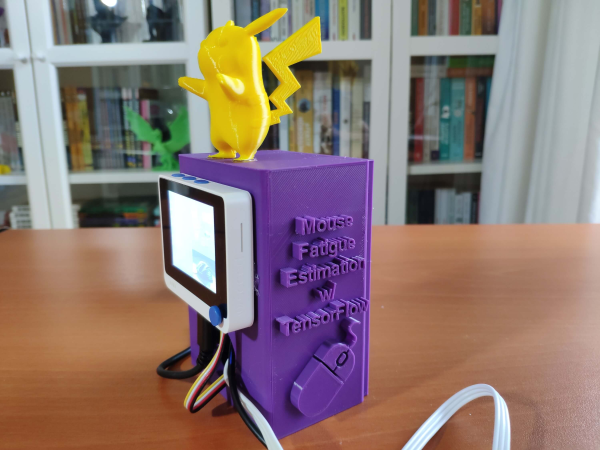
Hoping to catch signs of RSI before it manifests itself, [kutluhan_aktar] built a device that allows him to track mouse fatigue. It does so through two sensors: one that measures galvanic skin response (GSR) and another that performs electromyography (EMG). Together, these two measurements should give an indication of the amount of muscle soreness. The sensor readout circuits are connected to a Wio Terminal, a small ARM Cortex-M4 development board with a 2.4″ LCD.

However, calculating muscle soreness is not as simple as just adding a few numbers together; in fact the link between the sensor data and the muscles’ state of health is complicated enough that [kutluhan] decided to train a TensorFlow artificial neural network (ANN), taking into account observed stress levels collected in real life. The network ran on the Wio while he used the mouse, pressing buttons to indicate the amount of stress he experienced. After a few rounds of training he ended up with a network that reached an accuracy of more than 80%.

[kutluhan] also designed a rather neat 3D printed enclosure to house the sensor readout boards as well as a battery to power the Wio Terminal. Naturally, the case was graced by a 3D rendition of Pikachu on top (get it? a mouse Pokémon that can paralyze its opponents!). We’ve seen [kutluhan]’s fondness for Pokémon-themed projects in his earlier Jigglypuff CO2 sensor.

Although the setup with multiple sensors doesn’t seem too practical for everyday use, the Mouse Fatigue Estimator might be a useful tool to train yourself to keep good posture and avoid stress while using a mouse. If you also use a keyboard (and who doesn’t?), make sure you’re using that correctly as well.

Continue reading “Avoid Repetitive Strain Injury With Machine Learning – And Pikachu”

Weather Station Predicts Air Quality

Measuring air quality at any particular location isn’t too complicated. Just a sensor or two and a small microcontroller is generally all that’s needed. Predicting the upcoming air quality is a little more complicated, though, since so many factors determine how safe it will be to breathe the air outside. Luckily, though, we don’t need to know all of these factors and their complex interactions in order to predict air quality. We can train a computer to do that for us as [kutluhan_aktar] demonstrates with a machine learning-capable air quality meter.

The build is based around an Arduino Nano 33 BLE which is connected to a small weather station outside. It specifically monitors ozone concentration as a benchmark for overall air quality but also uses an anemometer and a BMP180 precision pressure and temperature sensor to assist in training the algorithm. The weather data is sent over Bluetooth to a Raspberry Pi which is running TensorFlow. Once the neural network was trained, the model was sent back to the Arduino which is now capable of using it to make much more accurate predictions of future air quality.

The build goes into quite a bit of detail on setting up the models, training them, and then using them on the Arduino. It’s an impressive build capped off with a fun 3D-printed case that resembles an old windmill. Using machine learning to help predict the weather is starting to become more commonplace as well, as we have seen before with this weather station that can predict rainfall intensity.

accelerometer, oled, and PocketBeagle create a gesture-controlled calculator

The Calculator Charm: Calculatorium Leviosa!

Have you ever tried waving your hand around like a magic wand and summoning a calculator? We would guess not since you’d probably look a little silly doing so. That is unless you had [Andrei’s] cool gesture-controlled calculator. [Andrei] thought it would be helpful to use a calculator in his research lab without having to take his gloves off and the results are pretty cool.

His hardware consists of a PocketBeagle, an OLED, and an MPU6050 inertial measurement unit for capturing his hand motions using an accelerometer and gyroscope. The hardware is pretty straightforward, so the beauty of this project lies in its machine learning implementation.

[Andrei] first captured a few example datasets to train his algorithm by recreating the hand gestures for each number, 0-9, and recording the resulting accelerometer and gyroscope outputs. He processed the data first with a wavelet transform. The intent of the transform was two-fold. First, the transform allowed him to reduce the number of samples in his datasets while preserving the shape of the accelerometer and gyroscope signals, the key features in the machine learning classification. Secondly, he was able to increase the number of features for the classification since the wavelet transform resulted in both approximation and detailed coefficients which can both be fed into the algorithm.

Because he had a small dataset, he used the Stratified Shuffle Split technique instead of the test train split method which is generally more suited for larger datasets. The Stratified Shuffle Split ensured approximately the same number of train and test samples for each gesture. He was also very conscious of optimizing his model for running on a portable processing unit like the PocketBeagle. He spent some time optimizing the parameters of his algorithm and ultimately converted his model to a TensorFlowLite model using the built-in “TFLiteConverter” function within TensorFlow.

Finally, in true open-source fashion, all his code is available on GitHub, so feel free to give it a go yourself. Calculatorium Leviosa!

Continue reading “The Calculator Charm: Calculatorium Leviosa!”

Mind-Controlled Flamethrower

Mind control might seem like something out of a sci-fi show, but like the tablet computer, universal translator, or virtual reality device, is actually a technology that has made it into the real world. While these devices often requires on advanced and expensive equipment to interpret brain waves properly, with the right machine learning system it’s possible to do things like this mind-controlled flame thrower on a much smaller budget. (Video, embedded below.)

[Nathaniel F] was already experimenting with using brain-computer interfaces and machine learning, and wanted to see if he could build something practical combining these two technologies. Instead of turning to an EEG machine to read brain patterns, he picked up a much less expensive Mindflex and paired it with a machine learning system running TensorFlow to make up for some of its shortcomings. The processing is done by a Raspberry Pi 4, which sends commands to an Arduino to fire the flamethrower when it detects the proper thought patterns. Don’t forget the flamethrower part of this build either: it was designed and built entirely by [Nathanial F] as well using gas and an arc lighter.

While the build took many hours of training to gather the proper amount of data to build the neural network and works as the proof of concept he was hoping for, [Nathaniel F] notes that it could be improved by replacing the outdated Mindflex with a better EEG. For now though, we appreciate seeing sci-fi in the real world in projects like this, or in other mind-controlled projects like this one which converts a prosthetic arm into a mind-controlled music synthesizer.

Continue reading “Mind-Controlled Flamethrower”

Visual Raspberry Pi With Node-Red And TensorFlow

If you prefer to draw boxes instead of writing code, you may have tried IBM’s Node-RED to create logic with drag-and-drop flows. A recent [TensorFlow] video shows an interview between [Jason Mayes] and [Paul Van Eck] about using TensorFlow.js with Node-RED to create machine learning applications for Raspberry Pi visually. You can see the video, below.

The video doesn’t go into much detail since it is only ten minutes long. But it does show how easy it is to do things like identify images using an existing TensorFlow model. There is a more detailed tutorial available, as well as a corresponding video, which you can see below.

Continue reading “Visual Raspberry Pi With Node-Red And TensorFlow”

Machine Learning Current Sensor Snoops On MCUs

Anyone who’s ever tried their hand at reverse engineering a piece of hardware has wished there was some kind of magic wand you could tap on a PCB to understand what its doing and why. We imagine that’s what put security researcher [Mark C] on the path to developing CurrentSense-TinyML, a fascinating proof of concept that uses machine learning and sensitive current measurements to try and determine what a microcontroller is up to.

Energy consumption as the LED blinks.

The idea is simple enough: just place a INA219 current sensor between the power supply and the microcontroller under observation, and record the resulting measurements as it goes about its business. Of course in this case, [Mark] knew what the target Arduino Nano was doing because he wrote the code that blinks its onboard LED.

This allowed him to create training data for TensorFlow, which was ultimately optimized into a model that could fit onto the Arduino Nano 33 BLE Sense which stands in for our magic wand. The end result is that the model can accurately predict when the Nano has fired up its LED based on the amount of power it’s using. [Mark] has done a fantastic job of documenting the whole process, which also doubles as a great intro for putting machine learning to work on a microcontroller.

Now we already know what you’re thinking: obviously the current would go up when the LED was lit, so the machine learning aspect is completely unnecessary. That may be true in this limited context, but remember, this is just a proof of concept to base further work on. In the future, with more training data, this technique could potentially be used to identify a whole range of nuanced activities. You’d be able to see when the MCU was sitting idle, when it was writing to flash, or when it was reading from sensors. In fact, with a good enough model, it might even be possible to identify the individual sensors that are being polled.

These are early days, but we’re very interested in seeing where this research goes. It might not be magic, but if analyzing the current draw of a coffee maker can tell you how much everyone in the office is drinking, then maybe it can help us figure out what all these unlabeled ICs are doing.

Is That A Cat Or Not?

Pandemic induced boredom takes people in many different ways. Some of us go for long walks, others learn to speak a new language, while yet more unleash their inner gaming streamer. [Niklas Fauth] has taken a break from his other projects by creating a very special project indeed. A cat detector! No longer shall you ponder whether or not the object or creature before you is a cat, now that existential question can be answered by a gadget.

This is more of a novelty project than one of special new tech, he’s taken what looks to be the shell from a cheap infra-red thermometer and put a Raspberry Pi Zero with camera and a small screen into it. This in turn runs Tensorflow with the COCO-SSD object identification model. The device has a trigger, and when it’s pressed to photograph an image it applies the model to detect whether the subject is a cat or not. The video posted to Twitter is below the break, and we can’t dispute its usefulness in the feline-spotting department.

[Niklas] has featured here more than once in the past. This is not his only pandemic project, either.

Continue reading “Is That A Cat Or Not?”