Crowdfunding: A Wireless Oscilloscope

One of the most ingenious developments in test and measuring tools over the last few years is the Mooshimeter. That’s a wireless, two-channel multimeter that can measure voltage and current simultaneously. If you’ve ever wanted to look at the voltage drop and power output on a souped up electrified go-kart, the Mooshimeter is the tool for you.

A cheap, wireless multimeter was only the fevered dream of a madman a decade ago. We didn’t have smartphones with Bluetooth back then, so any remote display would cost much more than the multimeter itself. Now this test and measurement over Bluetooth is bleeding over into the rest of the electronics workbench with the Aeroscope,  a wireless Bluetooth oscilloscope.

[Alexander] and [Jonathan], the devs for the Aeroscope got the idea for this device while debugging a mobile robot. The robot would work on the bench, but in the field the problem would reappear. The idea for a wireless troubleshooting tool was born out of necessity.

The specs for the Aeroscope are about equal to the quite capable ‘My First Oscilloscope’ Rigol DS1052E. Analog bandwidth is 100MHz, sample rate is 500 Msamples/second, and the memory depth is 10k points. Resolution per division is 20mV to 10V, and the Aeroscope “Deluxe Package” that includes a few leads, tip, clip, USB cable, and case is about the same price as the Rigol 1052E. The difference, of course, is that the Aeroscope is a single channel, and wireless. That’s fairly impressive for two guys who aren’t a team of Rigol engineers.

As is the case with all Bluetooth test and measurement devices, the proof is in the app. Right now, the Aeroscope only supports iOS 9 devices, but according to the crowdfunding campaign, Android support is coming. Since the device is Open Source, you can always bang something out in Python if you really need to.

While this is a crowdfunding campaign, it’s hosted on Crowd Supply. Crowd Supply isn’t Indiegogo or Kickstarter; there are people at Crowd Supply vetting projects. The campaign still has a month to go, but the first few pledges are putting the Aeroscope right on track to a successful campaign.


USB Soldering Iron Is Surprisingly Capable

We know what you’re thinking. There’s no way an 8 watt USB-powered soldering iron could be worth the $5 it commands on eBay. That’s what [BigClive] thought too, so he bought one, put the iron through a test and teardown, and changed his mind. Can he convince you too?

Right up front, [BigClive] finds that the iron is probably not suitable for some jobs. Aside its obvious unsuitability for connections that take a lot of heat, there’s the problem of leakage current when used with a wall-wart USB power supply. The business end of the iron ends up getting enough AC leak through the capacitors of the power supply to potentially damage MOSFETs and the like. Then again, if you’re handy to an AC outlet, wouldn’t you just use a Hakko? Seems like the iron is best powered by a USB battery pack, and [BigClive] was able to solder some surprisingly beefy connections that way. The teardown and analysis reveal a circuit that looks like it came right out of a [Forrest M. Mims III] book. We won’t spoil the surprise for you – just watch the video below.

While not truly cordless like this USB-rechargeable iron, we’d say that for the price, this is a pretty capable iron for certain use cases. Has anyone else tried one of these? Chime in on the comments and let us know what you think.

Continue reading “USB Soldering Iron Is Surprisingly Capable”

REM Detection Lets You Boss Around Your Dreams

[Michael] has been working on projects involving lucid dreaming for a long time. The recurring problem with most projects of this nature, though, is that they often rely on some sort of headgear or other wearable which can be cumbersome to actually sleep with. He seems to have made some headway on that problem by replacing some of the offending equipment with a small camera that can detect eye movements just as well as other methods.

The idea behind projects like this is that a piece of hardware detects when the user is in REM sleep, and activates some cue which alerts the sleeper to the fact that they’re dreaming (without waking them up). Then, the sleeper can take control of the dream. The new device uses a small camera that dangles in front of an eye, which is close enough to monitor the eye’s movement. It measures the amount of change between each frame, logs the movements throughout the night and plays audio tracks or triggers other hardware when eye movements are detected.

[Michael]’s goal is to eventually communicate from inside of a dream, and has gone a long way to achieving that goal. Now that this device is more comfortable and more reliable, the dream is closer to reality. [Michael] is looking for volunteers to provide sleep logs and run tests, so if you’re interested then check out the project!

Puzzle Box

Puzzle Box Is Rigged To Blow

[Sande24] needed a gift for his father’s birthday. He decided that rather than simply give his father the gifts, he would present his father with a unique challenge. The gifts are locked inside of a multi-stage puzzle box. This isn’t your average puzzle box though. This one is rigged to blow.

The puzzle box was designed to test his father’s reflexes, mind, and luck. The finished product looks sort of like a wooden crate made from particle board. The box contains three levels, each with its own gift and its own task to be completed.

With the lid opened, the first compartment and puzzle is revealed. Inside of the compartment were a new pair of gloves, meant to protect the father’s hands when working on the puzzles. The first puzzle is built into a sheet of wood with several custom-made levers. The levers must be moved into position in order to remove the wooden sheet and reveal the next level.

The first lever triggers a home-made detonator that eventually lights a series of fireworks placed around the box. You need to solve the puzzle box fast enough to prevent the fireworks from destroying the gifts that lay inside. [Sande24] was unable to legally purchase fuses where he lived, so he had to make his own.

The second level held a gas mask, also meant to protect the father from the booby traps of this mysterious box. This level, also made from a sheet of wood, has nine squares drawn on it. Each square is labeled with a different number which goes into solving a mathematical function (x^5-25x^4+233x^3-995x^2+1866x-1080 = 0). The solution to the function would reveal the safe path to be used to cut the wooden platform in half. Unfortunately [Sande24’s] father cut the wrong squares and released a huge amount of vinegar into the box. Oops.

The bottom level contained the final puzzle and the locked treasure compartment locked with an ordinary padlock. To find the key, another puzzle had to be solved based on a series of wooden levers labeled with different shapes. The shapes provided clues to the order in which the levers should be pulled. Once the levers were moved into position, two compartments were unlocked. One of them contained the key to the treasure box. The other contained another booby trap which would set off more fireworks, destroying the final gift of four cans of Kuld beer. That’s a lot of work to get a a few cans of frothy beverage!

[Thanks Ellery]

Automated Programming And Testing Jig Built With Raspberry Pi

[Doug Jackson] makes word clocks, and he must be doing quite a bit of business. We say that because he put together a programming and test bed for the clock circuit boards.

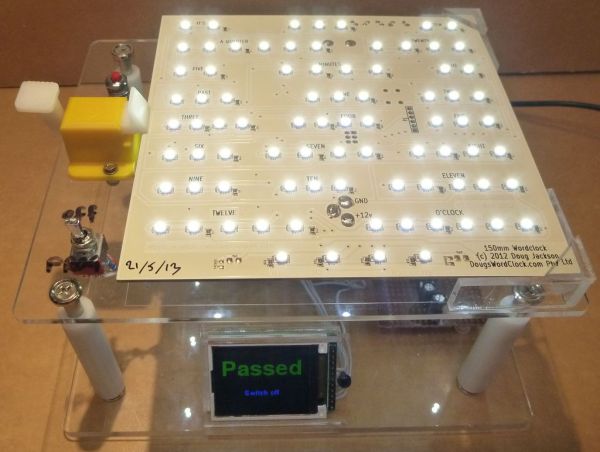
This is a great example to follow if you’re doing any kind of volume assembly. The jig lets the populated PCB snap into place, making all the necessary electrical connections. This was made possible by a package of goods he picked up on eBay which included rubber spacers to separate the board from the acrylic mounting plate, pogo pins to make the electrical connections, and a spring-loaded board clamp seen to the left in this image.

The switch in the lower right connects power to the board and pulls a Raspberry Pi GPIO pin high. The Python script running on the RPi polls that pin, executing a bash script which programs the ATmega169 microcontroller using the GPIO version of AVRdude. We looked through his Python script and didn’t see code for testing the boards. But the image above shows a “Passed” message on the screen that isn’t in his script. We would wager he has another version that takes the hardware through a self test routine.

We first saw one of [Doug’s] word clocks back in 2009 and then again a few months later. The look of the clock is fantastic and it’s nice to see the project is still going strong.

Test Your Project’s Mettle With A Protected Dummy Load

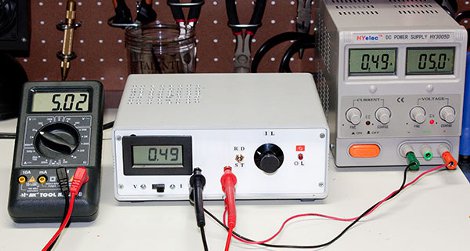
For a power hungry project the supply is sometimes a pretty big unknown. Whether stapling together a few different power supplies to meet a current requirement, or designing a system from the ground up: a big power supply can be quite a dangerous thing. It helps to have some kind of a dummy load to really shake down the electronics and get an idea of how hot things get or test stability before trusting the supply to run your stuff. [Paulo Oliveira] has constructed just such a thing, a slick looking adjustable constant current load.

Following the popular LM324 circuit from [David Jones] at EEVblog [Paulo] decided to make use of the two spare op-amps to provide both a thermal overload and a cooling fan circuit. We have seen other tweaks to [David]’s circuit in the past but through some resistors and MOSFETs [Paulo] can now load up to 7A (limited by resistor wattage). We would have used a really crazy server vacuum fan to make it genuinely frightening to push heavier loads. Thanks [Paulo]!

Constant Current Dummy Load

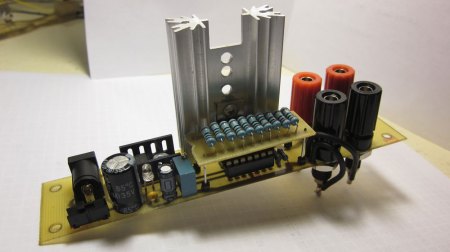
Inspired by a design he saw on the EEVblog, [George Graves] put together this constant current dummy load.  You might need on of these if you’re testing power supplies or batteries. They pull a constant current regardless of the voltage of the supply. [George’s] version extends the range of the original a little bit by running the op-amp at 8 volts. He says that everything runs fine at 1 amp. He tried 2 amps but things got hot pretty quickly. What we really like though, is he took fantastic pictures. Sometimes even simple things can catch our attention with the right pictures!