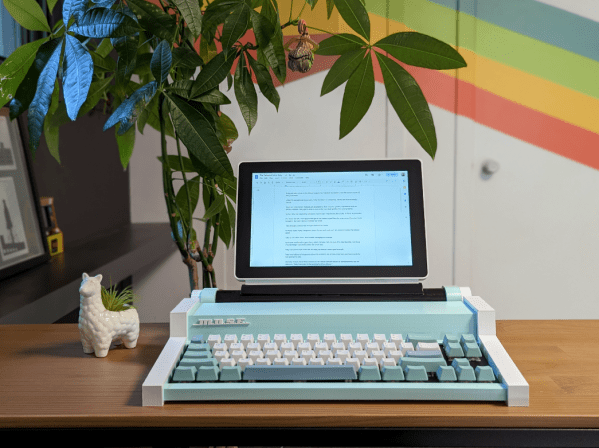
Low-Cost Display Saved By RP2040

Anyone looking for components for electronics projects, especially robotics, microcontrollers, and IoT devices, has likely heard of Waveshare. They are additionally well-known suppliers of low-cost displays with a wide range of resolutions, sizes, and capabilities, but as [Dmitry Grinberg] found, they’re not all winners. He thought the price on this 2.8-inch display might outweigh its poor design and lack of documentation, and documented his process of bringing it up to a much higher standard with a custom driver for it.

The display is a 320×240 full-color LCD which also has a touchscreen function, but out-of-the-box only provides documentation for sending data to it manually. This makes it slow and, as [Dmitry] puts it, “pure insanity”. His ultimate solution after much poking and prodding was to bit-bang an SPI bus using GPIO on an RP2040 but even this wasn’t as straightforward as it should have been because there are a bunch of other peripherals, like an SD card, which share the bus. Additionally, an interrupt is needed to handle the touchscreen since its default touch system is borderline useless as well, but after everything was neatly stitched together he has a much faster and more versatile driver for this display and is able to fully take advantage of its low price.

For anyone else attracted to the low price of these displays, at least the grunt work is done now if a usable driver is needed to get them up and running. And, if you were curious as to what [Dmitry] is going to use this for, he’s been slowly building up a PalmOS port on hardware he’s assembling himself, and this screen is the perfect size and supports a touch interface. We’ll keep up with that project as it progresses, and for some of [Dmitry]’s other wizardry with esoteric displays make sure to see what he’s done with some inexpensive e-ink displays as well.

Building The World’s Largest Nintendo 3DS

While the Nintendo 3DS was capable of fairly impressive graphics (at least for a portable system) back in its heyday, there’s little challenge in emulating the now discontinued handheld on a modern computer or even smartphone. One thing that’s still difficult to replicate though is the stereoscopic 3D display the system was named for. But this didn’t stop [BigRig Creates] from creating this giant 3DS with almost all of the features of an original console present.

The main hurdle here is that the stereoscopic effect that Nintendo used to allow the 3DS to display 3D graphics without special glasses doesn’t work well at long distances, and doesn’t work at all if there is more than one player. To get around those limitations, this build uses a 3D TV with active glasses. This TV is mounted to a bar stool with the help of some counterweights, and a second touch-sensitive screen courtesy of McDonalds makes up the other display.

The computer driving this massive handheld console runs Citra, and also handles the scaled-up controls as well. To recreate the system’s analog touch pad, a custom joystick tipped with conductive filament is used to interact with a smartphone hidden inside the case. Opposing rubber bands are used to pull the stick back into the center when it’s not being pushed.

Plenty of 3DS games are faithfully replicated with this arcade-sized replica, and as Citra supports various 3D displays, upscaling of the graphics, and the touchscreen interface, almost everything from the original console is produced here. There are a few games that don’t work exactly right, but all in all it’s a remarkable build and, as far as we can tell, the largest 3DS in the world. Don’t forget that even though this console is out of production now, there’s still a healthy homebrew scene to take part in.

Continue reading “Building The World’s Largest Nintendo 3DS”

A Raspberry Pi Phone For The Modern Era

While it might seem like mobile phones are special devices, both in their ease of use and in their ubiquity in the modern culture, they are essentially nothing more than small form-factor computers with an extra radio and a few specific pieces of software to run. In theory, as long as you can find that software (and you pay for a service plan of some sort) you can get any computer to work as a phone. So naturally, the Raspberry Pi was turned into one.

[asherdundas], the phone’s creator, actually found a prior build based around the Raspberry Pi before starting this one. The problem was that it was built nearly a decade ago, and hadn’t been updated since. This build brings some modernization to the antiquated Pi phone, and starts with a 3D printed case. It also houses a touchscreen and a GSM antenna to connect to the cell network. With some other odds and ends, like a speaker and microphone, plus a battery and the software to tie it all together, a modern functional Raspberry Pi phone was created, with some extra details available on the project page.

The phone has the expected features — including calling, texting, and even a camera. A small WiFi USB dongle allows it to connect to the Internet too, allowing it to do all of the internet browsing a modern smartphone might want to do. The only thing that it might be pretty difficult to do is install Android apps, and although there are ways to get Android apps working in Linux, it’s not always strictly necessary to have this functionality.

GCore: Make Portable Devices With Less Frustration

[Dan Julio]’s gCore (short for Gadget Core) is aimed at making GUI-based portable and rechargeable gadgets much easier to develop. gCore is the result of [Dan]’s own need for a less tiresome way to develop such hardware.

A touchscreen is great, but high-quality power control and charging features are what really make a portable device sing.

[Dan] found that he seemed to always be hacking a lot of extra circuitry into development boards just to get decent power management and charge control. To solve this, he designed his own common hardware platform for portable gadgets and the gCore was born.

While the color touchscreen is an eye-catching and useful addition, the real star of his design is the power management and charging features. Unlike most development hardware, the gCore intelligently shares load power with charging power. Power on and power off are also all under software control.

Sound intriguing? That’s not all the gCore has to offer, and you can learn more from the project page at hackaday.io (which has a more in-depth discussion of the design decisions and concept.) There are also some additional photos and details on [Dan]’s website.

[Dan] is no stranger to developing hardware. The tcam-mini thermal imager (and much more) is his work, and we have no doubt the gCore’s design and features are informed directly by [Dan]’s actual, practical development needs.

A small touchscreen displaying the Runbox GUI

Touchscreen-Powered USB Hub Selectively Powers Down Devices

One of the most useful features of the Universal Serial Bus is its hot-plugging capability. You simply plug in your device, use it, and unplug it when you’re done. But what if you’ve got a huge number of USB devices? You might not want to use all of them all of the time, but repeatedly unplugging and re-plugging them is inconvenient and wears out the connectors. [Matt G] fixed this problem by building the RUNBOX: a USB hub that can be controlled through a touchscreen.

The USB hub part consists of a Yepkit YKUSH 3, which is a USB 3.1 hub that support software-controlled disconnecting of devices. [Matt] hooked up a Raspberry Pi to its ports so that it could switch devices on and off through a software command. To make it more user-friendly he added a touch screen controller and created an app using the Electron framework. This allowed him to enable or disable separate devices with a single touch: turn on the mic and webcam for video-conferencing, or fire up the VR headset and game controller for a gaming session.

A USB hub in a laser-cut wooden enclosureThe modified USB hub is housed in a laser-cut enclosure with plenty of space to hook up a variety of USB devices. The touchscreen neatly fits just above [Matt]’s keyboard; this setup was inspired by head-down displays used in aircraft which similarly use a small additional screen for peripheral functions.

Although we’ve seen switchable USB hubs before, they usually require you to either press a manual switch or run dedicated software on your PC. We’ve also seen other sleek builds combining a Raspberry Pi with a USB hub.

Jared Holladay

The Safest Model Roller Coaster

[Jared Holladay] is a computer engineering student at the University of Cincinnati and a life-long roller coaster fanatic. A lot of people look at roller coasters as an exciting example of physics, like potential energy versus kinetic energy or inertia, and rightly so. [Jared] looks at them and wonders about the controls. Video also below and there is a feature-length explanation with more details. Some Hackaday readers and writers can identify the components, so we think his coaster model belongs here.

Like many folks in this field, he’s built K’nex models to get a handle on construction. He’s toured STEM shows with the tracks and undoubtedly wowed kids, adults, and physics teachers, but since he can speak to the programming, he is a triple threat. Now, he’s growing out of the toy construction plastic and moving into 3D printed parts with needle-fine tolerances.

His latest base is extruded aluminum, like what you’d want in a rigid CNC or printer. In addition to the industrial-grade surface, Rockwell Automation sent him a safety programmable logic controller, PLC, and a touchscreen HMI. Our fellows in the industry tell us those are far beyond the price scope of regular hobbyists. But fear not; your Arduino clones will suffice until you get your first grant.

The point of all the ruggedized hardware, aside from authenticity, is to implement safety features the same way you would in the industry. The redundant PLC connects to inductive prox sensors to check train speed and location. Other moving parts, like friction brakes, have sensors to report if there is a jam. After all, it’s no good if you can’t stop a train full of people. There are hundreds of things that can go wrong. Just ask [Jared] because he programmed on-screen indicators for all of them and classified them to let an operator know if they can keep the ride moving or if they need to call maintenance.

Not all homemade coasters are scale models, and some of the traditional ones have more than meets the eye.

Continue reading “The Safest Model Roller Coaster”

A Raspberry Pi Tablet, With A DSI Screen

Since the Raspberry Pi arrived back in 2012, we’ve seen no end of interesting and creative designs for portable versions of the little computer. They often have problems in interfacing with their screens, either on the very cheap models using the expansion port or on more expensive ones using an HDMI screen with associated controller and cabling. The official Raspberry Pi touchscreen has made life easier with its DSI convector, but as [jrberendt] shows us with this neat little tablet, there are other DSI-based options. This one uses a 5″ DSI touchscreen available through Amazon as well as a Pi UPS board to make a tablet that is both diminutive and self-contained.

Having fooled around ourselves in the world of Pi tablets we like this one for its clean look and a bezel that is little bigger than the screen itself. As is the case with so many Pi tablets though it has to contend with the bulk of a full-sized Model B board on its behind, making it more of a chunky brick than a svelte tablet. The screen has potential though, and we can’t help wondering whether there’s any mileage in pairing it with a much thinner Pi Zero board and a LiPo board for a slimmer alternative.

Probably the nicest Pi tablet we’ve brought you was this one, which managed to remain impressively slim despite its HDMI screen.