Only 8 Chips Make A CPU

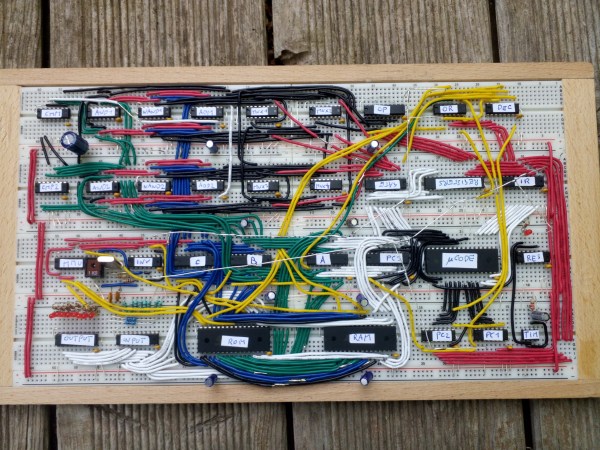
We’re no stranger to homemade CPUs on these pages, but we think that [Jiri Stepanovsky]’s 16-bit serial CPU might be a little special. Why? It has an astonishingly low chip count, with only 8 ICs in total. How on earth does he do it?

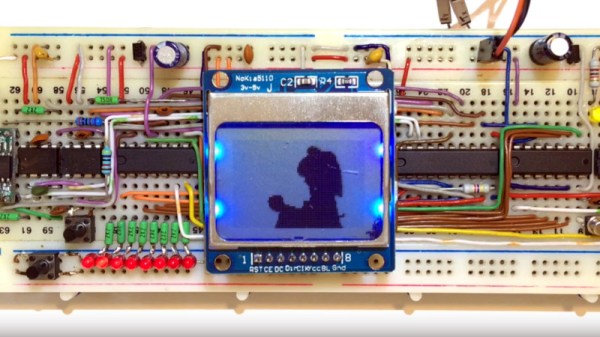
While a traditional TTL CPU has a relatively high chip count due to a parallel data bus, registers, and discrete ALU, this one takes a few shortcuts by opting for a one-bit serial bus with serial memory chips and an EPROM serving as a look-up-table ALU. Perhaps the most interesting result of this architecture is that it also allows the CPU to dispense with registers, like the Texas Instruments 16-bit chips back in the day. They all live in memory. You can see it below the break in action, streaming a video to a Nokia-style LCD.

Such a CPU would indeed have been unlikely to have been made back in the day due to the prohibitive cost of buying and programming such a large EPROM. However, old computers like the EDSAC also used a serial data path and mercury delay line memory to manage complexity. But for a solid-state CPU in 2023, we think the design is innovative. We think it would be challenging to reduce the chip count further — and no, we’re not counting designs that use a microcontroller to replicate a block of circuitry; that’s cheating — but we’re sure that somewhere there’s a designer with ideas for slimming the design further.

Continue reading “Only 8 Chips Make A CPU”

MikroLeo, A 4-Bit Retro Learning Platform

MikroLeo is a discrete TTL logic-based microcomputer intended for educational purposes created by [Edson Junior Acordi], an Electronics Professor at the Brazilian Federal Institute of Paraná, Brazil. The 4-bit CPU has a 
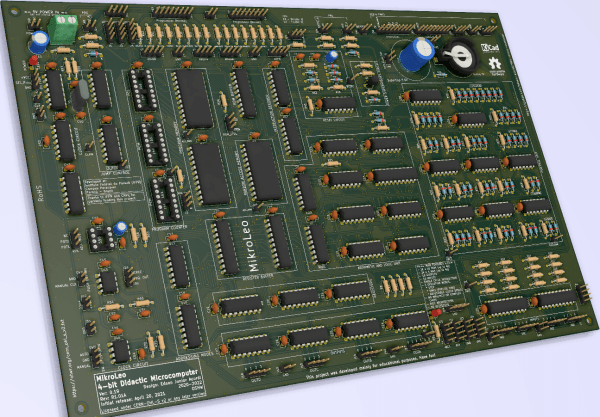
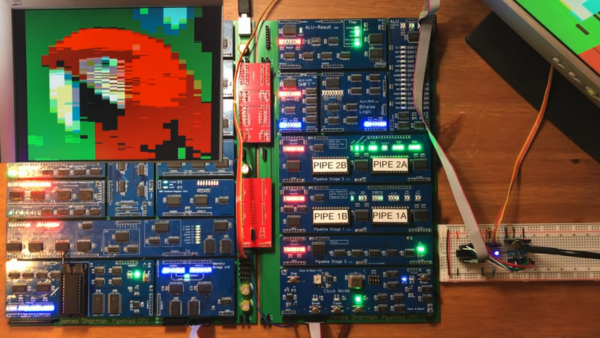
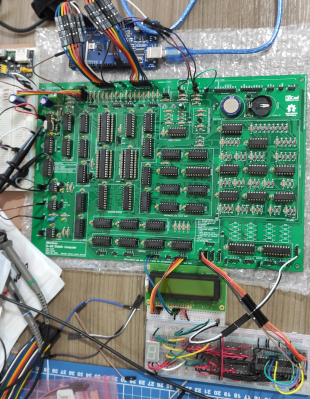
Harvard RISC architecture built entirely from 74HCT series logic mounted on a two-sided PCB using only through-hole parts. With 2K words of instruction RAM and 2K words of addressable RAM, the CPU has a similar resource level to comparable machines of old, giving students a feel for how to work within tight constraints.

Simulation of the circuit is possible with digital, with the dedicated PCB designed with KiCAD, so there should be enough there to get cracking with it. Four 4-bit IO ports make interfacing easy, with dedicated INput and OUTput instructions for the purpose. An assembler, compiler, and emulator are all being worked on (as far as we can tell) so keep an eye out for that, if this project is of interest to you.

We like computers a bit around these parts, the “hackier” and weirder the better. Even just in the 4-bit retro space, we’ve seen so many, from those built around ancient ALU chips to those built from discrete transistors and diodes, but you don’t need to go down that road, an emulation platform can scratch that retro itch, without the same level of pain.

A Well Documented BreadBoard Computer Shows Dedication

These pages have not been exactly devoid of home-built computers, with those constructed on solderless breadboard less frequent, but still not rarities. But what is more of a rarity is this ground-up 8-bit 74xx logic-based computer (video, embedded below) with full source, an emulator, assembler and test suite. [JDH] spent a solid couple of weeks working late into the night to build this, and the results show for themselves.

The new JDH-8 is now a figment of reality.

The architecture is a traditional 8-bit load/store microcoded processor with the microcode stored in easily programmable AT28C64 EEPROMs for ease of tweaking.  The address bus is 16-bits, which is quite ample for this, and puts it in line with (admittedly more sophisticated) 8-bit micros of old such as the 6502. There is also a hardware stack, and a discrete-logic ALU as well! Finally, since that wasn’t enough work already, he added in his own discrete logic video controller.

Wise people simulate before prototyping something like this

There are sixteen instructions covering memory access, ALU operations and I/O operations. One of the great things about this project is that [JDH] readily admits the mistakes made along the way, and how the architecture didn’t need to be this complex. One example is that hardware stack wasn’t really necessary as it could just have been implemented in software. Also, due to the implementation, memory accesses were so fast compared with the achievable cycle time, that there really was no point to using load/store architecture at all! Still, [JDH] had fun building and programming it!

It was interesting to see the use of LogiSim-Evolution to debug first a high level model of the architecture and then the translation into TTL chips. This scribe wasn’t aware of that tool (the shame!) but is going to try this out real soon.

All code for the software side of things can be found on the project GitHub. Perhaps the hardware design will appear there as well, be at the time of writing we couldn’t seem to find it.

Can’t get enough breadboard computers? (We can’t) check this out from last year. Stuck for a suitable enclosure for your latest bread breadboard computer? How about a bread bin.

Continue reading “A Well Documented BreadBoard Computer Shows Dedication”

A breadboard full of chips

BreadBin Is An 8-bit TTL CPU On A Breadboard, In A Bread Bin

Building a CPU out of logic gates is a great way to learn about the inner workings of microprocessors, and we’ve seen several impressive projects in this area. [c0pperdragon] set himself the task of designing a very capable 8-bit CPU using just 74HC type logic chips on a large plug-in breadboard. To emphasize the “bread” theme, he put the whole thing inside an actual bread bin and named the accompanying software BERND after an anthropomorphic loaf from a German TV channel.

Getting a reliable breadboard big enough for the task at hand required some engineering by itself: cheap breadboards often have trouble making a reliable contact at each and every pin, while the length of the ground path and lack of shielding cause trouble for high-speed circuits. [c0pperdragon] therefore bought high-quality breadboards and soldered the ground wires together to get a proper low-resistance path. A ground plane made of aluminium foil should also help to prevent signal integrity issues.

A breadboard computer inside a wooden bread binThe total circuit is incredibly compact for a complete CPU, using just 33 chips. This includes 64 KB of flash to store programs as well as a 555 timer to generate a clock signal. I/Os are limited to simple eight-bit input and output buses, but a sixteen-bit address bus gives it plenty of space to add ROM, RAM or fancier interfaces.

The aforementioned BERND program is an emulator that allows the BreadBin to run code written for the 65C816 processor, the 16-bit CPU used in the Super Nintendo and the Apple IIGS. This makes it easy to re-use programs developed for [c0pperdragon]’s earlier OS816 system, which uses an actual 65C816 chip.

This has to be one of the cleanest breadboard CPU designs we’ve seen so far, certainly a lot cleaner than this one. If you’d like to watch a detailed guide to building an 8-bit CPU on a breadboard, we recommend this project.

Creating Video From A ROM

We’re used to computers with display screens, yet how many of us have created the circuitry to drive one directly? Sure, we’ve coded up an SPI display driver on a microcontroller, but create the hardware to generate a usable video signal? That’s a little more difficult. [Jdh] has given it a go though, with a TTL video card.

In this case it’s not a card so much as a collection of breadboards, but all the logic is there to generate the complex array of video timings necessary for synchronisation, and to output the bits sequentially at the right voltage levels for the analogue monitor. It’s worth pointing out though that it’s not a composite video signal that’s being created sinceit’s monochrome only with no subcarrier.

In the end he encounters the problem that his ROM isn’t fast enough for the pixel rate and thus the image has artefacts, but it does at least produce a recognisable and readable something on the screen. Old hands in the video business might point out that analogue TVs were a bit forgiving when it came to exact timings and line counts so the circuit could quite possibly be simplified, and also that trading away some of the resolution might fix the ROM speed issue. But it’s an impressive piece of work, and should be of particular interest for anyone interested in how video works.

Fans of video cards on breadboards should also check out [Ben Eater’s] 7400-series video card.

Continue reading “Creating Video From A ROM”

VGA From Scratch On A Homebrew 8-bit Computer

[James Sharman] has built an impressive 8-bit homebrew computer. Based on TTL logic chips, it has a pipelined design which makes it capable of Commodore-level computing, but [James] hasn’t quite finished everything yet. While it is currently built on its own custom PCB, it has a limiting LCD display which isn’t up to the standards of the rest of the build. To resolve this issue, he decided to implement VGA from scratch.

This isn’t a bit-bang VGA implementation, either. He plans for full resolution (640×480) which will push the limits of his hardware. He also sets goals of a 24-bit DAC which will allow for millions of colors, the ability to use sprites, and hardware scrolling. Since he’s doing all of this from scratch, the plan is to keep it as simple as possible and make gradual improvements to the build as he goes. To that end, the first iteration uses a single latching chip with some other passive components. After adding some code to the CPU to support the new video style, [James] is able to display an image on his monitor.

While the image of the parrot he’s displaying isn’t exactly perfect yet, it’s a great start for his build and he does plan to make improvements to it in future videos. We’d say he’s well on his way to reproducing a full 8-bit retrocomputer. Although VGA is long outdated for modern computers, the standard is straightforward to implement and limited versions can even be done with very small microcontrollers.

Thanks to [BaldPower] for the tip!

Continue reading “VGA From Scratch On A Homebrew 8-bit Computer”

8-Bit Computer Addresses LEDs

Homebrew 8-bit computers tend to have fairly limited displays, often one or more seven-segment displays and an array of LEDs to show the values of RAM or perhaps some other states of the computer. [Duncan] is in the process of building just such an computer, but wondered if there was a way to create a more visually appealing display while still keeping the computer true to its 8-bit roots. With some interesting TTL logic he was able to create this addressable RGB LED display to some remarkable results.

The array works by controlling the WS2812B LED strips with a specific timing cycle which was pioneered by [Tim] for a different project. [Tim] was able to perform this timing cycle with some simple Assembly code, which means that [Duncan] could convert that code into TTL gate logic relatively easily. Using 74LS02 NOR chips gets the job done as far as timing goes, and the pulses are then fed into a shift register and support logic which then creates the signal for the LED strips.

When everything is said and done, [Duncan] has a fully addressable 16×16 RGB LED array as a display for his 8-bit computer without violating any of his design principles and keeping everything to discrete TTL logic chips and a stick of RAM. It’s a unique method of display that might go along really well with any other homebrew computer like this one that’s also built with 74LS chips.